NEW Featured eBook: AWS Cloud Cost Allocation: The Complete Guide - Download Now

AWS EC2 with public subnets with open ports

For instances provisioned in Public subnets, you must ensure that no inbound rules exist in any security group that allows unrestricted access (i.e., 0.0.0.0/0 or::/0) to TCP port 22.

To apply the concept of least privilege, traffic must be authorized from only known hosts, services needed IP addresses or other security groups.

Allowing unlimited access to an EC2 instance on port 22 allows an attacker to brute force their way into the system and potentially acquire access to the entire network. This can result in malicious activities such as hacking and man-in-the-middle (MITM) assaults.

Port 22 is used to establish an SSH connection to an EC2 instance and access a shell.

This rule can help you with the following:

Compliance Frameworks’ reports

  • SOC 2 Readiness Report
  • CIS Readiness Report

AWS Well-Architected Lens

  • AWS Well-Architected Framework Lens

Audit

Follow the procedures below to determine if your EC2 security groups allow unfettered SSH access:

1. Sign in and navigate to the AWS EC2 dashboard at https://console.aws.amazon.com/ec2/.

2. Under the**Network & Security** section by the left, click on the Security Groups option.

3. Inside the (Filter Security Groups) search box, scroll through the dropdown list and select the following as shown in the screenshot below:

a.Protocol – TCP

b.Port Range – SSH

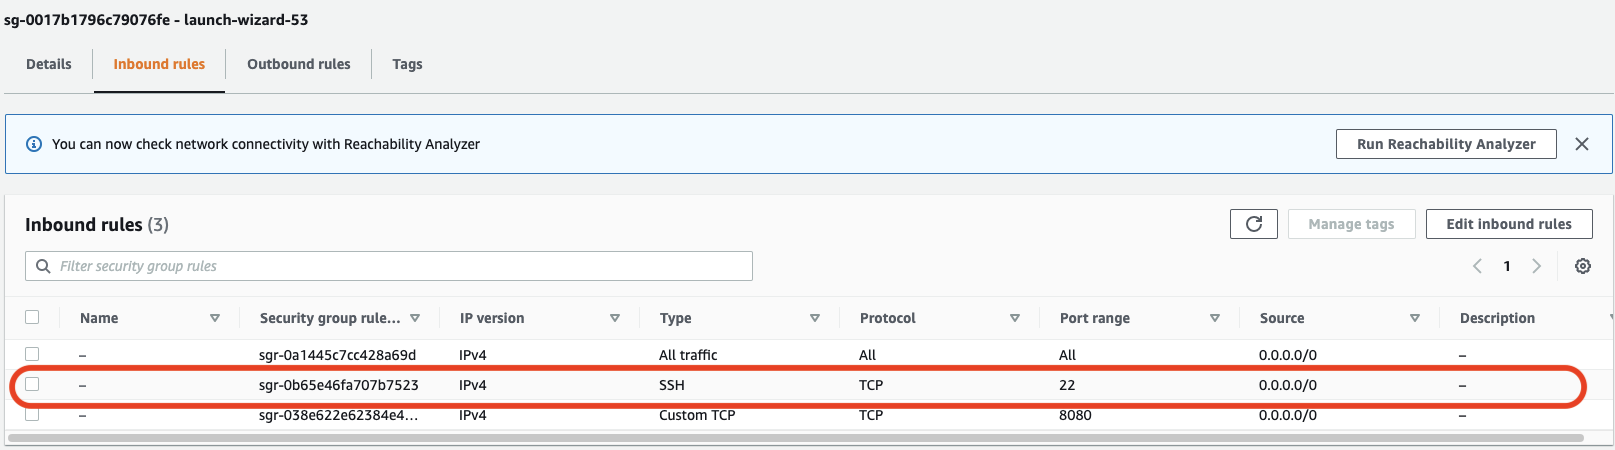
4. Choose one of the filtered security groups and scroll down to the Inbound rules tab.

5. Scroll horizontally and confirm the stated value under the Source column for any inbound/ingress rules with the Port Range set to 22.

Note that if one or more rules have the source set to 0.0.0.0/0 or**::/0** as identified in the screenshot below, the security group in question allows unrestricted traffic on port 22. However, if the Instances connected with this security group are provisioned in Private Subnets, this is not a problem.

6. Return to the EC2 dashboard.

7. Under the Instances section by the left, click the Instances option.

8. Inside the (Filter Security Groups) search box, scroll through the dropdown list and

a. Select the Security group IDs and select the ID of the security group chosen in Step 5 above.

b. Click on the Settings wheel on the right-hand side and ensure you have Subnet IDs displayed ON, as demonstrated below.

9. Take note of the subnet IDs of the displayed Instances. For example, subnet-0807cfba916abfa48 is the subnet ID of the selected Instance.

10. After that, navigate to the VPC dashboard at https://console.aws.amazon.com/vpc/.

11. Under the Virtual Private Cloud, by the left, select the Subnets option.

12. Select the Filter Subnets search box, choose Subnet ID among the listed properties and select the subnet-id identified in Step 9 as shown below.

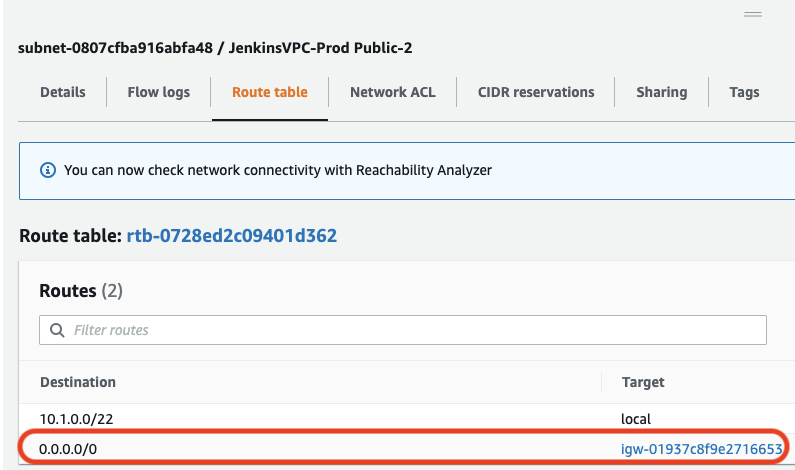
13. Select the identified subnet and scroll down to the Route Table tab

14. If you find a route to an Internet Gateway, the subnet in question is a public subnet, and the associated EC2 instance is at risk.

15. Repeat Steps 10 -14 for all instances identified in Step 8.

16. Repeat Steps 10-15 for all security groups returned in Step 5.

1. Run the describe-security-groups command using the required values as shown in the sample below to retrieve the list of security groups with ingress rules that allow SSH traffic (TCP port 22) from any address:

aws ec2 describe-security-groups \\
	--region us-east-1 \\
	--filters Name=ip-permission.from-port,Values=22 Name=ip-permission.to-port,Values=22 Name=ip-permission.cidr,Values='0.0.0.0/0' \\
	--query 'SecurityGroups[*].{GroupID: GroupId, Name:GroupName }'

 
2. In return, you should receive a list of Security Group IDs and Names that have unfettered SSH access. If you obtain no output, it implies that no EC2 security groups permit unrestricted SSH access.

[
    {
        "GroupID": "sg-000733f1909fa454c",
        "Name": "ricardo-nessus"
    },
    {
        "GroupID": "sg-0017b1796c79076fe",
        "Name": "launch-wizard-53"
    },
    {
        "GroupID": "sg-0025ccd0a2ac11c01",
        "Name": "jorge-sg"
    },
		...
    {
        "GroupID": "sg-0039067806d7a7d32",
        "Name": "launch-wizard-79"
    },
    {
        "GroupID": "sg-00a0549138ca12713",
        "Name": "AutoScaling-Security-Group-1"
    },
    {
        "GroupID": "sg-00a2ad181cf9c287a",
        "Name": "launch-wizard-100"
		}
]

 
3. Now copy a security group id from among the output and run the describe-instances command with the appropriate values to determine the associated EC2 instances and their subnets . The following example retrieves all instances that have the security group sg-0017b1796c79076fe attached to it:

aws ec2 describe-instances \\
	--region us-east-1 \\
	--filters Name=network-interface.group-id,Values=sg-0017b1796c79076fe \\
	--query 'Reservations[*].Instances[*].{ID: InstanceId, SubnetId: SubnetId, VPCId: VpcId}[]'

 
4. The response should contain a list of all instances and subnet ids that are members of the security group mentioned earlier. There are no instances linked with the security group if the returned list has 0 items.

[
    {
        "ID": "i-0cef3d8f841f9e6e8",
        "SubnetId": "subnet-0807cfba916abfa48",
        "VPCId": "vpc-00fe952cb22d6bff5"
    },
    {
        "ID": "i-040e31e435bcab271",
        "SubnetId": "subnet-0807cfba916abfa48",
        "VPCId": "vpc-00fe952cb22d6bff5"
    }
]

 
5. Now grab the SubnetId and run describe-route-tables command with necessary filters to determine the routes tables associated with the subnet.

aws ec2 describe-route-tables \\
	--region us-east-1 \\
	--filters Name=association.subnet-id,Values=subnet-0807cfba916abfa48 \\
	--query 'RouteTables[*].{Id: RouteTableId, Routes: Routes}'

 
6. The output should return any explicit route table and the corresponding routes associated with the subnet. Suppose a subnet is not explicitly associated with any route table, i.e., In that case, the output of the above command is an empty list. The subnet would be implicitly associated with the main route table of the VPC. In our case, the command’s output is an empty list; hence the subnet is associated with the main route table of the VPC.

[]

 
7. Using the VPCId returned in Step 4, Run describe-route-tables again to fin out the main route table and associated routes as shown below

aws ec2 describe-route-tables \\
	--region us-east-1 --filters Name=vpc-id,Values=vpc-00fe952cb22d6bff5 Name=association.main,Values=true \\
--query 'RouteTables[*].{TableId: RouteTableId, Routes: Routes}'

 
8. The output of the above command should return the list of main route tables associated with the VPC, as shown below. Check if there is an associated route to 0.0.0.0/0 via an Internet Gateway. e.g., in the output below, we can see a route to 0.0.0.0/0 via Internet Gateway Id igw-01937c8f9e2716653. This indicates that the concerned subnet is a public subnet and the EC2 instance chosen is at risk. ****
 
9. Repeat Steps 5 – 8 for all instances identified in Step 4.
 
10. Repeat Steps 3 – 9 for all security groups identified in Step 2.

Remediation / Resolution

1. Sign in and navigate to the EC2 dashboard at https://console.aws.amazon.com/ec2/.

2. Under the**Network & Security** section by the left, click on the Security Groups option.

3. Please choose one of the filtered security groups we discovered in Step 3 of the Audit section and scroll down to the Inbound rules tab.

4. Click the Edit Inbound Rules button so that you can modify the incoming traffic control rules.

5. To do this, follow one of the following steps:

a. Click the dropdown box in the Source column and select the My IP option.

b. Leave the Custom option in the Source dropdown list and perform one of the following actions based on your specified access details:

  • Set the static IP/Elastic IP address with the suffix set to /32, e.g., x.x.x.x/32.
  • Select an appropriate option under the CIDR blocks sub-section. This will be the IP address range of the permitted hosts.
  • Set another security group’s name or ID. The selected security group must be provisioned in the same region.

6. Save the newly modified details.

7. Repeat steps 4 – 6 to update other filtered security groups.

8. To discover and fix security groups that allow unfettered access, update the region name in the top navigation bar and apply the entire process again.

1. Execute the revoke-security-group-ingress command with the necessary values as shown in the sample below. This will remove all affected inbound rules from the selected security group. Please keep in mind that the command has no output.

aws ec2 revoke-security-group-ingress \\
	--region us-east-1 \\
	--group-name MyEC2SecurityGroup \\
	--protocol tcp \\
	--port 22 \\
	--cidr 0.0.0.0/0

 
2. After that, run the authorize-security-group-ingress command to now add the inbound rules but with better access configurations.

To do this, follow one of the steps below. Again, Please keep in mind that the command has no output.
 
a. Allow SSH from a specific host only

aws ec2 authorize-security-group-ingress \\
	--region us-east-1 \\
	--group-name MyEC2SecurityGroup \\
	--protocol tcp \\
	--port 22 \\
	--cidr X.X.X.X./32

 
b. Allow SSH from a specific IP Range

aws ec2 authorize-security-group-ingress \\
	--region us-east-1 \\
	--group-name MyEC2SecurityGroup \\
	--protocol tcp \\
	--port 22 \\
	--cidr X.X.X.X./24

 
c. Allow SSH from another security group

aws ec2 authorize-security-group-ingress \\
	--region us-east-1 \\
	--group-name MyEC2SecurityGroup \\
	--protocol tcp \\
	--port 22 \\
	--source-group MyWebAppSecurityGroup

 
3. Update other identified EC2 security groups by carrying out Steps 1 – 2.
 
4. Update the — region parameter and perform Steps 1 through 3 to discover and fix security groups in other regions.

Still Need Help?

Come see why we are the #1 cloud management platform and why companies like Uber, Dickey’s BBQ Pit and Norwegian Cruise Line trust nOps to manage their cloud.