NEW Featured eBook: AWS Cloud Cost Allocation: The Complete Guide - Download Now

NEW Featured eBook: AWS Cloud Cost Allocation: The Complete Guide - Download Now

Detected usage of root account

Root user credentials provide unrestricted access to all AWS resources, including billing details, the root user password, and the power to alter account settings and terminate the account. You must never use AWS root user credentials for your routine operations, including administrative ones. Instead, adhere to the best practice of using the root user only to create your first IAM user. You should use root accounts to perform only a few account and service management tasks as specified here.

nOps suggests enforcing the least privilege principle by defining IAM users/roles and restricting them to only the actions they need to do their tasks.

This rule can help you with the following:

Compliance Frameworks

  • SOC 2 Readiness Report
  • HIPAA Readiness Report
  • CIS Readiness Report

AWS Well-Architected Lens

  • AWS Well-Architected Framework Lens
  • FTR Lens

Audit

Follow the steps outlined below to determine whether your AWS root account credentials have been recently used.

1. Access the IAM dashboard at https://console.aws.amazon.com/iam/.

2. Under the Access reports by the left, choose the Credential Report option.

3.Download Report

Clicking the download button lists all your account’s users and the status of their various credentials. After a report is created, it is stored for up to four hours.

4. Open the report and examine the value of the password_last_used column corresponding to the root <root_account> user. A value within the last 30 days indicates that you recently used the specified root credentials.

5. You should repeat steps 1 – 4 for each additional AWS account you manage.

1. Execute the get-credential-report command to retrieve your AWS account’s credential report. The report details all users in your account and various credentials’ status, which may include passwords, access keys, and multi-factor authentication (MFA) devices.

aws iam get-credential-report

 
a. If the command returns an error, it implies that there is no credential report in your account.

In this case, you need to generate the credential report using the generate-credential-report command as shown below:

aws iam generate-credential-report

**Output**
{
 "State": "STARTED",
 "Description": "No report exists. Starting a new report generation task."
}

Note that a report is stored for up to four hours after being created.
 
b. Execute the generate-credential-report repeatedly until the State status changes to Completed.

aws iam generate-credential-report

**Output**
{    
	"State": "COMPLETE"
}

 
c. Run the get-credential-report command once the report is generated ****to retrieve it in CSV format.

aws iam get-credential-report

**Output**
"Content": "dXNlcixhcm4sdXNlcl9jcmVhdGlvbl90aW1lLHBhc3N3b3JkX2VuYWJsZWQscGFzc3dvcmRfbGFzdF91c2VkLHBhc3N3b3JkX2xhc3RfY2hhbmdlZCxwYXNzd29yZF9uZXh0X3JvdGF0aW9uLG1mYV9hY3RpdmUsYWNjZXNzX2tleV8xX2FjdGl2ZSxhY2Nlc3Nfa2V5XzFfbGFzdF9yb3RhdGVkLGFjY2Vzc19rZXlfMV9sYXN0X3VzZWRfZGF0ZSxhY2Nlc3Nfa2V5XzFfbGFzdF91c2VkX3JlZ2lvbixhY2Nlc3Nfa2V5XzFfbGFzdF91c2VkX3NlcnZpY2UsYWNjZXNzX2tleV8yX2FjdGl2ZSxhY2Nlc3Nfa2V5XzJfbGFzdF9yb3RhdGVkLGFjY2Vzc19rZXlfMl9sYXN0X3BCnNtYXJ0YWRtaW4sYXJuOmF3czppYW06OjY0MDA3MDIzMDAzNjp1c2VyL3NtYXJ0YWRtaW4sMjAyMS0wNi0yMFQwNToxNjo0OSswMDowMCx0cnVlLDIwMjEtMTEtMTRUMDg6NTY6MzArMDA6MDAsMjAyMS0wNi0yMFQwNToxNjo1MSswMDowMCxOL0EsZmFsc2UsZmFsc2UsMjAyMS0wNi0yMFQwNToxNjo1MCswMDowMCxOL0EsTi9BLE4vQSx0cnVlLDIwMjEtMDctMTdUMDI6NTY6NTMrMDA6MDAsMjAyMS0xMS0xM1QyMTowMDowMCswMDowMCx1cy1lYXN0LTEsaWFtLGZhbHNlLE4vQSxmYWxzZSxOL0E=",
    "ReportFormat": "text/csv",
    "GeneratedTime": "2021-11-14T09:16:00+00:00"
}

 
2. Note that the Content is Base64 encoded. Copy the content and decode it to store in a CSV file.

echo "dXNlcixhcm4sdXNlcl9jcmVhdGlvbl90aW1lLHBhc3N3b3JkX2VuYWJsZWQscGFzc3dvcmRfbGFzdF91c2VkLHBhc3N3b3JkX2xhc3RfY2hhbmdlZCxwYXNzd29yZF9uZXh0X3JvdGF0aW9uLG1mYV9hY3RpdmUsYWNjZXNzX2tleV8xX2FjdGl2ZSxhY2Nlc3Nfa2V5XzFfbGFzdF9yb3RhdGVkLGFjY2Vzc19rZXlfMV9sYXN0X3VzZWRfZGF0ZSxhY2Nlc3Nfa2V5XzFfbGFzdF91c2VkX3JlZ2lvbixhY2Nlc3Nfa2V5XzFfbGFzdF91c2VkX3NlcnZpY2UsYWNjZXNzX2tleV8yX2FjdGl2ZSxhY2Nlc3Nfa2V5XzJfbGFzdF9yb3RhdGVkLGFjY2Vzc19rZXlfMl9sYXN0X3BCnNtYXJ0YWRtaW4sYXJuOmF3czppYW06OjY0MDA3MDIzMDAzNjp1c2VyL3NtYXJ0YWRtaW4sMjAyMS0wNi0yMFQwNToxNjo0OSswMDowMCx0cnVlLDIwMjEtMTEtMTRUMDg6NTY6MzArMDA6MDAsMjAyMS0wNi0yMFQwNToxNjo1MSswMDowMCxOL0EsZmFsc2UsZmFsc2UsMjAyMS0wNi0yMFQwNToxNjo1MCswMDowMCxOL0EsTi9BLE4vQSx0cnVlLDIwMjEtMDctMTdUMDI6NTY6NTMrMDA6MDAsMjAyMS0xMS0xM1QyMTowMDowMCswMDowMCx1cy1lYXN0LTEsaWFtLGZhbHNlLE4vQSxmYWxzZSxOL0E=" | base64 -d >> credentials.csv

 
3. Open the report and examine the value of the password_last_used column corresponding to the root <root_account> user. A value within the last 30 days indicates that you recently used the specified root credentials.
 
4. You should repeat steps 1 – 4 for each additional AWS account you manage.

Remediation / Resolution

You should only use a root account to generate your first IAM user with the least necessary permissions. We'll create an IAM user with full S3 administrative permissions in this example. You should strive to create different IAM users/roles for distinct AWS actions.

1. Access the IAM dashboard at https://console.aws.amazon.com/iam/.

2. Under the Access management section by the left, select the Users option.

3. Click on the Add Users button.

4. Perform the following actions on the next screen:

a. Set user details section: Here, set a user name. Click the Add another user option to add multiple users simultaneously.

b. Select AWS access type section: Here, you need to determine what kind of access you want to grant to the user(s)

I. Select Access key - Programmatic access if you want to grant programmatic access to the user

II. Select Password - AWS Management Console access if you want to grant only AWS Console access to the user with a password.

For simplicity in this example, we will choose Password - AWS Management Console access to grant AWS Console access to the user.

c. For the Console password option, choose an Autogenerated Password or create a custom password.

d. Choose Require password reset to ensure that user resets the password on their first login.

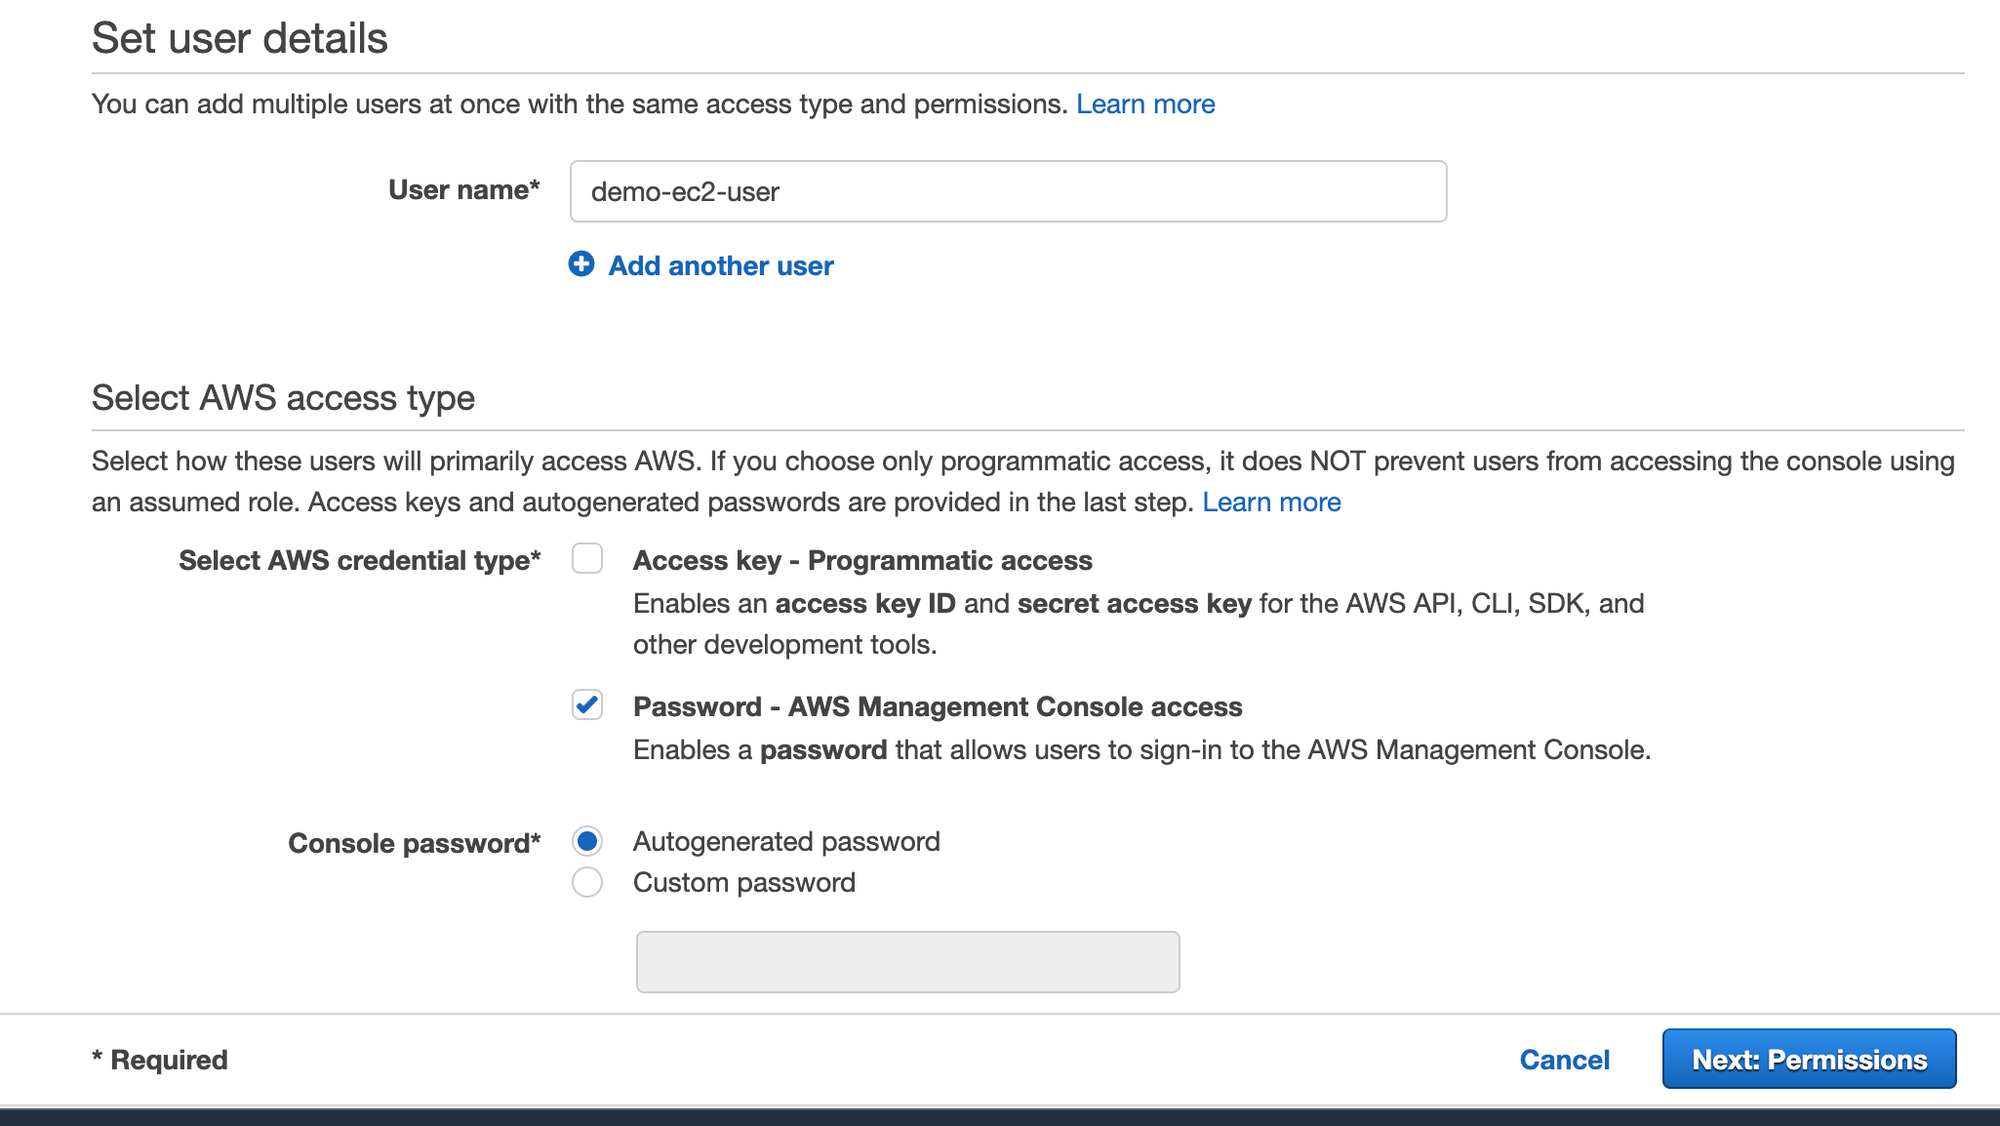
5. Click on the Next:Permissions button.

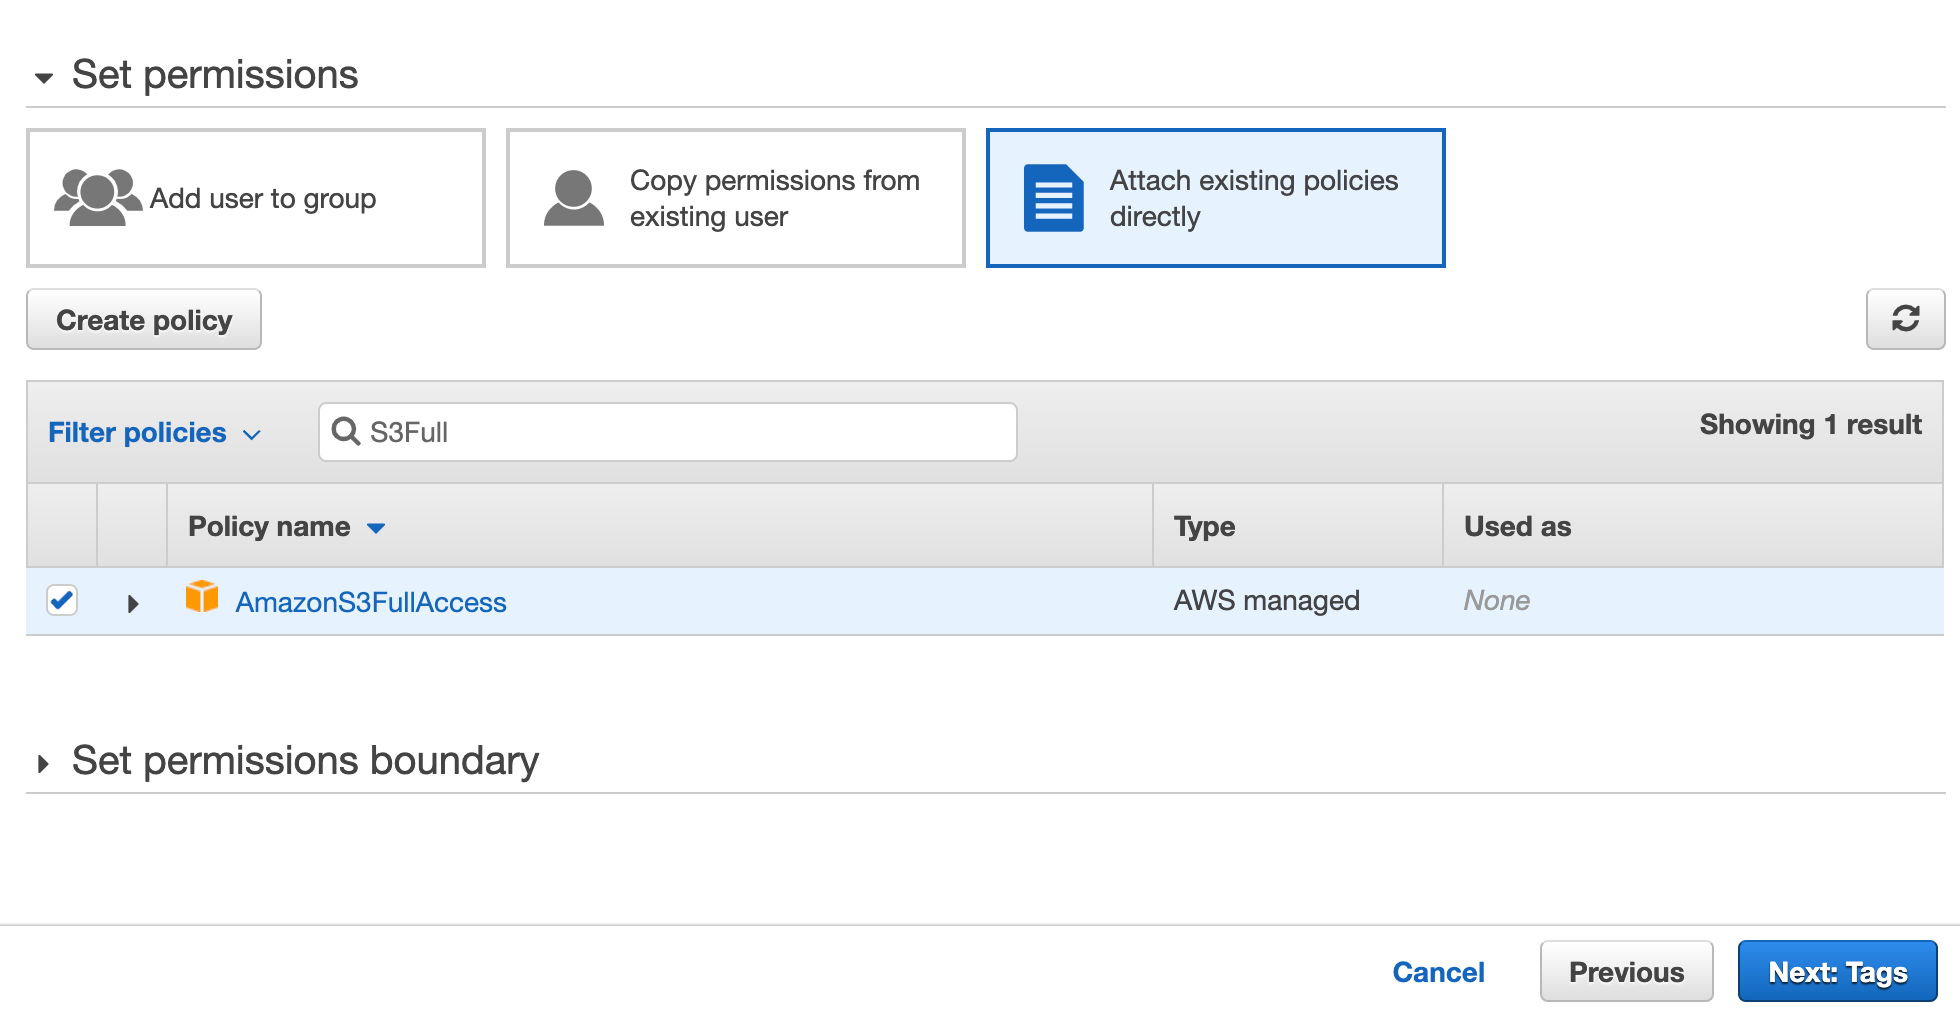
6. On the Set permissions section,

a. Select the Attach existing policies directly option.

b. Search for S3FullAccess in the search box.

c. Select the AmazonS3FullAccess managed policy as shown below. The selected access policy provides full access to Amazon S3 resources via the AWS Management Console.

d. Click on Next:Tags

7. Add any tags (key-value pairs) if you want to add valuable information to the user.

8. Click on the **Next:Review** button.

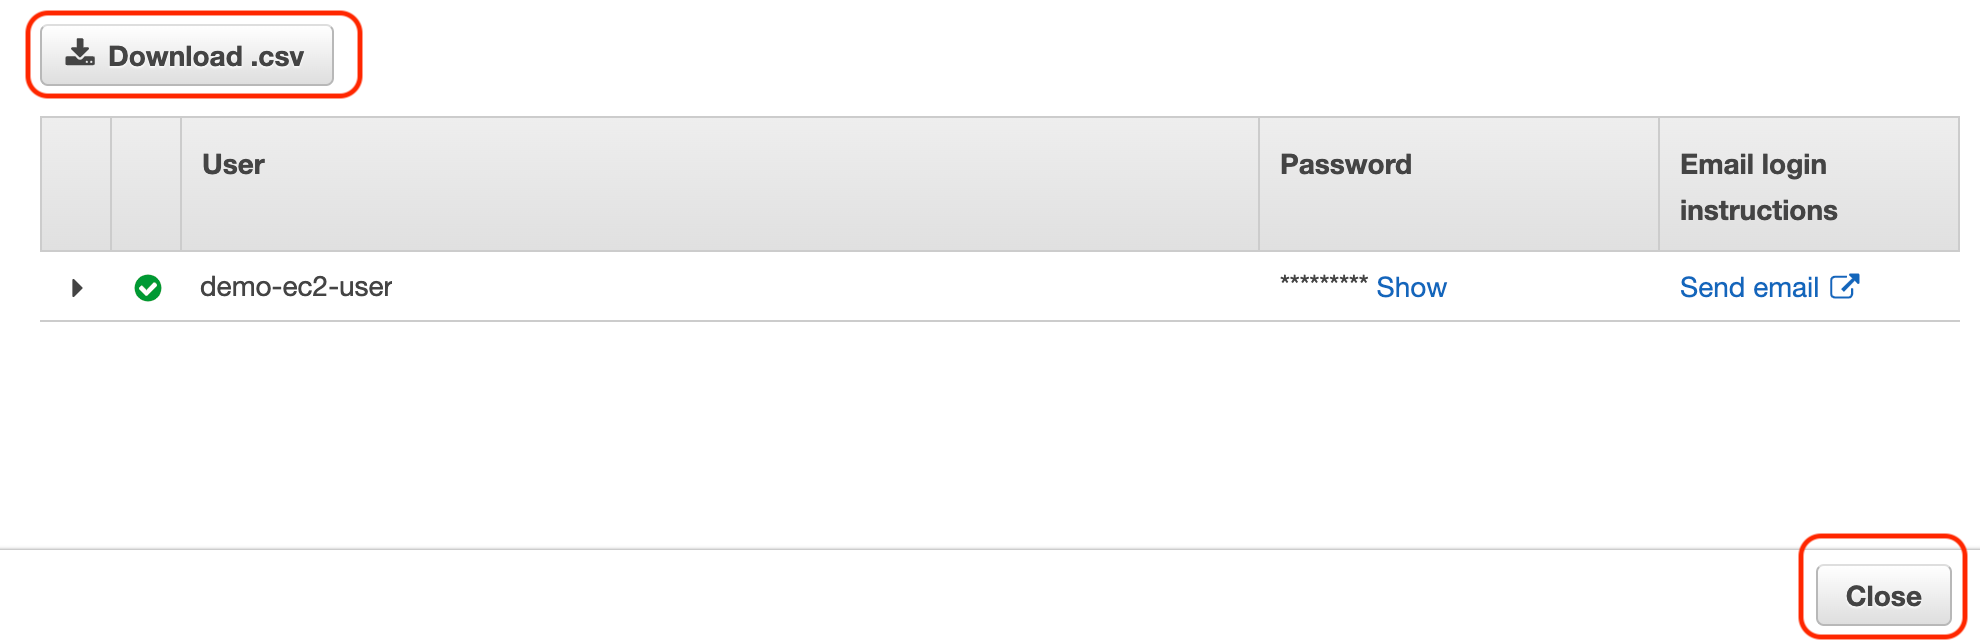
9. Click on the Create user button.

10. Note down the user information and click on Close on the next page. You can also download a CSV file with the user’s data.

11. To sign in now with your newly created user, click on the Dashboard option by the left and copy the **Sign-in URL for IAM users** on the right-hand side under **AWS Account**.

12. Sign Out from your root login and use the copied Sign-in URL for IAM users in a browser window. Log in using the newly created IAM user credentials with full S3 administrative permissions and start accessing S3 services and resources like buckets, objects, etc.

1. Execute the create-user command and the specified parameter below to create a new AWS IAM user.

aws iam create-user \\
	--user-name demo-s3-user 

**Output**
{
    "User": {
        "Path": "/",
        "UserName": "demo-s3-user",
        "UserId": "XXXXXXXXXXXXXXX",
        "Arn": "arn:aws:iam::XXXXXXXXX:user/demo-s3-user",
        "CreateDate": "2021-12-04T00:42:19+00:00"
    }
}

 
2. Execute the attach-user-policy command to attach the stipulated managed policy (e.g AmazonS3FullAccess) to the designated user using the full ARN as shown below. The command will produce no output if successful.

aws iam attach-user-policy \\
	--policy-arn arn:aws:iam::aws:policy/AmazonS3FullAccess \\
	--user-name demo-s3-user \\
  --profile smartique

 
3. Execute the create-login-profile command along with the necessary parameters as shown below to assign a password for the IAM user (Remember to replace the <your_password> placeholder with your own desired password):

aws iam create-login-profile \\
	--user-name demo-s3-user \\
	--password demoS3Password12345678 \\
	--profile smartique
 
**Output**
{
    "LoginProfile": {
        "UserName": "demo-s3-user",
        "CreateDate": "2021-12-04T00:48:40+00:00",
        "PasswordResetRequired": false
    }
} 

 
4. (Optional), if you want to enable MFA for this user, please follow IAM-002 MFA for IAM users with Console Sign-in
 
5. Repeat steps 1 – 4 to create additional IAM users in your account as desired.

Still Need Help?

Come see why we are the #1 cloud management platform and why companies like Uber, Dickey’s BBQ Pit and Norwegian Cruise Line trust nOps to manage their cloud.