NEW Featured eBook: AWS Cloud Cost Allocation: The Complete Guide - Download Now

Disabled Multi-AZ ElastiCache Redis instances

Reduce your AWS costs by 50% on auto-pilot.
  • Risk-free commitment
  • Management Automatically pause idle resources
  • Automatically automatize your EKS cost
  • Book a Demo › |
    Share

    nOps recommends that provisioned ElastiCache resources have a Multi-AZ deployment configuration to enhance High Availability (HA). This ensures that the service can automatically failover to a read replica when the primary cache node fails, for example, in case of planned maintenance, the unlikely event of a primary node, or Availability Zone failure.

    ElastiCache will handle this failover transparently, and there is no need to create or provision a new primary node. You can resume writing to the new primary as soon as read replica promotion to the primary node is complete.

    This rule can help you with:

    AWS Well-Architected Lens

    • AWS Well-Architected Framework Lens

    Please note that:

    Redis Cache Multi-AZ with automatic failover does not support T1 and T2 cache node types or cache clusters with the Redis engine version earlier than 2.8.6

    Redis Cache Multi-AZ with automatic failover is only available if the cluster has at least one read replica.

    Audit

    To determine if your ElastiCache Redis Cache clusters are using a Multi-AZ configuration, perform the following:

    1. Login to the AWS Management Console.

    2. Visit the ElastiCache dashboard at https://console.aws.amazon.com/elasticache/.

    3. Navigate to the left panel and click Redis to access the **Elasticache** clusters provisioned with the **Redis** engine.

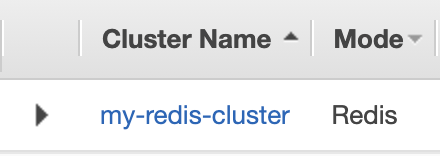
    4. Select the cache cluster you intend to verify its configuration. After that, use the **Show Item Details** icon next to the cluster.

    5. Confirm the Multi-AZ status as displayed below

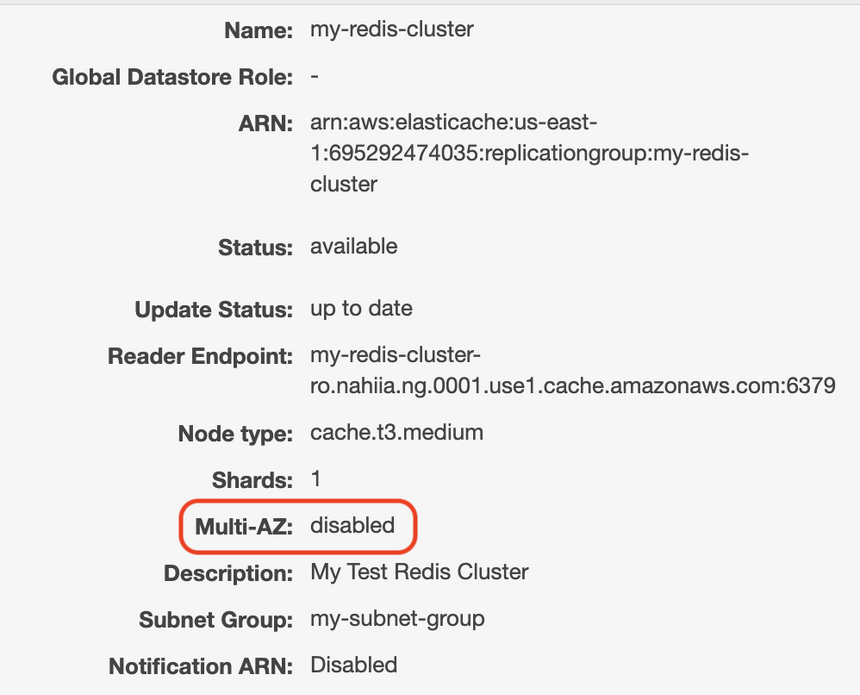
    Suppose the current status is set to Disabled. In that case, the selected Elasticache cluster is not running in a Multi-AZ Replication Group, and hence it can’t handle a primary node failure.

    6. Perform steps 4 and 5 again to check the Multi-AZ status of other ElastiCache clusters provisioned in the same region.

    7. To verify the status of clusters present in other AWS regions, switch to the desired region and repeat the entire audit process.

    1. Run the **describe-replication-groups** command (OSX/Linux/UNIX) to retrieve the identifiers of all ElastiCache Redis Replication Group in a given region:

    aws elasticache describe-replication-groups \\
      --region us-east-1 \\
      --query 'ReplicationGroups[*].ReplicationGroupId'


    2. The output should list the identifiers of the available replication groups in your account in the us-east-1 region:

    [
        "my-redis-cluster"
    ]


    3. Rerun describe-replication-groups, but this time with the identifier of the cluster that you want to examine to determine the Multi-AZ status for the selected replication group

    aws elasticache describe-replication-groups \\
      --region us-east-1 \\
      --replication-group-id my-Redis-cluster \\
      --query 'ReplicationGroups[*].MultiAZ'


    4. The command output should return the current Multi-AZ status, as shown below.

    [
        "disabled"
    ]
    

    If the status is set to Disabled, then the cache cluster cannot handle primary node failure.
     
    5. Perform steps 3 and 4 again to check the Multi-AZ status of other ElastiCache clusters provisioned in the same region.
     
    6. To verify the status of clusters present in other AWS regions, change the –region command parameter value to the desired AWS region and repeat the audit process.

    Remediation / Resolution

    To enable Multi-AZ setup for your ElastiCache Redis Cache clusters, perform the following:

    1. Login to the AWS Management Console.

    2. Visit the ElastiCache dashboard at https://console.aws.amazon.com/elasticache/.

    3. Navigate to the left panel and click Redis to access the **Elasticache** clusters provisioned with the **Redis** engine.

    4. Select the cache cluster that you intend to modify its Multi-AZ status. You can have a look at the ‘Using AWS Console‘ part of the Audit section to confirm your selection.

    5. Click on the Modify button from the top menu, as shown below

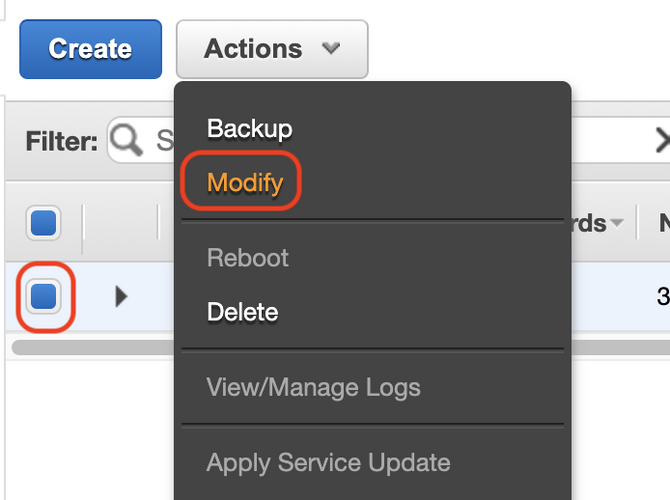
    6. Implement the following stipulated actions in the Modify Cluster dialog box that pops ups.

    a. Check Multi-AZ

    If this is disabled, then your current Redis Cluster Configuration doesn’t support Multi-AZ. Revisit your current cluster configuration. E.g., Instance Types may not be supported, or your Subnet Group may not have all availability zones selected.

    b. Check Apply Immediately

    AWS will apply the modifications asynchronously as soon as possible. If Apply Immediately is not selected, the changes will be processed during the next maintenance window.

    c. Click on Modify

    Please note that the cluster status should change from available to modifying and then back to available. Once the configuration update is complete, the Multi-AZ status on the description panel should change to enabled.

    7. Perform steps 4 – 6 again to modify the Multi-AZ configuration of other ElastiCache clusters provisioned in the same region.

    8. To enable the Multi-AZ feature of ElastiCache clusters present in other AWS regions, switch to the desired region using the navigation bar and repeat the entire audit process.

    1. Run the modify-replication-group command to enable the Multi-AZ feature for the selected ElastiCache Redis replication group using its identifier as shown below:

    aws elasticache modify-replication-group \\
        --region us-east-1 \\
        --replication-group-id my-redis-cluster \\
        --multi-az-enabled \\
        --apply-immediately
    

    Please note that using --apply-immediately will apply the changes immediately rather than the next maintenance window.
     
    2. The output will return the metadata of the Redis Cluster selected for update. Confirm that the MultiAZ attribute has changed to enabled.

    {
        "ReplicationGroup": {
            "ReplicationGroupId": "my-redis-cluster",
            "Description": " ",
            "GlobalReplicationGroupInfo": {},
            "Status": "available",
            "PendingModifiedValues": {},
            ...
            "AutomaticFailover": "enabled",
            **"MultiAZ": "enabled",**
            "SnapshotRetentionLimit": 0,
            "SnapshotWindow": "03:30-04:30",
            "ClusterEnabled": false,
            "CacheNodeType": "cache.t3.medium",
            "TransitEncryptionEnabled": false,
            "AtRestEncryptionEnabled": false,
            "ARN": "arn:aws:elasticache:us-east-1:695292474035:replicationgroup:my-test-cluster",
            "LogDeliveryConfigurations": []
        }
    }


    3. To enable the Multi-AZ feature of other ElastiCache clusters provisioned in the same region, perform steps 1 and 2 again.
     
    4. To turn on the Multi-AZ feature of ElastiCache clusters present in other AWS regions, change the –region command parameter value to the desired AWS region and repeat the entire audit process.

    Still Need Help?

    Come see why we are the #1 cloud management platform and why companies like Uber, Dickey’s BBQ Pit and Norwegian Cruise Line trust nOps to manage their cloud.