NEW Featured eBook: AWS Cloud Cost Allocation: The Complete Guide - Download Now

Reduce your AWS costs by 50% on auto-pilot.
  • Risk-free commitment
  • Management Automatically pause idle resources
  • Automatically automatize your EKS cost
  • Book a Demo › |
    Share

    How To Schedule Idle EC2 Instances For Cost Optimization?

    As organizations move their workloads to the cloud, one of the critical challenges they face is optimizing their infrastructure costs. One effective way to reduce cloud costs is to schedule idle resources that are not proactively used at each given time. Thus, shutting down the idle EC2 instances during periods of low usage can help you save HUGE amounts!


    You can reduce your cloud bills and increase your operational efficiency by scheduling idle resources. This approach enables you to allocate resources based on your actual usage needs, ensuring that you are only paying for the resources you need when you need them. But, the question arises of how to schedule idle EC2 instances?


    Read through this blog to know and understand the different ways of scheduling idle EC2 instances manually as well as automatically through the AWS console. We’ll also explore the primary comparison between the standard AWS console automation and an easier automatic approach using nSwitch.

    How To Schedule Idle EC2 Instances?

    To schedule idle EC2 resources, there are two primary approaches. One is the standard AWS console automation; the other is automatic scheduling via nSwitch.

    Follow the below-mentioned steps to schedule idle resources:

    Audit

    To determine if your AWS IAM users have unnecessary active access keys, perform the following:

    How to Schedule an idle AWS EC2 using AWS console.

    1. Firstly, log into your AWS account, click on the search tab, type IAM, and then open the IAM service.
    2. After clicking the IAM tab, you can see the IAM service dashboard, and then inside the IAM service, you need to click on the policies tab.
    3. After clicking on the Policies tab, you can see all the Policies, but you need to create a new Policy by clicking on the blue button (create policy).
    4. In the next window, we have Two options to create a new policy, Visual editor and JSON. You need to choose JSON Tab here.
    5. Under the JSON Tab, Put the below Json code.
    
    {
    "Version": "2012-10-17",
    "Statement": [
    {
    "Effect": "Allow",
    "Action": [
    "logs:CreateLogGroup",
    "logs:CreateLogStream",
    "logs:PutLogEvents"
    ],
    "Resource": "arn:aws:logs:*:*:*"
    },
    {
    "Effect": "Allow",
    "Action": [
    "ec2:Start*",
    "ec2:Stop*"
    ],
    "Resource": "*"
    }
    ]
    }"Action": [ "ec2:Start*", "ec2:Stop*" ], "Resource": "*" }

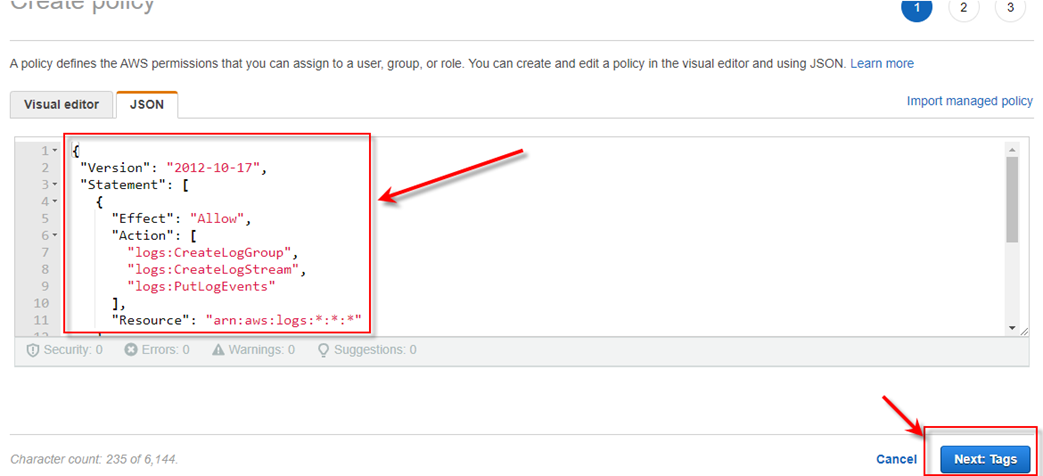
    6. And then click on the Next button (Next Tags). And then Next Review and create.

    7. And in the next window, give any name for your policy and click on create policy. And your Policy has been created.

    8. After creating a Policy, you need to create an IAM Role For the Lambda function.

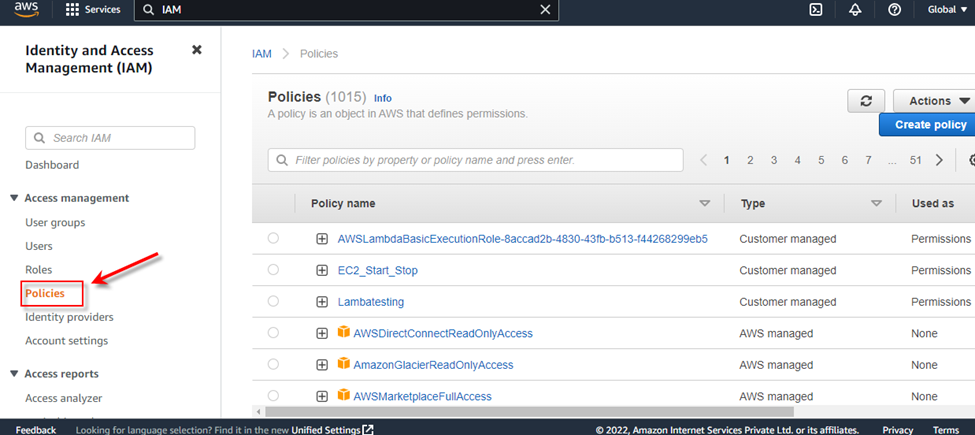
    9. Firstly, click on Role Tab given under the IAM service and click on Create role Tab.

    10. Once you click on the create policy you can see the next windows of this service and you            need to choose the Lambda option under (Use Case) and then next.

    11. In the Next Step, you need to give permission for this Role, and select your created policy, And then next.

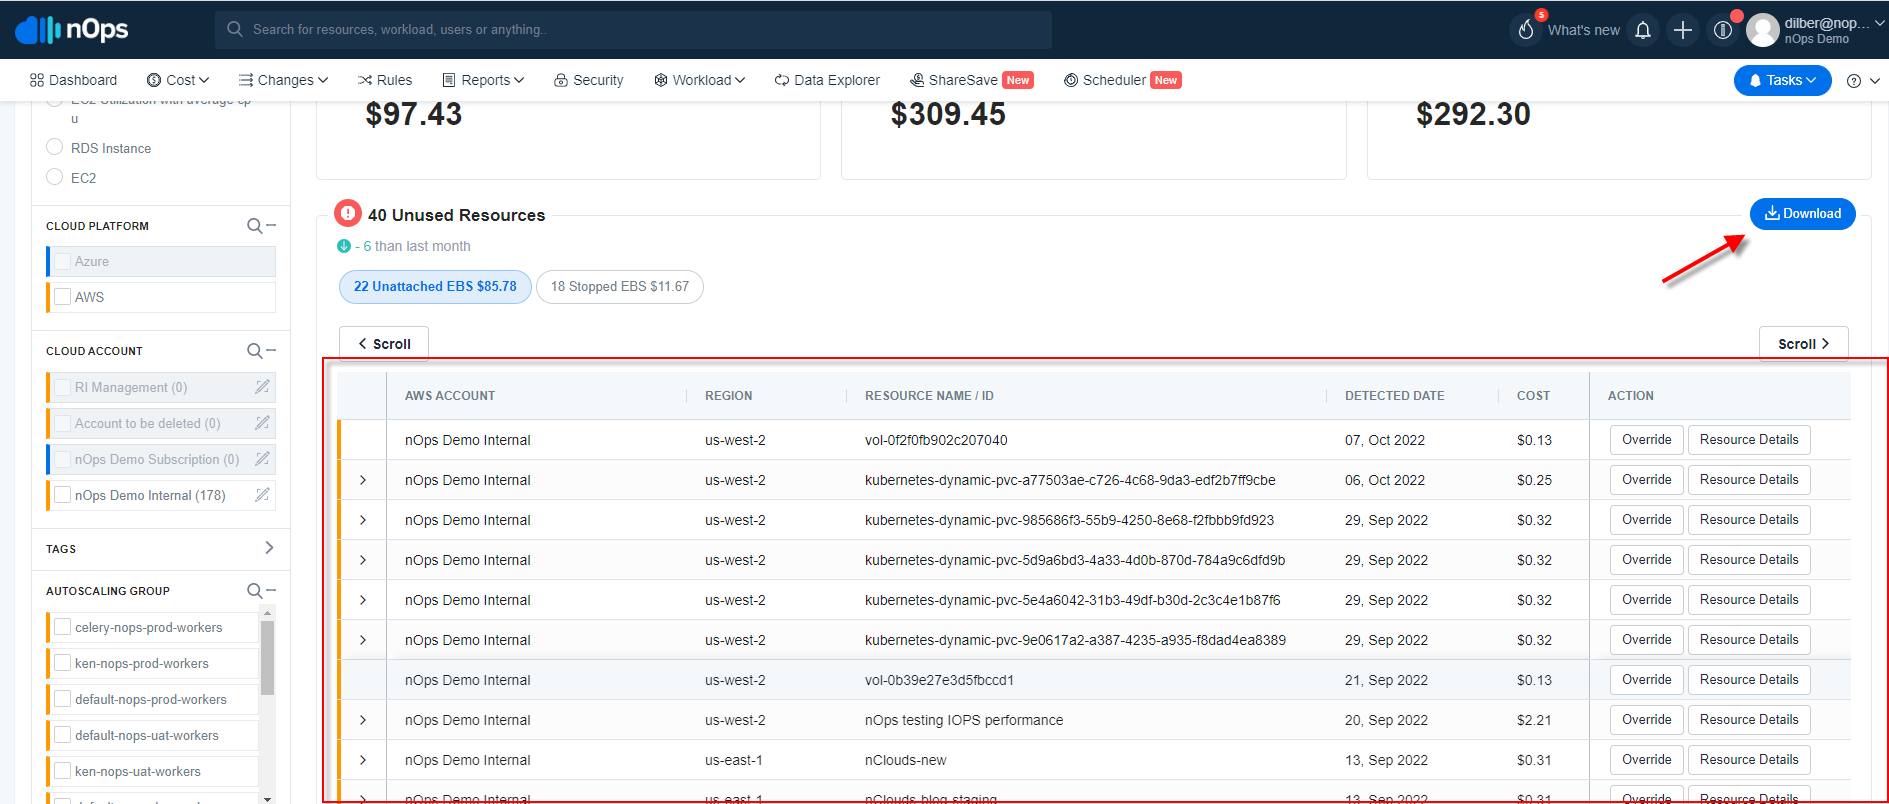
    12. Afterward, assign a name to the Role and click the create role button.

    13. After doing these two steps, you need to create a Lambda function. Go back to AWS home, click on the services, and search Lambda in the search bar.

    14. You can access the Lambda dashboard and the function tab in the left panel. Here you have to create two functions. The first function is for starting the Ec2 instance, and the second is for stopping.

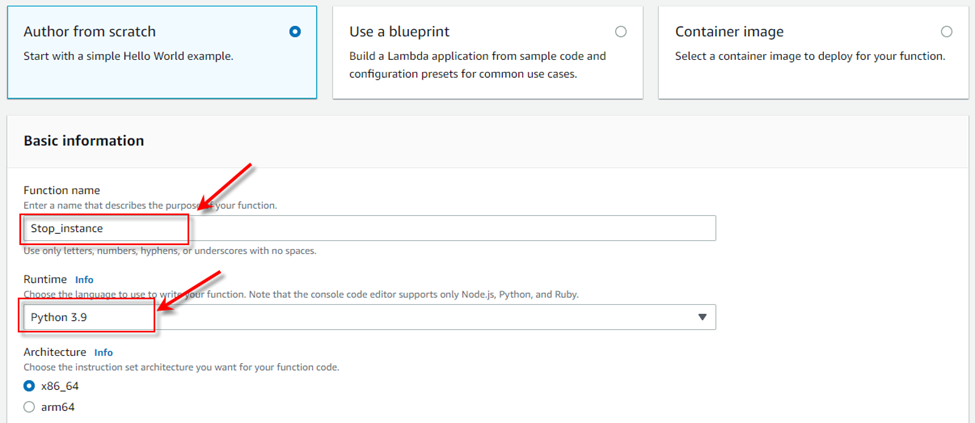
    15. To create a function, you need to click on the create function. In the next window, you can see some options. In the first option, you need to assign a name for the Lambda function, and in the Runtime tab, select python 3.9.

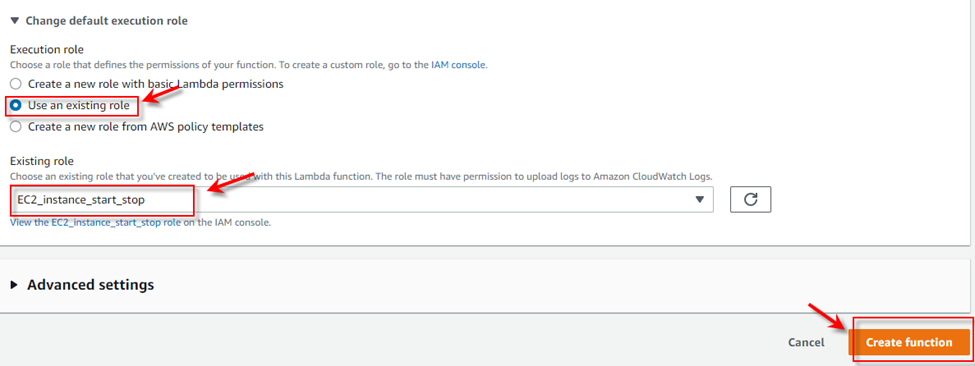
    16. In the “Change default execution role” tab, select “use an existing role” and choose your created role. And then click on the create function.

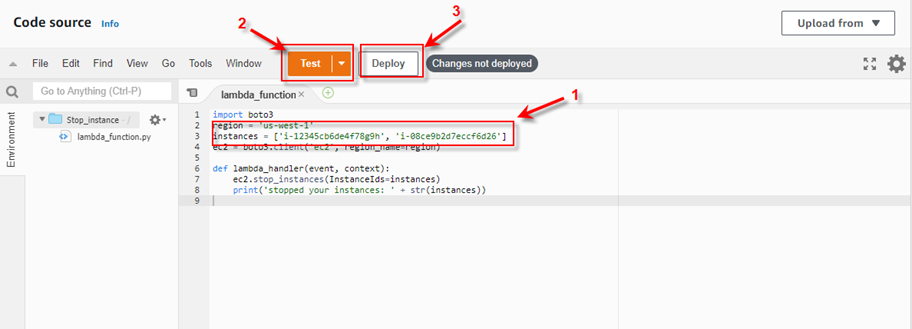
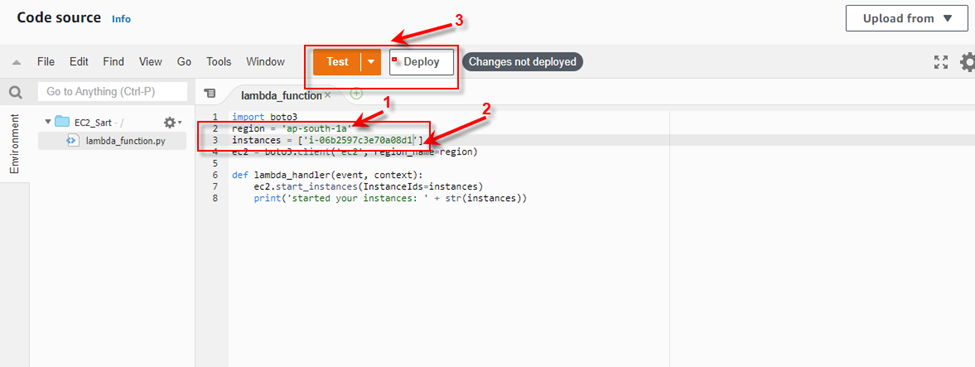
    17. After clicking the create function, the next window of the Lambda function will pop up, and in this window, you have to enter a code and change it according to the snapshot.

     import boto3
    region = 'us-west-1'
    instances = ['i-12345cb6de4f78g9h', 'i-08ce9b2d7eccf6d26']
    ec2 = boto3.client('ec2', region_name=region)
    
    def lambda_handler(event, context):
    ec2.start_instances(InstanceIds=instances)
    print('started your instances: ' + str(instances))

    18. Mention your instance ID and region. And secondly, click on the test and deploy button to deploy this code.

    19. After completing the above steps, you have completed the first function (Start Instance).
    Now you need to create a second function of the Stop instance. Click on the create function button and Give any name for your function. And select python 3.9 in the use case.

    20. And in the “change default execution role,” select “use an existing role,” and next, in the existing role, select your created role.

    21. Afterward, the next window of the function will pop up in the code source past the following code.

     import boto3
    region = 'us-west-1'
    instances = ['i-12345cb6de4f78g9h', 'i-08ce9b2d7eccf6d26']
    ec2 = boto3.client('ec2', region_name=region)
    
    def lambda_handler(event, context):
    ec2.stop_instances(InstanceIds=instances)
    print('stopped your instances: ' + str(instances))

    22. And then click on test and deploy the code and save according to the below snapshot.

    23. Now you have completed both the steps (start function and stop function). Next, you need to create a Cloudwatch event to trigger these functions.

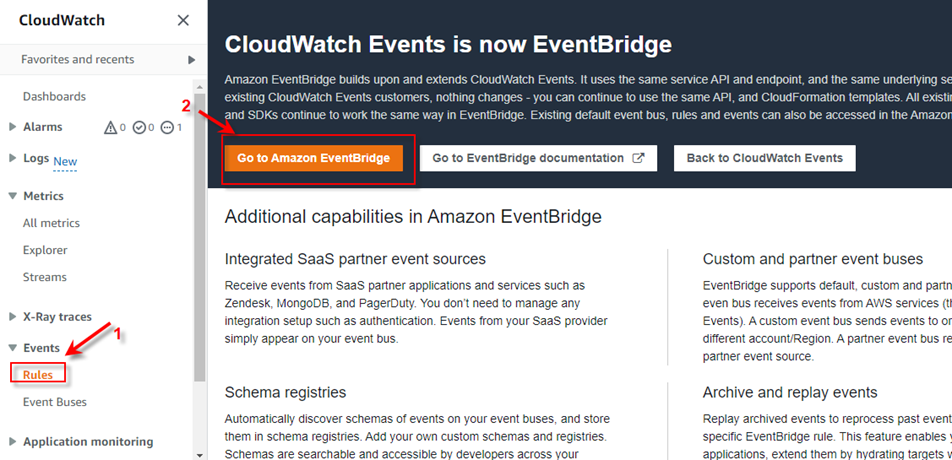
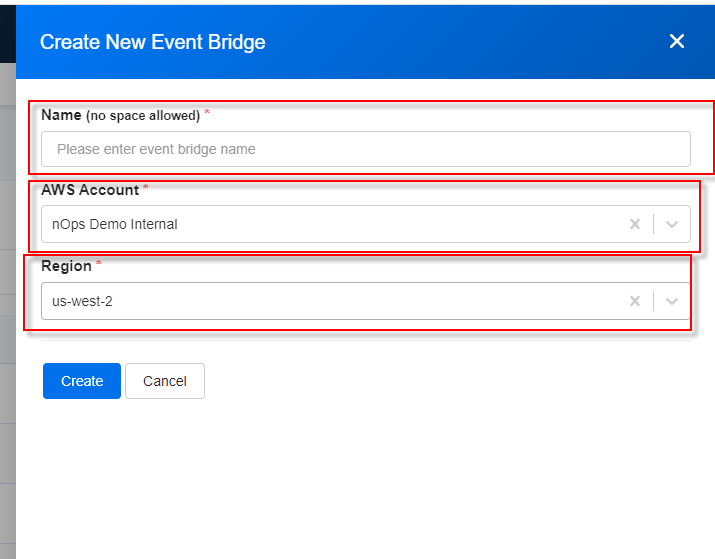
    24. First, go to the Aws homepage and search CloudWatch in the search bar, and Open CloudWatch service. In the left panel, you need to select Rule Tab and under the Rules, click on Go TO Amazon EventBridge.

    25. And then click on Create Rule. And in the next window, assign any name to this rule, and inside the Rule type, select Schedule and then next.

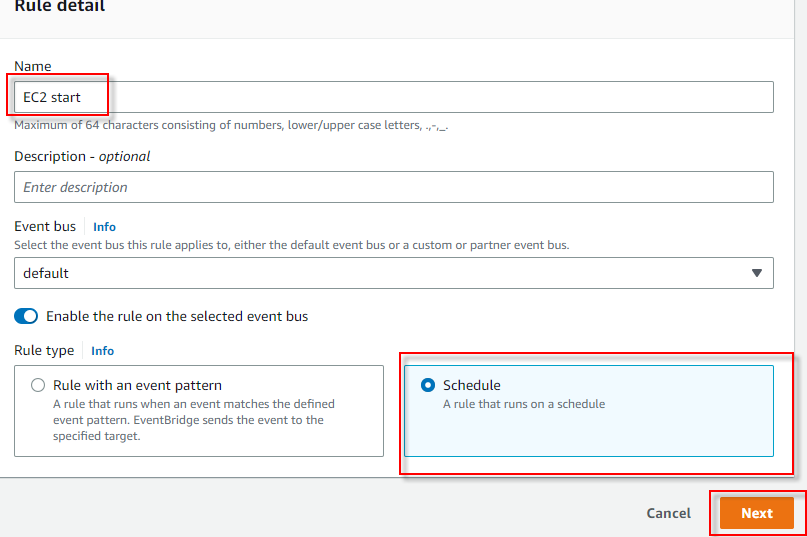
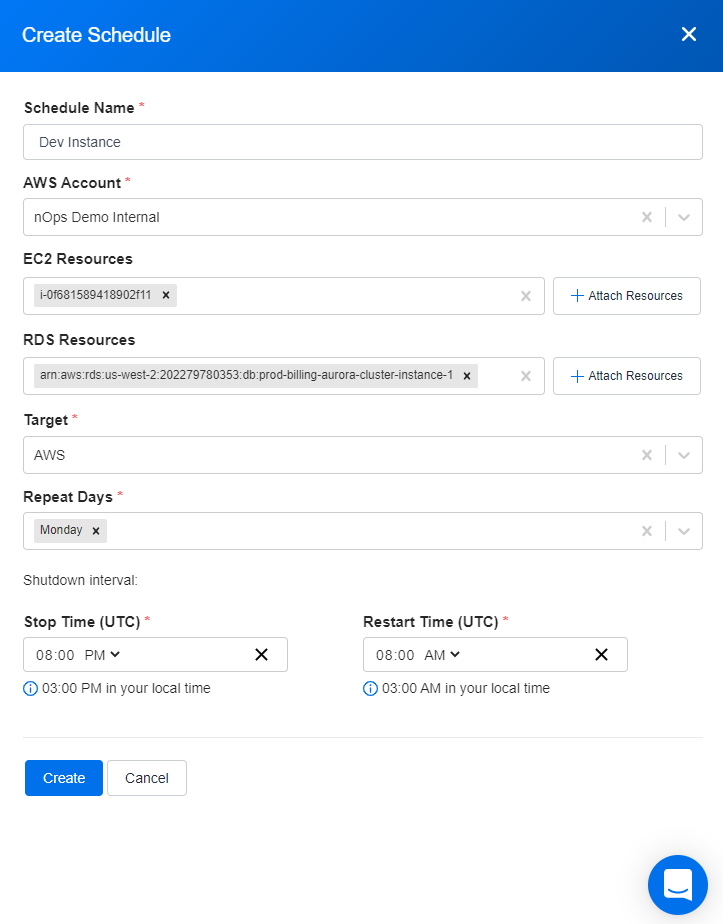
    26. Here, we can see the schedule pattern, and you can set your timing to trigger the function. And then next.

    Note:- You can set a time only according to UTC timing.

    27. In the next window, select a target, choose the Lambda function, choose your created function for the stop instance, and then next, next, and create. You have to create both starts and stop roles if you want your instance to start and stop automatically.

    28. You are all sorted! Your instance will automatically start and stop according to your set schedule.

    How to Schedule idle AWS EC2 instances using the nOps platform.

    To start with scheduling idle AWS EC2 instances, it is required to update IAM policies. Then the platform will be able to trigger the Event bridge, and then the Event bridge will trigger the AWS lambda function.

    Update all pending IAM policies.

    1. Make sure login into the AWS console using the Admin account Login to the nOps platform using admin credentials
    2. Navigate to the organization settings.
    3. Click on the IAM policy update and check if there is any new IAM policy released from nOps.
    4. Click on Update on AWS; it will take you to the AWS management console.
    5. Run Cloudformation stacks that we will create a new and updated IAM role with read-only permissions.

    Create an event bridge.

    1. Login into the nOps management console using admin account credentials.
    2. Now navigate to the organization settings by clicking on the user name at the right-hand side of the home page.
    3. Under integrations, click on EventBridge Tab
    4. Click on create event bridge button then it will ask for the Name, AWS account, and Region. All information is required to run a cloud formation stack that we create an EventBridge.
    5. Then hit create button.
    6. Now click the Launch Stack button, and make sure that the AWS account is logged in the same browser.
    7. Now check the I acknowledge box and hit create stacks button.


    Then hit create button.
    Now click the Launch Stack button, and make sure that the AWS account is logged in the same browser.
    Now check the I acknowledge box and hit create stacks button.

    Schedule Idle AWS EC2 instances

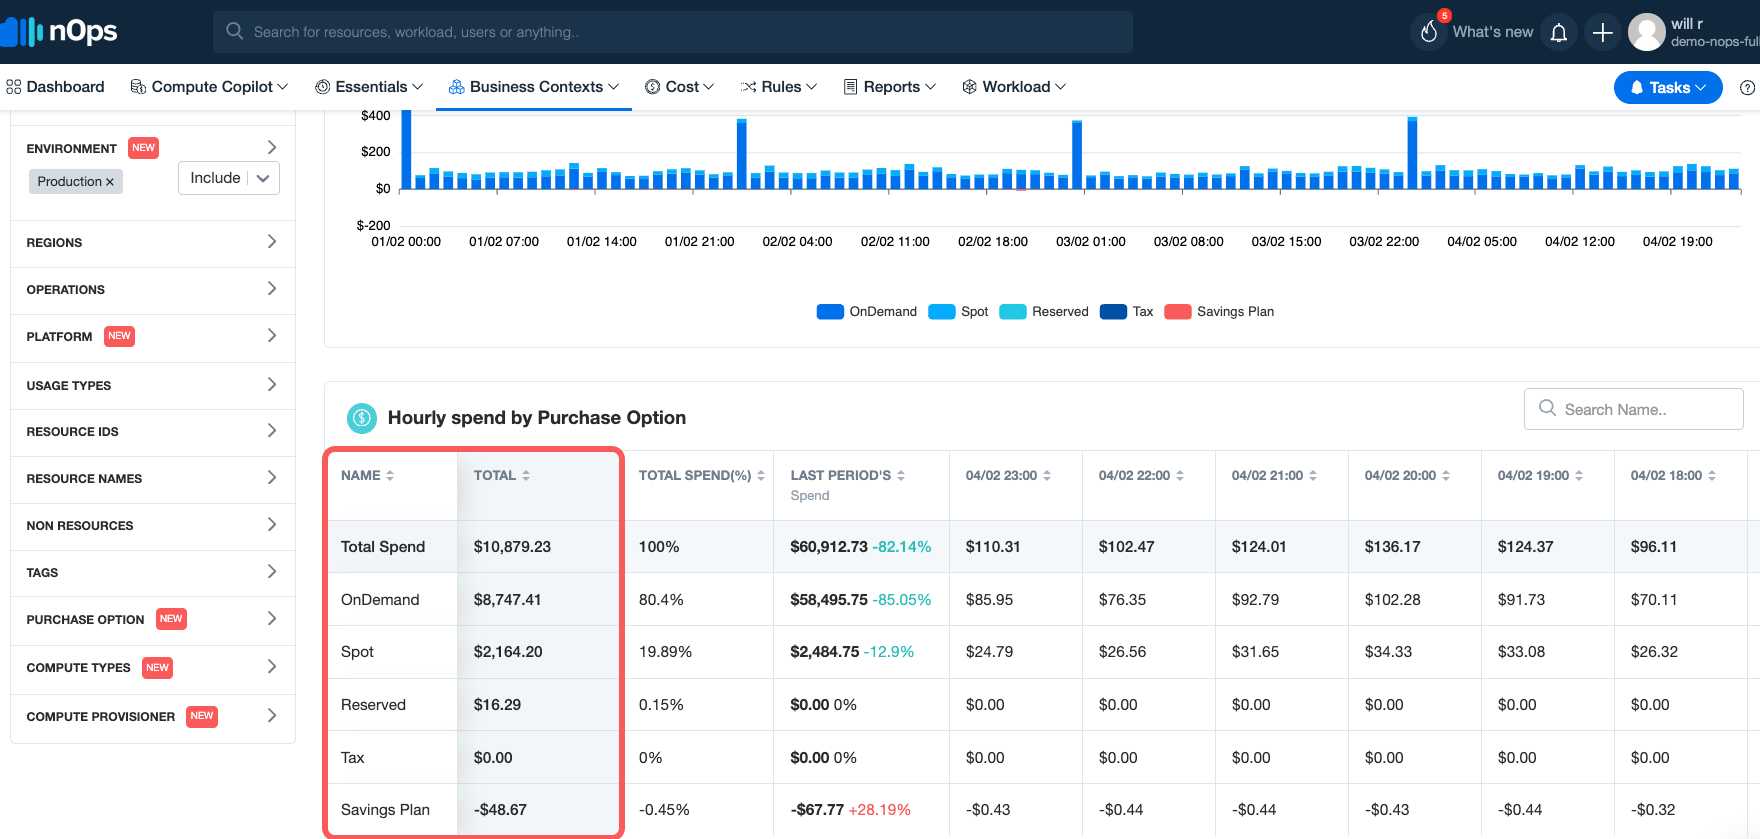
    After a few days of data ingestion platform will show up the recommendation for all idle instances that can be scheduled during the idle time under the ShareSave dashboard.

    Let’s schedule an idle AWS EC2 instance

    1. Login into the nOps platform
    2. Navigate to Scheduler Dashboard.
    3. Hit Create New Scheduler button.
    4. A pop window will appear where the platform will ask to enter information like Schedule name, AWS account name, EC2 Resources id, RDS Resources id, target, repeat days and time, etc. After entering all the information, hit Create button, which will set up a scheduler for selected machines. Users can also start and stop instances by hitting the start and stop buttons on the same page.

    Why Is nSwitch An Easier Way To Automatic Scheduling?

    Thus, it is a lot easier with nSwitch to automatically schedule the start/stop points for the focussed instances. And you will be saving tons of time and money! nOps nSwitch makes it easy to pause resources during inactivity and leverages the Amazon EventBridge bus to deliver signals to resources to stop them during inactivity and restart them when they are most likely to be used automatically.
    Your team focuses on innovation, while nOps runs optimization on auto-pilot to help you track, analyze and optimize accordingly! Our customers can benefit in two key ways:

    > Second, use less by automatically pausing idle resources.

    > Second, use less by automatically pausing idle resources.

    Let us help you save! Sign up for nOps today.

    Still Need Help?

    Come see why we are the #1 cloud management platform and why companies like Uber, Dickey’s BBQ Pit and Norwegian Cruise Line trust nOps to manage their cloud.