Skip to content

- Blog
- Uncategorized
- EC2 Auto Scaling Groups: The Complete Guide
EC2 Auto Scaling Groups: The Complete Guide
As IT budgets are squeezed and companies face pressure to cut costs, Auto Scaling Group (ASG) costs often comprise a significant portion of your cloud bill. That’s why we put together a complete, step-to-step guide to cost optimizing your AWS Auto SCaling Groups.
We’ll take you through the full process, from preventing overprovisioning to running stateless applications safely on Spot – with practical how-to information, screenshots, and best practices.
Let’s dive into the basics, or you can use the table of contents to skip right to utilizing Spot in your Auto Scaling Groups.
What is an EC2 Auto Scaling Group?
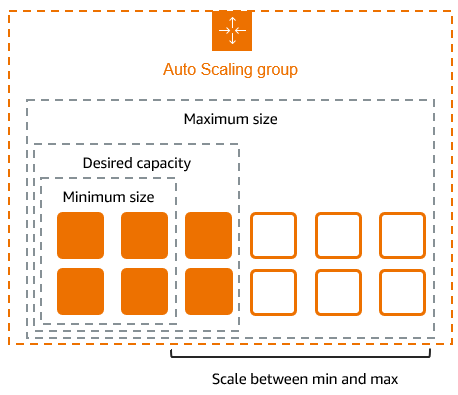
AWS Auto Scaling monitors your applications and adjusts the number of Amazon EC2 instances in your application using Launch Configurations and/or Launch Templates. They can scale multiple resources up or down based on predefined policies and health checks, and ensure there are a maximum and minimum number of instances running.
How Do EC2 Auto Scaling Groups Work?
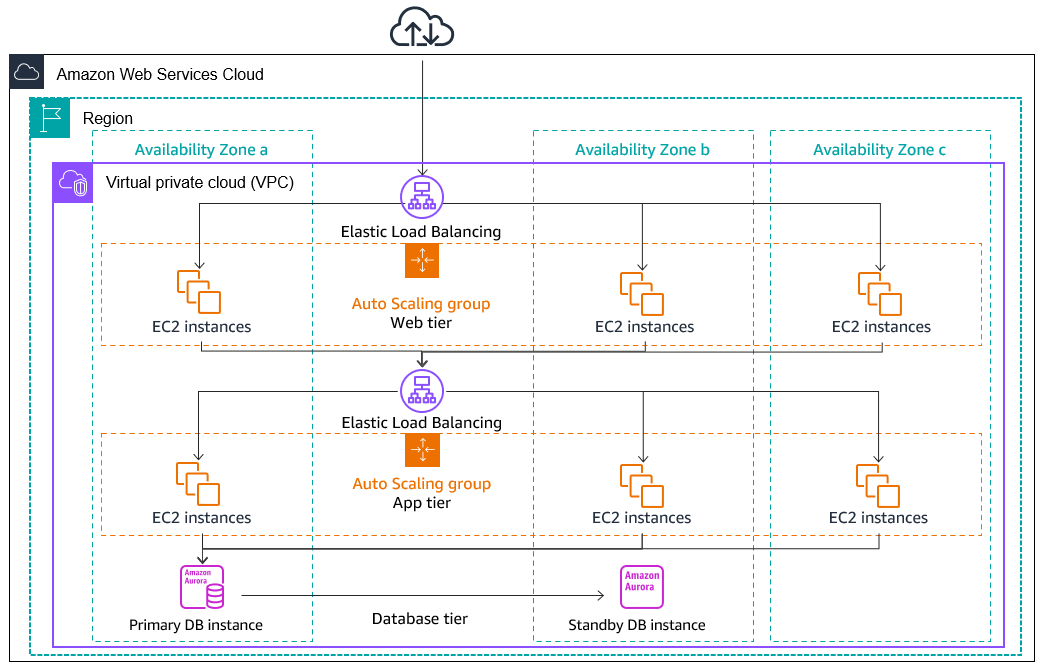
An Auto Scaling group continuously evaluates the state of your infrastructure. When a scaling policy is triggered—based on metrics like CPU, memory, or custom CloudWatch alarms—it launches or terminates EC2 instances using your defined launch template. Instances are distributed across Availability Zones for fault tolerance, and health checks ensure only healthy instances stay in service. The group integrates with Elastic Load Balancing to keep traffic routed to available capacity as the environment scales.
EC2 Auto Scaling Groups and Availability Zones
Auto Scaling Groups are designed to distribute EC2 instances across multiple Availability Zones within a region for better fault tolerance and availability. When you enable multiple zones in the group’s configuration, the ASG automatically balances instance placement to avoid single points of failure. If one zone becomes unavailable, the group replaces instances in healthy zones to maintain the desired capacity. This helps ensure high uptime and resilience without requiring manual intervention.
What is Auto Scaling Cost Optimization?
Auto Scaling Groups in and of themselves are free; you pay only for the EC2 instances and AWS resources needed to run your applications and other AWS services like CloudWatch monitoring fees.
AWS Auto Scaling cost optimization strategies include configuring your Auto Scaling Groups to optimize performance and cost, monitoring your Auto Scaling Groups, setting appropriate scaling policies to avoid over-provisioning, leveraging Elastic Load Balancing, taking advantage of Spot discounts, etc.
Strategies for EC2 Auto Scaling Groups Cost Optimization
Here at nOps, we’ve helped many teams save on ASG costs. Let’s delve into some practical cost-saving strategies.
Set Up CloudWatch Alarms
Based on these metrics, set up CloudWatch alarms to proactively manage costs and ensure quick responses to unexpected changes in demand. Here are the steps:
- Open the AWS Management Console and navigate to the CloudWatch service.
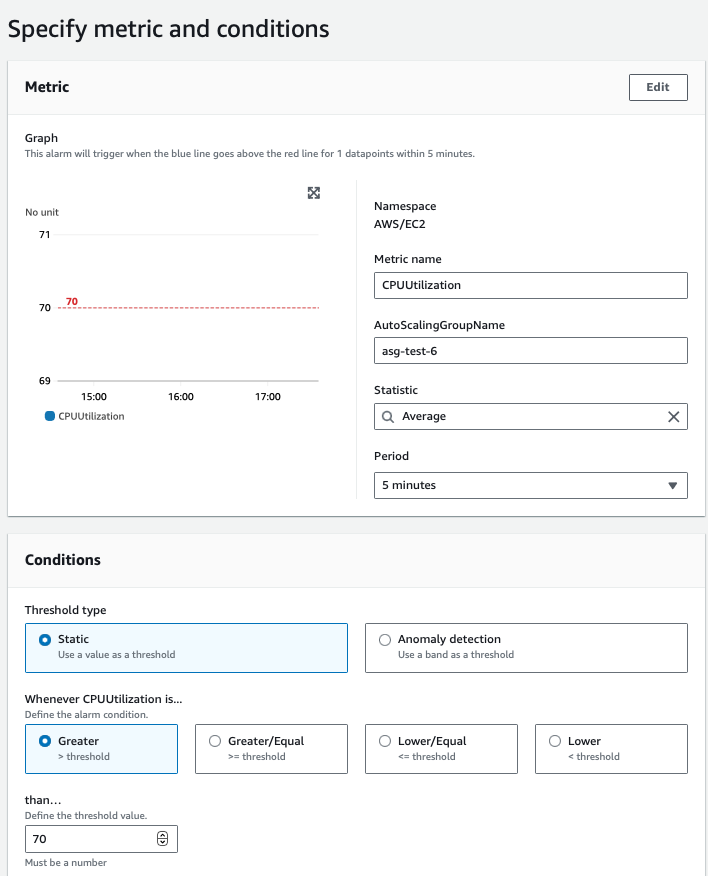
- Create CloudWatch alarms for the chosen metrics. Define the threshold values that should trigger scaling actions.
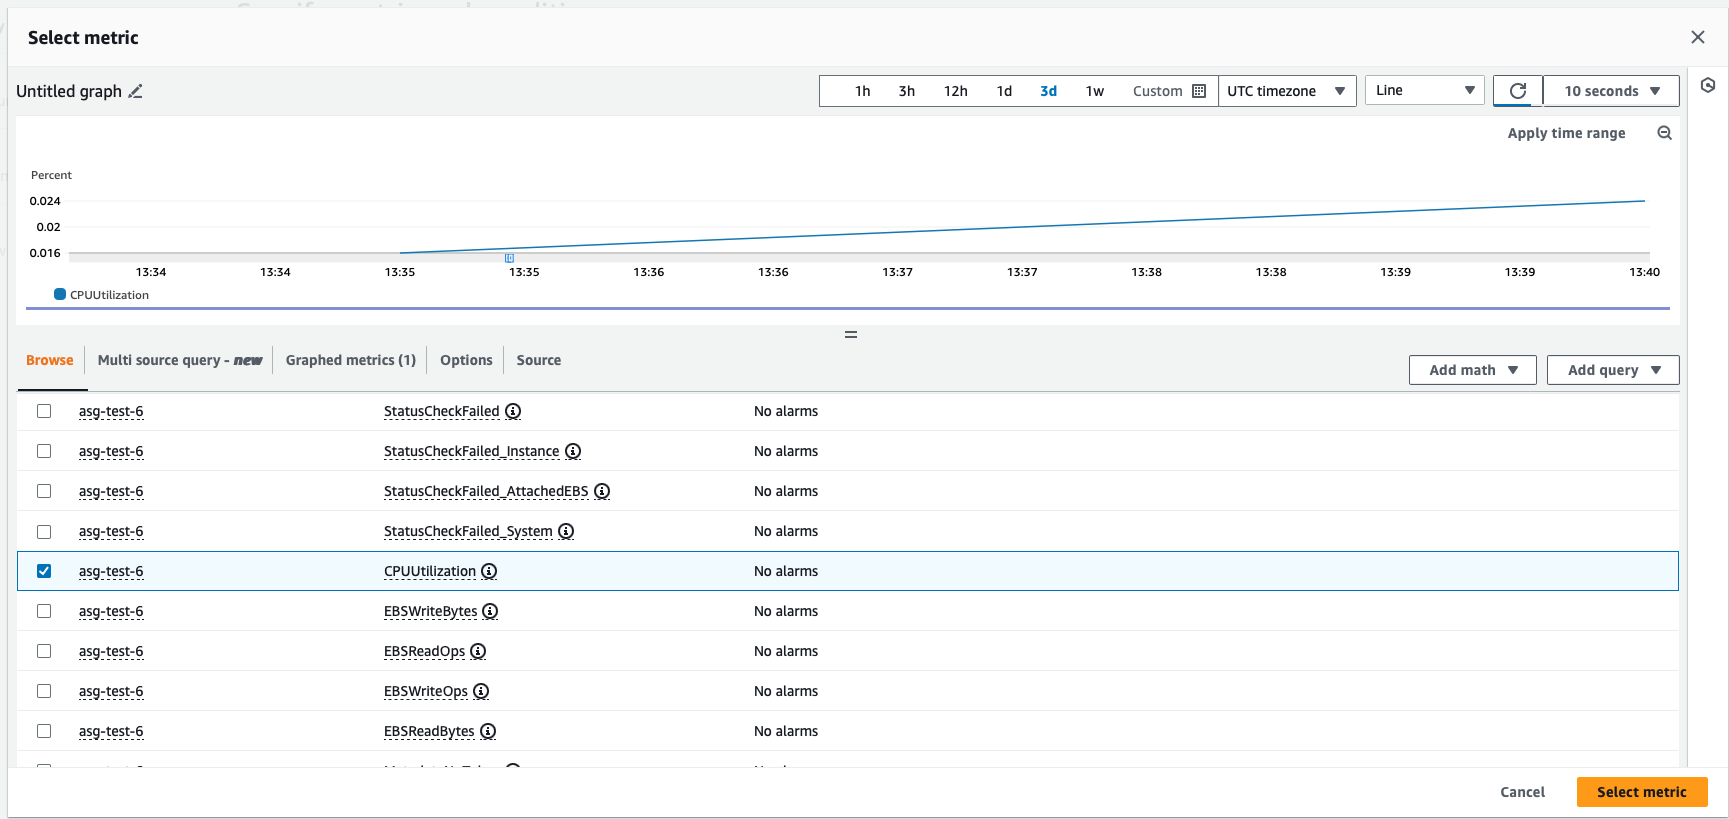
3. For example, create an alarm that triggers when the average CPU utilization across instances in your Auto Scaling group exceeds 70%.
The Definitive Guide to AWS Rightsizing
4.Create budgeting alarms. CloudWatch monitoring alarms alert you about over-usage based on metrics. To monitor based on cost instead, you can set up budget alarms.
Navigate to the AWS Management Console → AWS Budgets dashboard → Create Budget → select the Budget Type → Define budget with a “name”, “Set the Budget Amount”, “Select Cost Filters” → Configure Alerts.
Define and Automate Dynamic Scaling Policies.
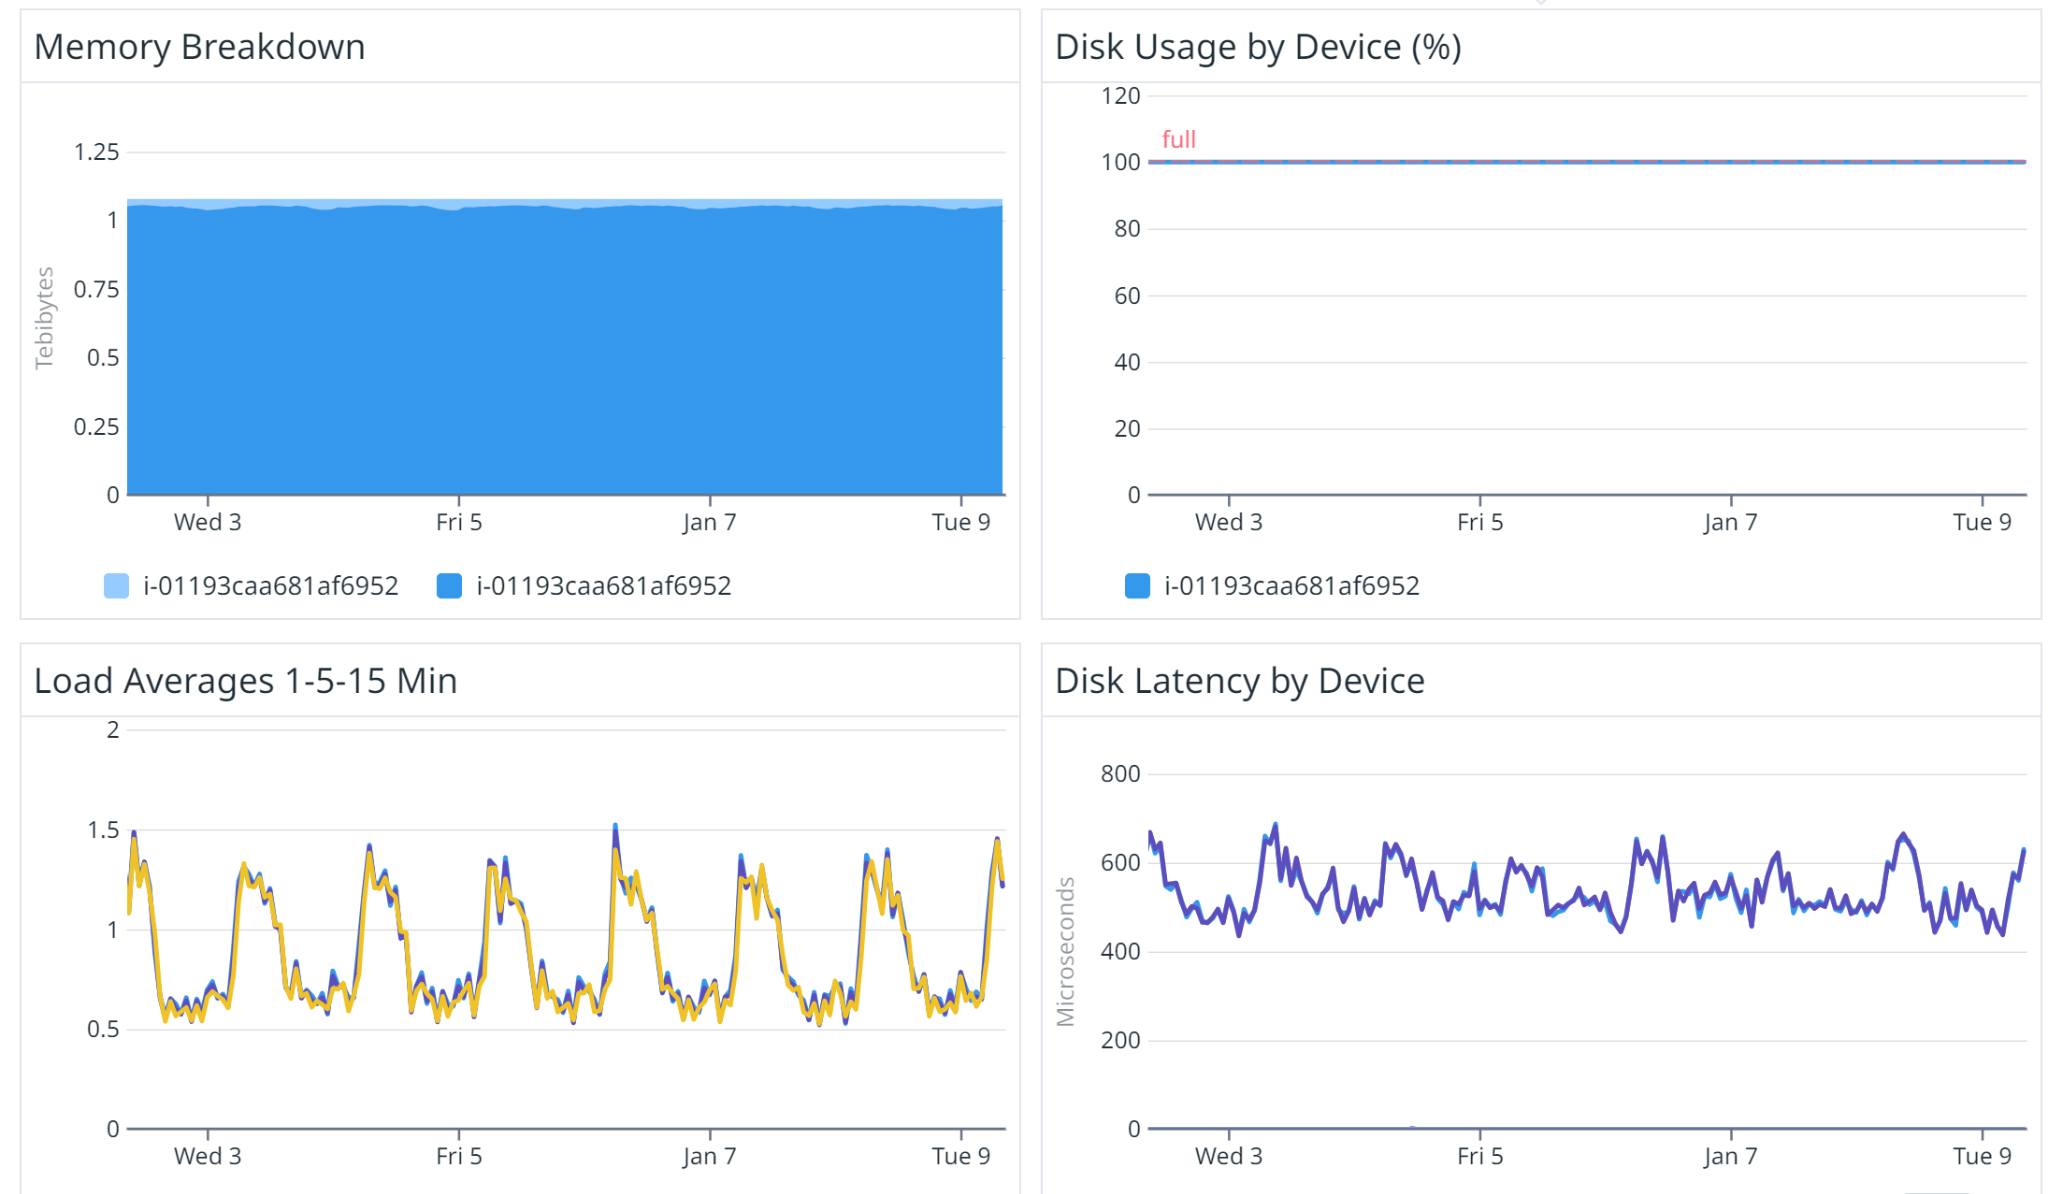
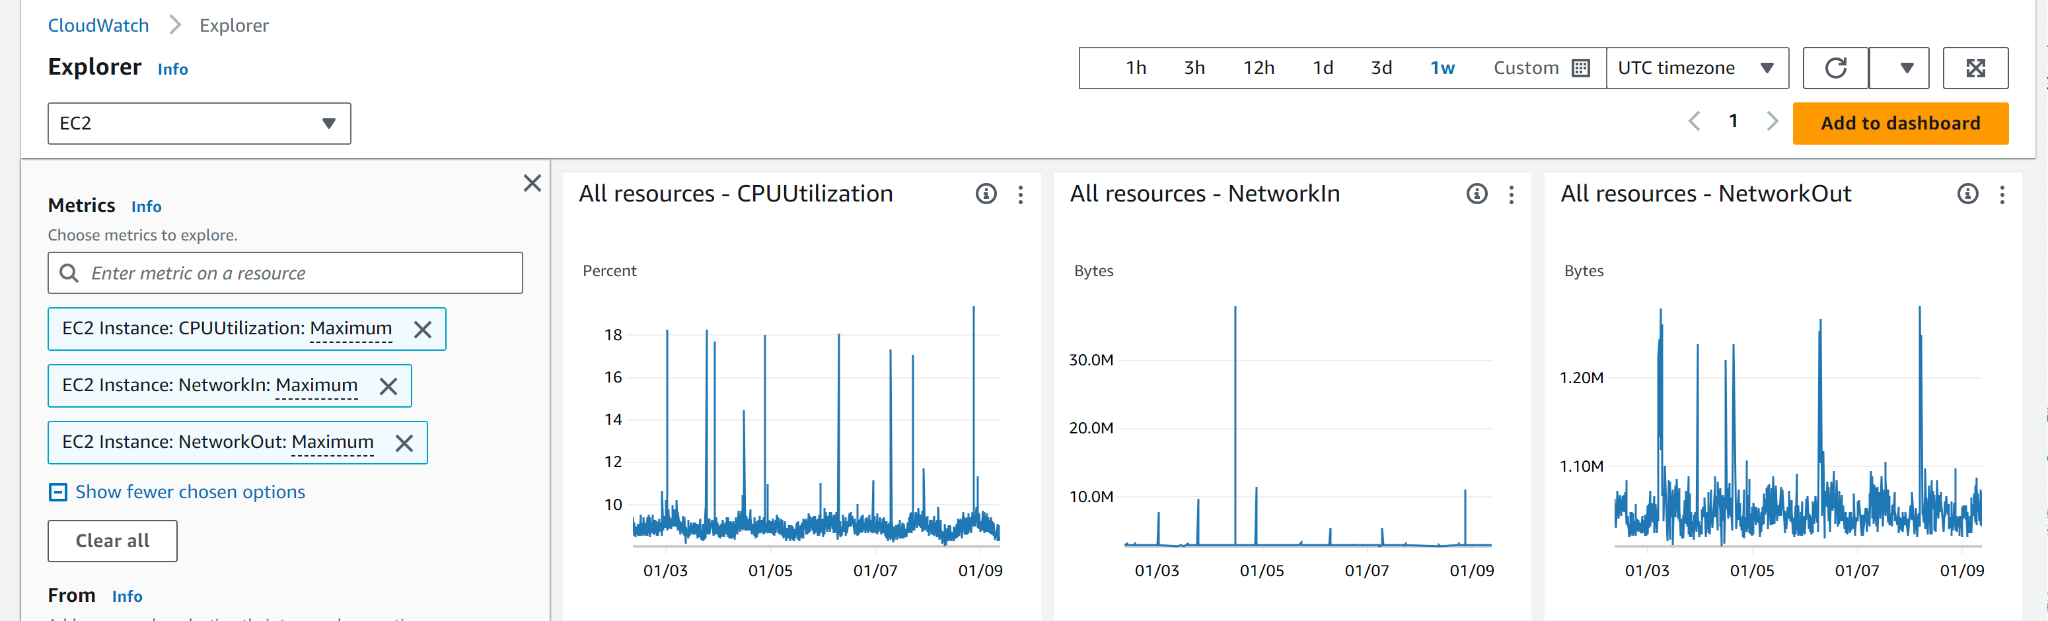
- Identify the metrics most critical for your application’s performance and stability. Common metrics include CPU utilization, network throughput, memory usage or custom application-specific metrics.
- Establish appropriate minimum, maximum, and desired capacity settings for your Auto Scaling Groups. These should align with your anticipated workload demands, ensuring that the Auto Scaling Group can scale efficiently without over-provisioning.
For example, scale out (add instances) when CPU utilization exceeds a certain threshold, and scale in (remove instances) when the utilization decreases.
One strategy to consider is adjusting settings proactively in advance of predicted changes in demand, optimizing resource utilization and cost. We can also schedule the scaling based on the monitoring metrics where we can observe spikes and create the Auto Scaling Group to scale out during certain events or times of the week.

On the other hand, if your application has sporadic or unpredictable loads, consider using a mix of instances, possibly including burstable types (e.g. AWS T-series) that offer baseline performance with the ability to burst.
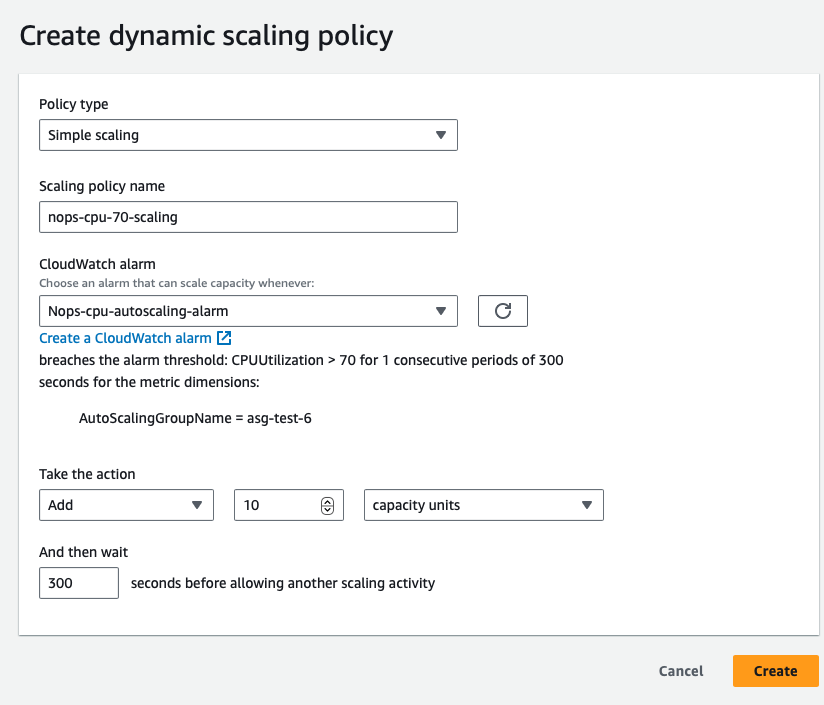
- Create Dynamic Scaling Policies to properly utilize your resources and maintain cost-effective performance as your usage changes. In the AWS Management Console, go to the Auto Scaling service.
Define policies for scaling out and scaling in based on the CloudWatch alarms. Configure your ASG to actively adjust its capacity in anticipation of idle or loading windows, i.e. periods of low and high demand. You’ll need to regularly review historical data in CloudWatch to continually fine-tune your scaling policies.
Tip: Vertical vs horizontal scaling
After monitoring your application’s requirements, you can decide to set up either horizontal or vertical scaling. Vertical Scaling involves changing the instance type to a more powerful one as needed. Horizontal Scaling is adding more instances of the same type. If your infrastructure supports it, horizontal scaling tends to be more cost-optimized.
2. Configure Scaling Actions: This may include adjusting the desired capacity, minimum and maximum instance counts, and cooldown periods that prevent rapid scaling events in response to fluctuations, ensuring stability.
Using the Right EC2 Instance Type and AWS Resources
Here are the main factors to consider when selecting instance types. First, you need to understand your application.
| Type | Purpose | Example |
| CPU Intensive | Compute-optimized — for applications that are CPU-bound, such as Batch processing jobs or gaming servers | C-Series |
| Memory Intensive | For memory-bound applications like databases or big data processing tasks | R-Series |
| Network Intensive | For applications that require high network throughput, like video streaming multiple services | A1, M5n |
| HPC Optimized | For applications requiring high-performance processors, such as complex simulations and deep learning tasks | H1, Z1d |
| Storage Optimized | Tailored for tasks that need high sequential read/write access to large local data sets. They excel in delivering tens of thousands of low-latency, random I/O operations per second (IOPS) for applications | I3, D2 |
| Accelerated Computing | Leverage hardware accelerators or co-processors for more efficient execution of tasks like floating point calculations, graphics processing, and data pattern matching, compared to traditional software running on CPUs | P2, P3, F1 |
High Availability and Fault Tolerance: Ensure that the same instance type is available in all Availablity Zones. Choose instance types and distribute them across multiple Availability Zones to enhance availability and fault tolerance. On Demand instance pricing varies across regions — choose cheaper regions without latency issues (for example us-east-2 is slightly cheaper than us-east-1).
Tip: Consider the growth trajectory of your application. Select an instance type that not only meets current needs but can also accommodate future growth without frequent changes.
Utilizing Spot for Optimizing Costs
Optimizing your Auto Scaling Groups only goes so far — for the biggest discounts, moving your usage onto discounted Spot instances can help you save significantly. However, there are challenges involved in this approach:
Spot is unstable. AWS gives you a discount on the instance, but not a guarantee that you’ll be able to use it to the end of your compute need. When a user willing to pay the full On-Demand price emerges, AWS can terminate these instances with a two-minute warning (known as a Spot Instance Interruption). These unexpected interruptions can cause workloads to fail, potentially posing a major problem for production or mission-critical applications.
The Spot market frequently shifts. Even if you find a suitable Spot option for a particular instance type, market pricing and availability might change the next day — meaning frequent interruptions and the constant work of finding new suitable Spot options for your workload.
Savings Plans and Reserved Instances go underutilized. Unless you constantly track and balance the amount of Spot you use with your existing AWS commitments, you may inadvertently use too much Spot and waste the SP and RIs that you’ve already paid for.
The Ultimate Guide to AWS Commitments

Spot Best Practices
#1: Thoroughly Analyze Workload Suitability
Before migrating instances to Spot, assess the suitability of your workload. Stateless applications with no dependency on individual instances’ persistence are ideal candidates to avoid compromising on reliability.
#2: Implement Spot Instance Diversification
#3: Monitor and Respond to Spot Termination Notifications
#4: Automate Scaling Policies
With tools like CloudWatch, you can trigger predictive scaling actions based on predefined metrics to ensure timely adjustments to changes in Spot market conditions.
Diversifying Spot Instances
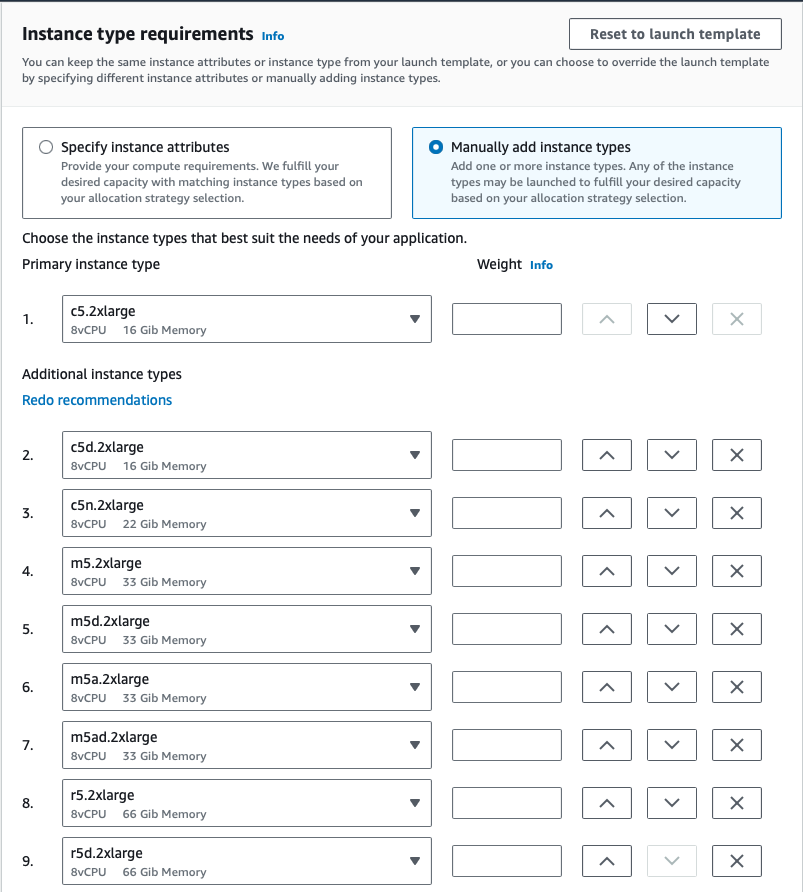
| Allocation Strategy | Description | Use Case |
| priceCapacityOptimized | Optimizes for capacity and price by selecting the lowest priced pools with high availability. Recommended for various workloads, including stateless applications, microservices, web apps, data analytics, and batch processing. | Stateless applications, microservices, web applications, data analytics, batch processing. |
| capacityOptimized | Optimizes for capacity by launching instances into the most available pools based on real-time data. Suitable for workloads with a higher cost of interruption, such as CI, image rendering, Deep Learning, and HPC. Option to set priorities for instance types. | Continuous Integration (CI), image rendering, Deep Learning, High Performance Compute (HPC) workloads. |
| lowestPrice | Default strategy, selects the lowest priced pool. May lead to higher interruptions. Recommended to override with priceCapacityOptimized for improved capacity and price optimization. | Default strategy; override with priceCapacityOptimized for better optimization. |
For example, if you have a mission critical workload and you want to prioritize stability, you can select capacityOptimized.if your workload is highly fault tolerant and you want to save the maximum amount of money, select lowestPrice.
To better understand the market conditions for your selected instance types you can use Spot Placement Scores provided by AWS.
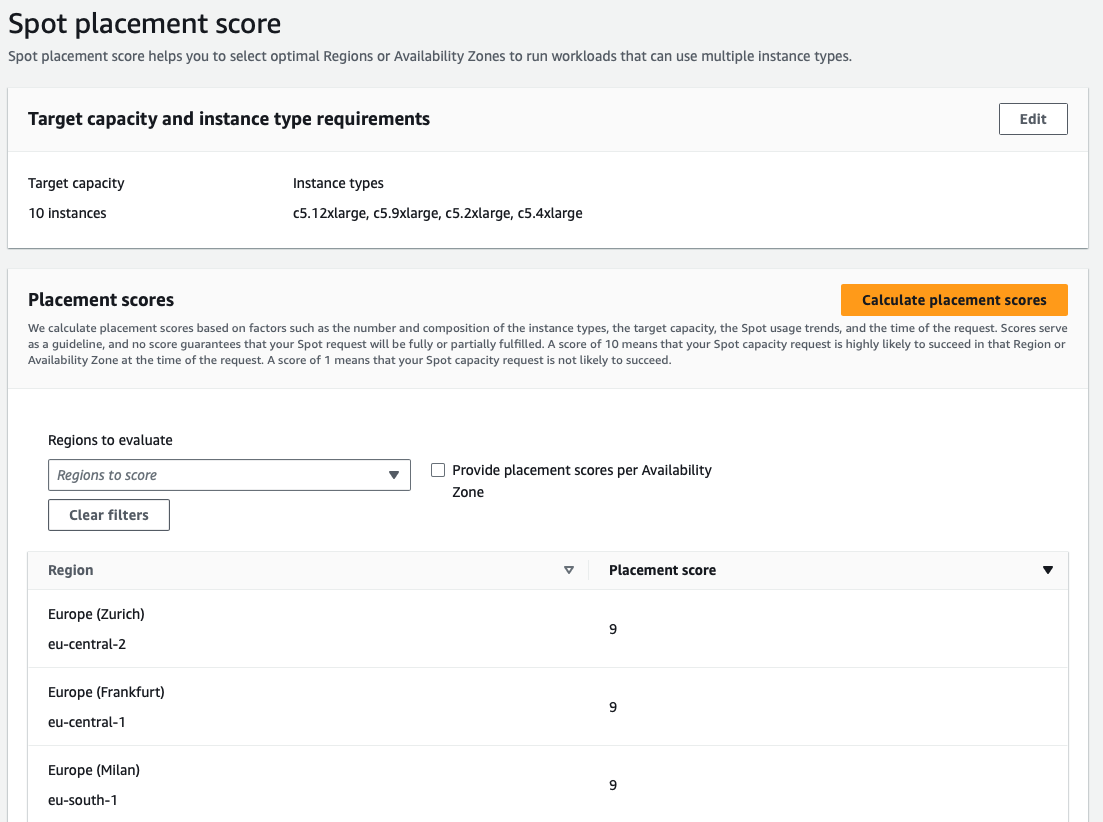
However, it’s worth noting understanding and interpreting placement scores accurately demands a deep understanding of how AWS calculates these scores and their implications on Spot instance availability. Incorporating Spot placement scores into auto-scaling strategies adds complexity, because you need to balance cost, performance, and availability.
As described above, changing Spot market pricing and availability means users must continuously monitor and react quickly to score changes to optimize their Spot instance use.
Building a complex forecasting and prediction model with lack of enough historical data is very complex and the reliability of those instances is highly volatile.
Let nOps Compute Copilot automatically optimize costs for you
If these challenges sound familiar, nOps Compute Copilot can help. Just simply integrate it with your Auto Scaling Groups and let nOps handle the rest.
Leveraging historical and current Spot data based on the $2 billion+ in cloud spend we manage, our solution employs a comprehensive scoring system for each instance. This scoring considers factors such as Spot lifetime in the region, Availability Zone, price, capacity, and more. In real-time, scores are assigned to every Spot market instance based on these factors.
Copilot moves your Auto Scaling Groups onto the best Spot instances for you, using ML to consider the four dimensions of Price (lowest cost), Capacity (sufficient availability), Reliability (preferring instances with the highest lifetime), and Priority (considering customer-chosen instance families). And by leveraging ASG built-in features like Mixed Instance Policies, it ensures you can always fall back to On-Demand if needed to avoid the possibility of downtime.
Based on this proprietary AI-driven management of instances for the best price in real time, Copilot continually analyzes market pricing and your existing commitments to ensure you are always on the best blend of Spot, Reserved, and On-Demand.
Here are the key benefits of delegating the hassle of cost optimization to nOps.
Hands free cost savings. Copilot automatically selects the optimal instance types for your ASG workloads, freeing up your time and attention to focus on building and innovating.
Enterprise-grade SLAs for the highest standards of reliability. Run production and mission-critical workloads on Spot with complete confidence.
Effortless onboarding. Just plug in your Batch, ASG, EKS, or other compute-based workload to start saving effortlessly.
No upfront cost. You pay only a percentage of your realized savings, making adoption risk-free.
nOps was recently ranked #1 in G2’s cloud cost management category. Join our customers using nOps to slash your cloud costs by booking a demo today!
The below diagram provides additional information on how Copilot helps optimize performance and cost for your AWS Auto Scaling Groups.
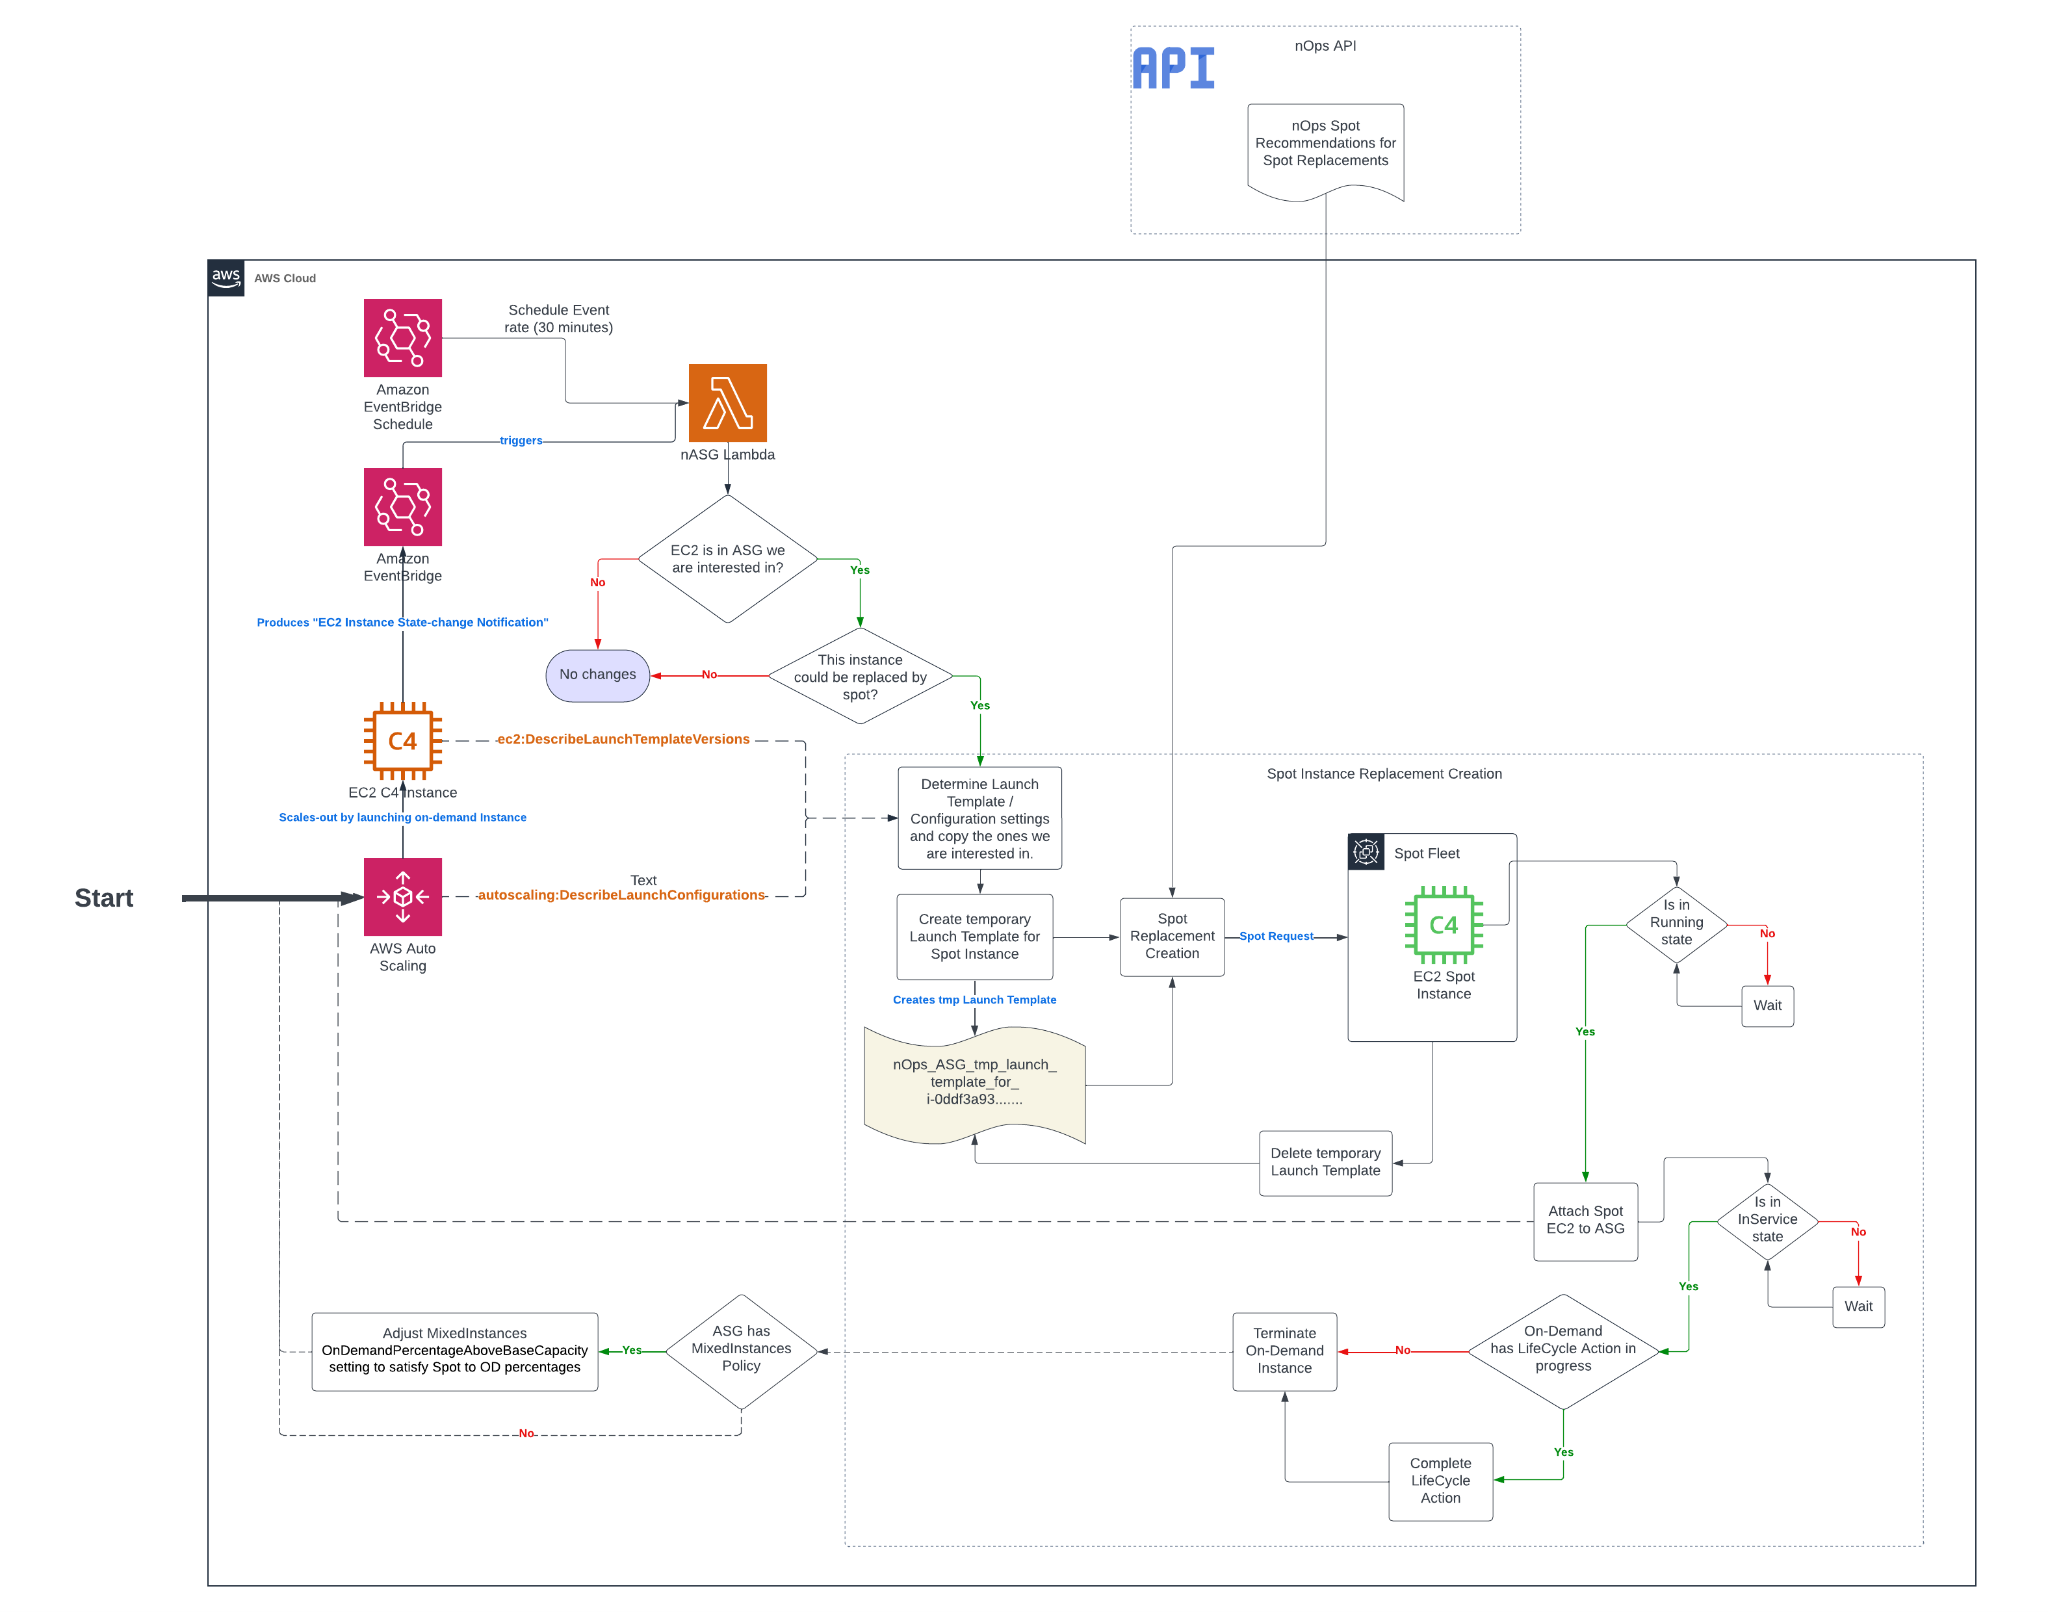
- ASG launches a new on-demand instance
- Lambda intercepts the EC2 Instance State-change Notification event from EventBridge
- If the created instance is not protected from termination and should be replaced, Compute Copilot performs the following steps.
-
- Copy the Launch Template or Launch Configuration from the ASG launch template
- In the copied Launch Template, modify Network Interfaces, Tags, Block Device and/or Mappings from the instance Launch Template or Configuration if needed
- Fetch recommended instance types from nOps API
- Request Spot Fleet with the copied Launch Template and recommended instance types
- Once the Spot request is fulfilled, get the Spot Instance and wait for it to its state to be Running
- Attach the created Spot Instance to the ASG
- Wait for the attached Spot Instance’s state to be InService
- If there is a lifecycle hook for termination for On-Demand, the On-Demand will go through the lifecycle hook action for termination
- Terminate the On-Demand instance
- If there is a Mixed-Instance Policy, modify the percentages of On-Demand and Spot accordingly.
For more information, you can also consult the documentation.

Demo
AI-Powered Cost Management Platform
Discover how much you can save in just 10 minutes!
Frequently Asked Questions
What is the Auto Scaling group in EC2?
An Auto Scaling group (ASG) in EC2 is a service that automatically launches, manages, and terminates EC2 instances to meet demand. You define the minimum, maximum, and desired number of instances, and the ASG ensures that the desired capacity is always maintained. It integrates with load balancers, scaling policies, and health checks to maintain application availability and optimize costs based on real-time traffic, performance metrics, or custom-defined rules.
How many instances can an EC2 Auto Scaling group have?
By default, an AWS EC2 Auto Scaling group can manage up to 200 EC2 instances, but this limit can be increased by submitting a request to AWS support. The number of instances you can run also depends on your service quotas and regional capacity. You can define minimum, maximum, and desired instance counts.
How to add EC2 instance to Auto Scaling group?
To add an EC2 instance to an Auto Scaling group, the instance must be launched using the group’s launch template or configuration. You can also attach a running instance using the AWS CLI, API, or Management Console, provided the instance is in the same Availability Zone and meets ASG requirements.
What are the advantages of using Auto Scaling groups for EC2 instances?
Auto Scaling groups help you maintain application availability and reduce AWS auto scaling cost by automatically adjusting EC2 capacity based on demand. They handle failures by replacing unhealthy instances, support scaling policies for performance or cost efficiency, and integrate with Spot Instances for further savings. ASGs also simplify infrastructure management—ensuring the right number of instances are always running without manual intervention.
Last Updated: February 9, 2026, AWS
Last Updated: February 9, 2026, AWS