NEW Upcoming Enablement Session: Optimizing Auto Scaling Groups for ECS - Register Now

NEW Featured eBook: AWS Cloud Cost Allocation: The Complete Guide - Download Now

Out of date AMIs

Reduce your AWS costs by 50% on auto-pilot.
  • Risk-free commitment
  • Management Automatically pause idle resources
  • Automatically automatize your EKS cost
  • Book a Demo › |
    Share

    This rule checks for AMIs that are older than six months old. An Amazon Machine Image (AMI) contains all the necessary information needed to launch instances in AWS. When you launch an instance, it is mandatory to specify an AMI. If you require the identical configuration for all of your instances, you may launch them from the same AMI. To ensure that your instances are up-to-date with the latest security patches, software versions, you must regularly update your AMIs.

    Any AMI older than 180 days is considered obsolete and is missing important patches and security updates required for reliable operations.

    This rule can help you with the following:

    • AWS Well-Architected Framework Lens

    Audit

    Follow the steps below to check if you have any outdated AMIs in your AWS account:

    1. Sign in and navigate to the AWS EC2 dashboard at https://console.aws.amazon.com/ec2/.

    2. Under the Images section by the left, click on the AMIs option.

    3. Sort the list by the date of its creation by clicking on the Creation Date column.

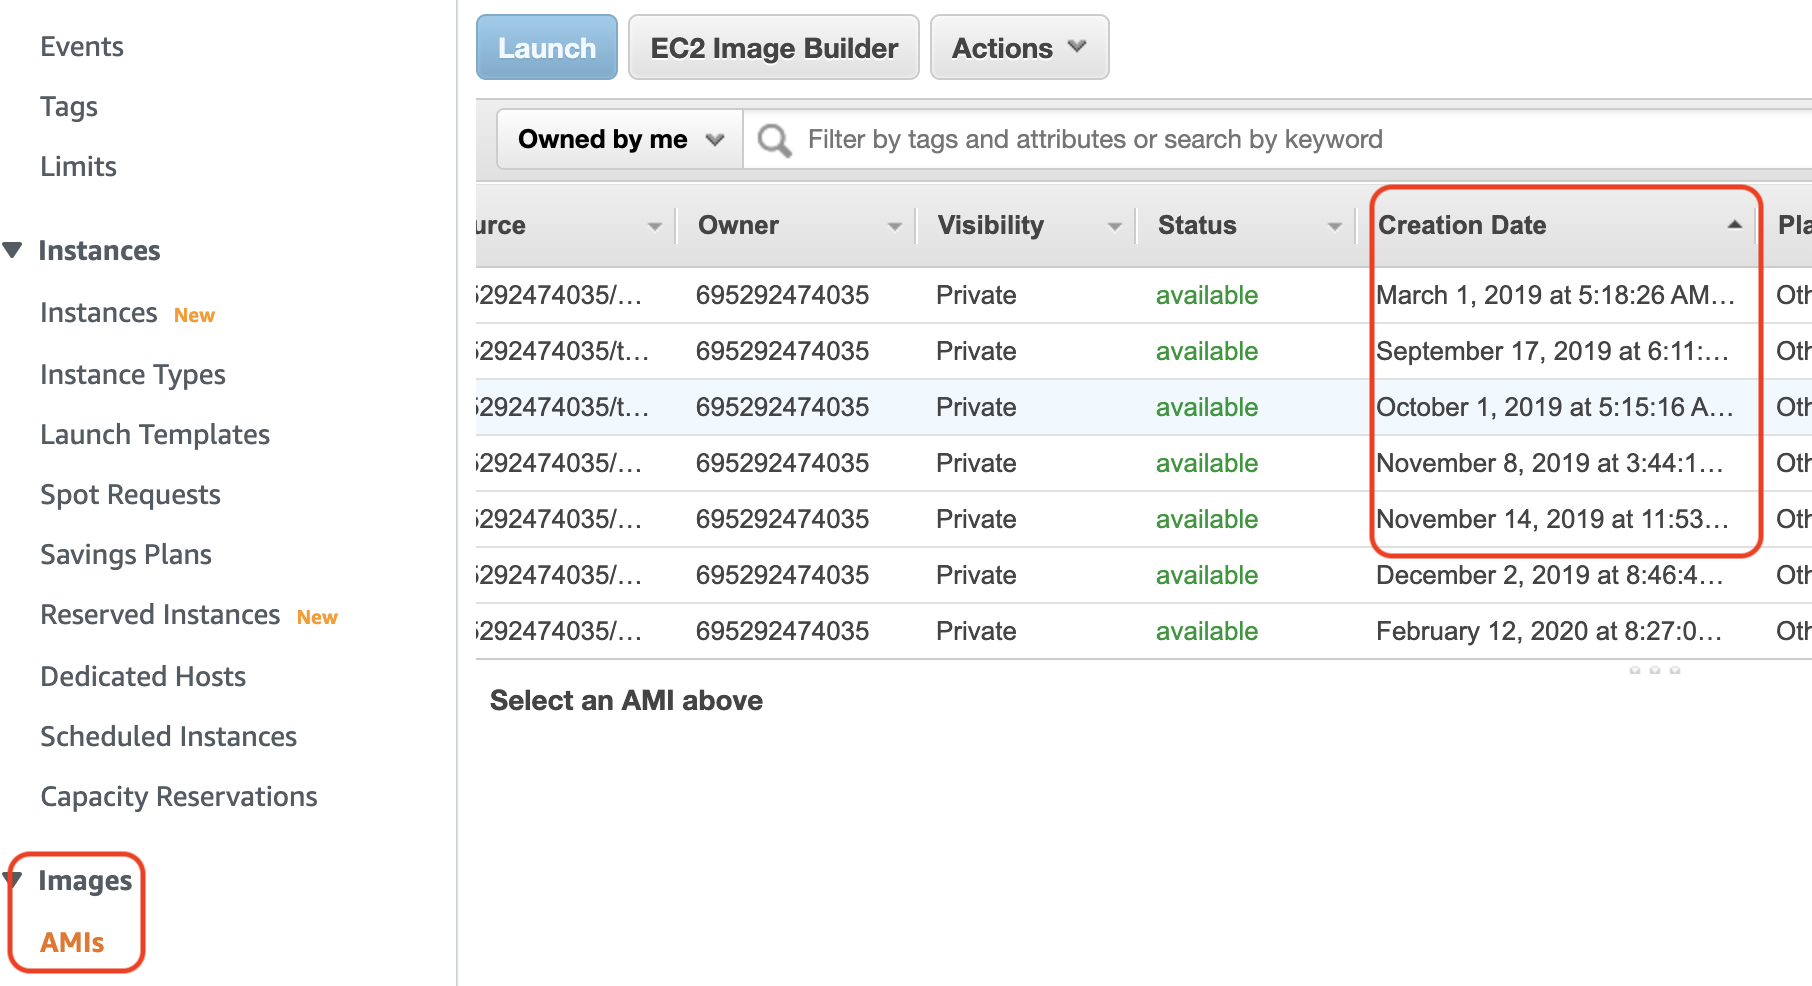
    4. Identify the images at the top of the list that was created more than 180 days ago. All of these images are too old and may be missing critical patches and security updates.

    5. Please select one of these images to confirm its creation date on the Details page.

    6. Perform steps 4 and 5 on other AMIs available in the current region to confirm their Creation Date.

    7. Switch the AWS region at the top navigation bar to discover other outdated AMIs present in other regions.

    1. Run the**describe-images** command to retrieve the IDs of all AMIs in a specific region (using —region option) with a custom filter and sort query as shown below:

    aws ec2 describe-images \\
    --region us-east-1 \\
    --owners self \\
    --query 'sort_by (Images, &CreationDate)[].{Image: ImageId , CreationDate: CreationDate}[]' \\
    --output table

    2. The command should output a table containing each available AMI’s creation dates and IDs as shown below:

    -------------------------------------------------------
    |                   DescribeImages                    |
    +---------------------------+-------------------------+
    |       CreationDate        |          Image          |
    +---------------------------+-------------------------+
    |  2019-02-28T18:18:26.000Z |  ami-009fdca76724a5627  |
    |  2019-09-16T20:11:55.000Z |  ami-0ceeb44013fdf7847  |
    |  2019-09-30T19:15:16.000Z |  ami-0fe7ee6881b6e3b94  |
    |  2019-11-07T16:44:10.000Z |  ami-01e917dc05de5b1de  |
    |  2021-01-14T21:11:33.000Z |  ami-06fa027dd544c5d33  |
    |  2021-02-15T21:17:18.000Z |  ami-0e30b4947abefe201  |
    |  2021-02-17T03:34:50.000Z |  ami-0abc1244e2ad057b9  |
    |  2021-06-16T00:50:45.000Z |  ami-07be615dde4308247  |
    |  2021-07-10T00:42:35.000Z |  ami-0e1b6ff2ccab23f7d  |
    |  2021-09-08T18:32:16.000Z |  ami-0852981d99732189e  |
    |  2021-09-08T18:39:42.000Z |  ami-076663aa9761fae8b  |

    3. Again, AMIs created more than 180 days ago are outdated and must be updated to ensure the latest patches and security updates are applied.
     
    4. To confirm the creation date of each AMI, Run the describe-images command with the desired AMI properties as shown below:


    aws ec2 describe-images \\
    	--region us-east-1 \\
    	--image-ids ami-009fdca76724a5627 \\
    	--query 'Images[*].CreationDate'

    5. The command output will show the creation date of the AMI.

    [
        "2019-02-28T18:18:26.000Z"
    ]

    If the AMI creation date is older than 180 days, the AMI is considered outdated and must be replaced.
     
    6. Perform steps 4 and 5 on other AMIs available in the current region to confirm their creation dates.
     
    7. To check other AMIs in other AWS regions, update the AWS region by changing the –region command parameter value in Step 1 and repeat steps 1 – 6.

    Remediation / Resolution

    Once you discover outdated AMIs in your account, you can do either of the following to remediate any security risks:

    1. Leave the AMIs unused – If no instances are consuming such an AMI, you can ignore these AMIs and keep them flagged in the nOps console so that no one spins any new EC2 instance using these AMIs.
    2. Update the AMI with the latest software stack. Suppose a running EC2 instance or an instance in an active software/application stack uses an out-of-date AMI. In that case, you must update the underlying AMI with the latest security patches, software stack, etc., to avoid any security risks.Note that the remediation procedure described below is based on the 2nd option where you have running instances with out-of-date AMIs.

    1. Sign in and navigate to the EC2 dashboard at https://console.aws.amazon.com/ec2/.

    2. Under the Images section by the left, click on the AMIs option.

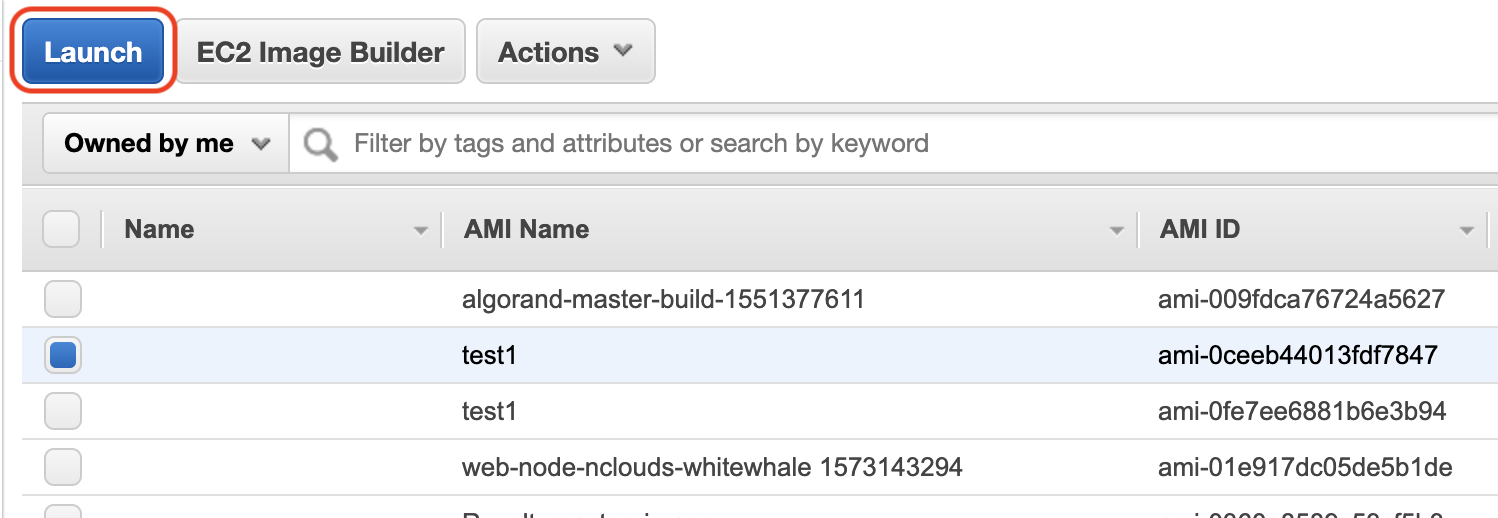
    3. Select the old AMI you want to recreate (see Audit section part I to identify the AMIs).

    4. Launch an EC2 Instance by clicking on the Launch button

    5. Choose an Instance Type and then click Configure Instance Details button.

    6. Configure Instance, Storage, and Security Group settings as desired. Furthermore, click on the Review and Launch page without making any changes.

    7. Attach an existing Key Pair or create a new one to your Instance so that you can connect to it.

    If you need help with launching a new EC2 instance, please consult one of our friendly consultants.

    8. Navigate back to the Instances section using the View Instances button.

    9. Confirm that the instance status is set to running. Then, using the Key, SSH into the Instance and update your application to the newest version.

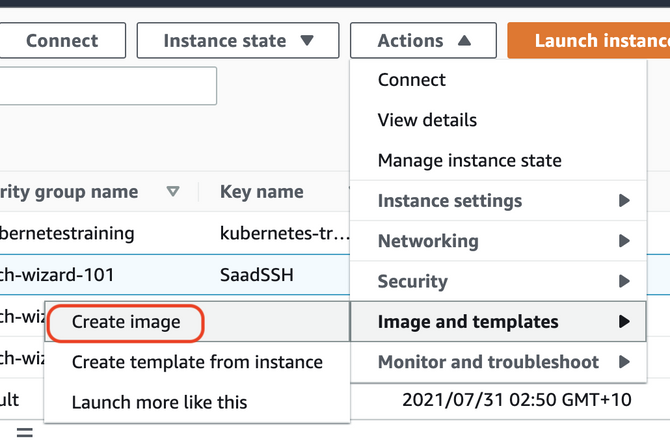
    10. We should be able to create a fresh AMI once all updates are finished successfully. Click on the Actions button > Select Image and Templates > Click Create Image as shown below**:**

    11. You will be directed to the Create Image page:

    a. Input an Image Name. Note that this can’t be edited after creation.

    b. Make a detailed Image description. This is optional but useful in the future.

    c. Don’t check the No reboot box. This is left unchecked by default to ensure your AMI integrity making it both crash and application consistent.

    d. Update the Instance Volumes section as desired or leave the default ones in place.

    e. Associate Tags with the AMI if you want. This is optional.

    f. Click on Create Image.

    12. You will be redirected to the Instances page and a successful AMI creation note will be shown.

    13. Click on the AMI notification or navigate back to the AMI section. You should notice a new AMI getting created. The AMI status will change from pending to available once the procedure is done.

    14. Repeat steps 4–13 to fix any additional obsolete AMIs in the current region.

    15. To discover and update outdated AMIs in other regions, update the region name in the top navigation bar and apply the entire process again.

    1. Launch an instance with an outdated AMI by executing the run-instances command along with necessary parameters. The example below launches an instance with an outdated AMI ami-0ceeb44013fdf7847

    aws ec2 run-instances \\
    	--region us-east-1 \\
    	--image-id ami-0ceeb44013fdf7847 \\
    	--count 1 \\
    	--instance-type t2.large \\
    	--key-name my-key-pair \\
    	--security-groups default

    2. The command output will return the metadata of the newly launched instance as shown below.

    {
        "Groups": [],
        "Instances": [
            {
                "AmiLaunchIndex": 0,
                "ImageId": "ami-0ceeb44013fdf7847",
                "InstanceId": "i-00cc6a9219f964621",
                "InstanceType": "t2.large",
                "KeyName": "my-key-pair",
                "LaunchTime": "2021-10-29T23:34:40+00:00",
                "Monitoring": {
                    "State": "disabled"
                },
                "Placement": {
                    "AvailabilityZone": "us-east-1b",
                    "GroupName": "",
                    "Tenancy": "default"
                },
                "PrivateDnsName": "ip-172-31-87-151.ec2.internal",
                "PrivateIpAddress": "172.31.87.151",
                "ProductCodes": [],
                "PublicDnsName": "",
                "State": {
                    "Code": 0,
                    "Name": "pending"
                },
                "StateTransitionReason": "",
                "SubnetId": "subnet-3f8b1c11",
                "VpcId": "vpc-53ed4929",
    						...
            }
        ],
        "OwnerId": "695292474035",
        "ReservationId": "r-063e481cac95bd489"
    }

    3. Take note of the instance id and state (currently pending) and run describe-instances to monitor the state of the Instance

    aws ec2 describe-instances \\
    	--region us-east-1 \\
    	--instance-ids i-00cc6a9219f964621 \\
    	--query 'Reservations[].Instances[].State.Name[]'

    4. The output will return the current state of the instance. Keep repeating Step 3 until the state of the instance is running.

    [
        "running"
    ]

    5. Once the instance is running, SSH into the Instance using the Key and then update your application OS to its latest version.
     
    6. Once all updates are finished successfully, create an updated AMI by running create-image command as shown below:

    aws ec2 create-image \\
    	--region us-east-1 \\
    	--instance-id i-00cc6a9219f964621 \\
    	--name "my-new-updated-image" \\
    	--description "Update Image v1.1" \\
    	--no-reboot

    7. The output will return the new Image id.

    {
        "ImageId": "ami-06add1fe069298504"
    }

    8. Run describe-images command again to ascertain the current state of image. Execute this command repeatedly until you get an **available**status.

    aws ec2 describe-images \\
    	--region us-east-1 \\
    	--image-ids ami-06add1fe069298504 \\
    	--query 'Images[].State'
    
    **Initial** **Output
    [
        "pending"
    ]
    
    Final Output
    [
        "available"
    ]**

    9. Run theterminate-instances to destroy the temporary instance that you started in Step 1

    aws ec2 terminate-instances \\
    	--region us-east-1 \\
    	--instance-ids i-00cc6a9219f964621 
    
    **Output**
    {
        "TerminatingInstances": [
            {
                "CurrentState": {
                    "Code": 32,
                    "Name": "shutting-down"
                },
                "InstanceId": "i-00cc6a9219f964621",
                "PreviousState": {
                    "Code": 16,
                    "Name": "running"
                }
            }
        ]
    }

    10. Repeat steps 1–9 to fix any additional outdated AMIs in the current region.
     
    11. Update the — region parameter and perform Steps 1 – 10 to discover and update outdated AMIs in other regions.

    Still Need Help?

    Come see why we are the #1 cloud management platform and why companies like Uber, Dickey’s BBQ Pit and Norwegian Cruise Line trust nOps to manage their cloud.