Optimizing AWS Auto Scaling Groups: Instance Management and Instance Refresh
AWS Auto Scaling is an essential tool for enhancing application availability, fault tolerance and cost-efficiency. There are 6 tabs on the AWS Auto Scaling details page in the AWS console.

We’ll focus on the Instance Management and Instance Refresh tabs, and how to leverage their features (such as lifecycle hooks and warm pools) effectively. This practical guide includes steps, sample configurations, screenshots and best practices for maximizing the performance and cost-efficiency of your Auto Scaling Groups.
Instance Management
The Instance Management tab provides a user-friendly interface for checking and configuring the state in which your ASG instances are. They also allow you to specify the lifecycle transitions of the instances and how ASG should behave on scale-in and scale-out. Let’s dive into the features available under this Tab, including Instances, LifeCycle Hooks and Warm Pools.
Managing Instances

The first block in this tab is the list of instances. Here you can check the instance id, instance type, health status, availability zone, lifecycle state and other details. It’s particularly useful for troubleshooting and ensuring the ASG is working as expected.
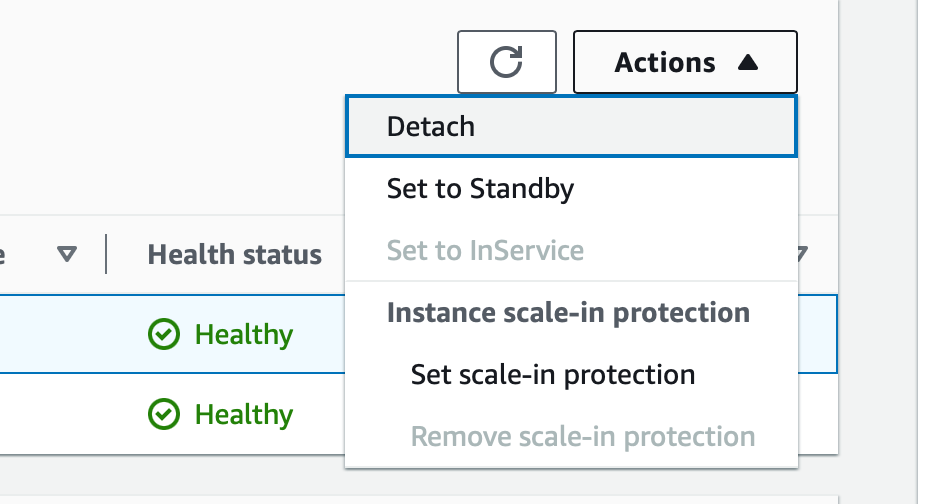
In the “Actions” dropdown you can manipulate the instances attached to this ASG:
- Detach: This action allows you to detach an instance from the ASG. It will be still running, but no longer as part of the ASG — so you can use it independently or attach it to another Auto Scaling Group. This can be used to perform tests on the instances that were launched by ASG in prod environments, without making it serve the traffic.
- Set to Standby / InService: Transitioning an instance to Standby status stops it from handling traffic, though it remains part of the ASG. This feature helps you stop and start the instances or reboot them without worrying about Amazon EC2 Auto Scaling terminating the instances as part of its health checks or during scale-in events.
- Set / remove scale-in protection: Protecting an instance from scale-in actions prevents its termination, even if the ASG scales-in by decreasing the Desired Capacity.
Lifecycle Hooks
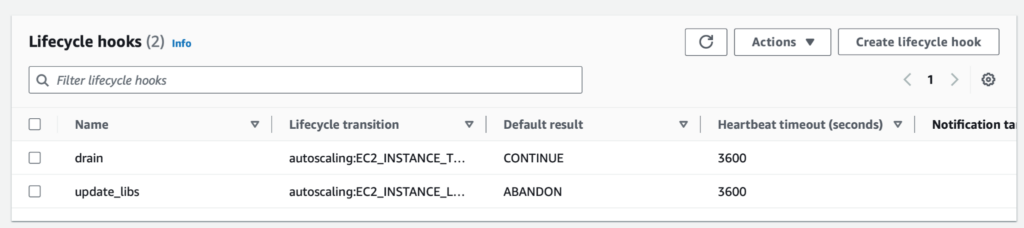
Lifecycle Hooks in AWS Auto Scaling allow you to pause instances as they launch or terminate, giving you the opportunity to perform custom actions like downloading the latest application code or draining connections before an instance is terminated. When you configure a Launch Lifecycle Hook, you can force the instance to go through the following states: Pending -> Pending:Wait (some custom action) -> InService, instead of just Pending -> InService. Lifecycle Hooks can help you to manage complicated instance lifecycles in various ways:
| Instance management tasks | These can be performed before instances are put into service or before they are terminated |
| Execute custom actions | Trigger Lambda functions or other automation workflows to execute tasks specific to your application’s needs |
| Perform controlled executions | Lifecycle Hooks hooks help provide better control over the instance state transitions, allowing for more graceful startup and shutdown behaviors. |
Let’s look at a practical example to illustrate.
Real-world example: Configure a Lifecycle Hook on an AWS ASG to install the latest libraries on the instance being launched
Prerequisites
Before you start, ensure you have the following:
- An AWS account with permissions to manage Auto Scaling Groups and Lifecycle Hooks.
- An Auto Scaling Group where you want to add the Lifecycle Hook.
- An IAM role with permissions to access necessary AWS services (e.g., S3 for script storage, EC2 for instance management).
- A script to install the required libraries on your instances.
Step 1: Prepare your custom script
You can use a Bash script, for example, to install the latest versions of the libraries your application is running on:
#!/bin/bash sudo apt-get update sudo apt-get install -y python3-pip sudo pip3 install --upgrade some-library]Step 2: Create a LifeCycle Hook:
- Open the Amazon EC2 console: Go to Auto Scaling Groups.
- Select your Auto Scaling Group: Click on the name of the ASG you want to configure.
- Go to the ”Instance Management”
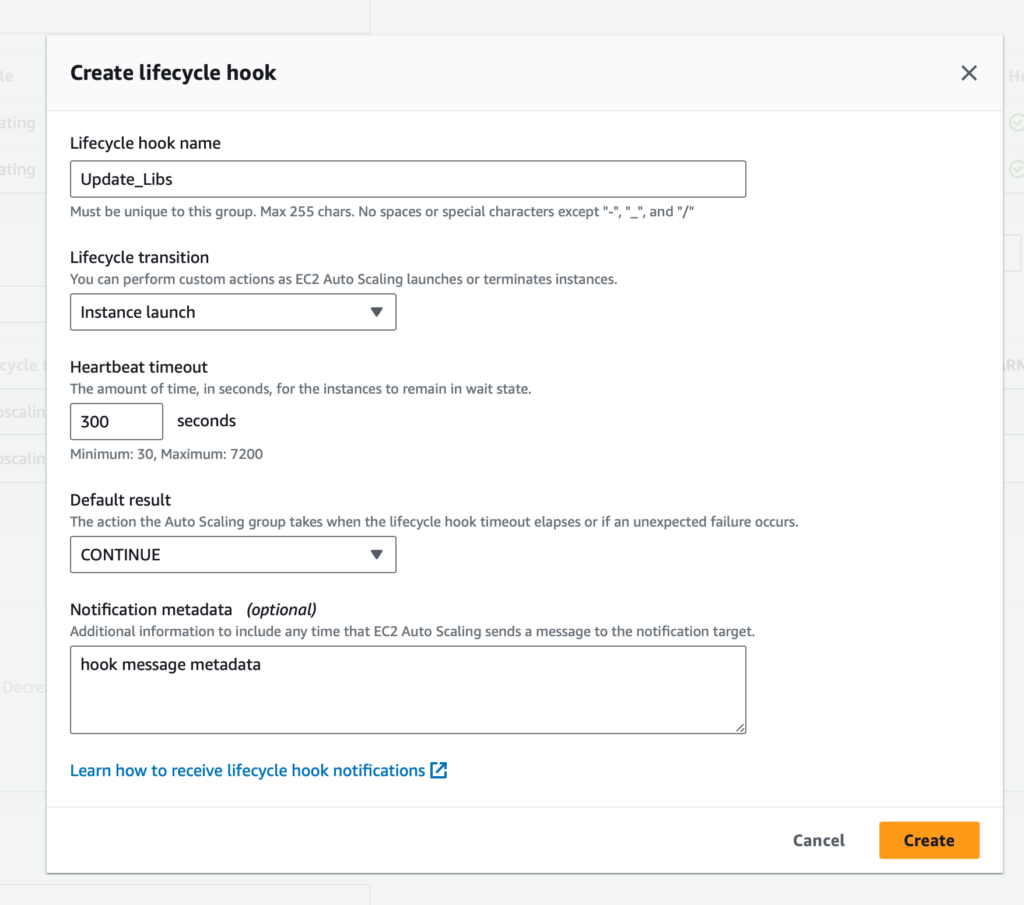
- Create a new Lifecycle Hook: Click on the “Create Lifecycle Hook” button.
- Configure the Hook:
- Lifecycle Hook Name: Enter a name for your hook.
- Lifecycle Transition: Select “Instance Launch”.
- Heartbeat Timeout: Specify the time in seconds the instance has to complete the lifecycle action. (For example, 300 seconds).
- Default Result: Choose “CONTINUE” to allow the instance to start serving if the script execution fails.
- Notification Metadata: Optionally, include additional information that will be sent to the notification target.
Save the Lifecycle Hook.
Step 3: Update the Instance Launch Template with a User Data:
To have the instance execute your script during launch, you’ll need to modify the instance’s launch template to run your script as part of its initialization. This is typically done using the user data script.
Modify the Launch Configuration:
- Go to the launch template associated with your ASG.
- Edit the user data to include the script that updates the libraries
Step 4: Test the Configuration
After setting up the Lifecycle Hook and updating the user data, test the configuration:
- Increase the desired capacity of the ASG by one to trigger a new instance launch.
- Monitor the instance’s system logs (via the EC2 console or SSH) to verify that the script executed correctly.
- Optionally, set up CloudWatch alarms or SNS notifications to get alerts based on the Lifecycle Hook.
Warm Pools:
Warm Pools are a relatively recent addition to AWS Auto Scaling. A warm pool is a pool of pre-initialized EC2 instances that sits alongside an Auto Scaling group. Whenever your application needs to scale out, the Auto Scaling group can draw on the warm pool to meet its new desired capacity. This helps you to ensure that instances are ready to quickly start serving application traffic, accelerating the response to a scale-out event. Warm Pools can significantly improve the responsiveness of your applications by maintaining a pool of pre-initialized instances that are ready to serve traffic. You can use Warm Pool settings to manage the state of your Warm Pool instances for testing configurations or cost management. Additionally, you can dynamically adjust the size of the Warm Pool to meet demand without impacting the performance of your running application. Let’s take a quick look at the benefits.
Cost-effectiveness | Warm Pool instances can be configured to keep an instance in a stopped state, reducing costs while still allowing for quick scaling when demand spikes. |
Faster scaling | By having instances that are pre-initialized, the time it takes to scale out is reduced, which is crucial for performance-sensitive applications. This aligns well with how cost optimization strategies differ in ECS environments. |
Lifecycle management | Similar to regular instances, you can manage Warm Pool instances through the “Instance Management” tab, applying similar lifecycle policies and actions |
Configuring a Warm Pool on an AWS Auto Scaling Group
- Open the Amazon EC2 console: Go to the Auto Scaling Groups page
- Select your Auto Scaling Group: Click on the name of the group you want to configure.
- Go to the Instance Management tab.
- Create a Warm Pool: Click “Create Warm Pool”.
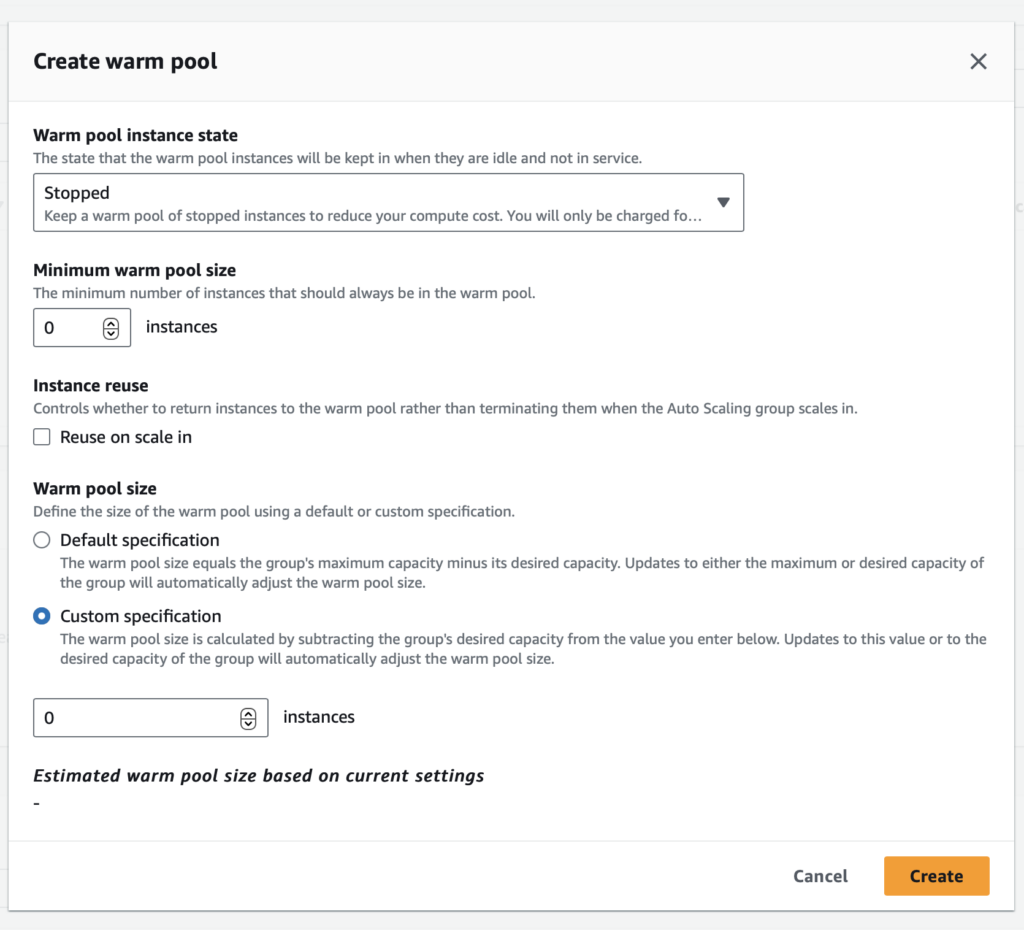
- Configure the Warm Pool:
- Warm Pool instance state: Select one of the states (Stopped, Running, Hibernated). This state defines in what state the warmed instances will stay until they are attached to the ASG if needed.
Stopped: Instances kept in “Stopped” state can help you to reduce your compute costs. You won’t be charged for the EC2 usage, only for the resources attached to this EC2 instance (EBS volumes, EIP addresses, …)
Running: Use this state if you want the lowest possible latency on the ASG scale-out. You will be charged the full price of the warmed EC2 instance even if it stays in the Warm Pool and does not actually serve traffic.
Hibernated: If your EC2 instance supports hibernation, you can use this setting to meet the balance between the other two options – you won’t be charged for the EC2 instance usage, only for the resources attached to this EC2, but at the same time the scale-out speed will be faster compared to the warmed instances that are in the “Stopped” state.
- Minimum warm pool size: Define the minimum number of instances that should always be in the warm pool.
- Instance reuse: If this option is selected, EC2 instances will be returned back to the Warm Pool on scale-in events, insead of termination. This is a relatively new option that allows you to better utilize your instances by re-using them if needed.
- Warm Pool size: By default size is set to (Pool Size = “Max Capacity” – “Desired Capacity”). So if your ASG has the Maximum capacity set to 10 and the Desired capacity set to 7, your Warm Pool size will be 3. You can override this behavior to use the following formula (Pool Size = “Desired Capacity” – “Custom Value”)
Now, let’s take a look at the other crucial Auto Scaling Group tab in the Management Console that can help you optimize your ASGs for cost and performance.
Instance Refresh
Keeping servers up to date is crucial. That’s why the AWS feature Instance Refresh is so important — let’s dive into why.
What is Instance Refresh?
Instance Refresh allows you to automatically replace the instances in your ASG to match the current Launch Configuration or Templates. This is crucial when you have made updates to your AMI (Amazon Machine Image), instance type, or other configurations that are part of the Launch Template. Instead of manually updating each instance, Instance Refresh automates this process, ensuring all instances in the group conform to the latest settings.
Use Cases for Instance Refresh | |
Software Updates | Whenever there’s a critical software update or patch, Instance Refresh can roll out these changes across all instances to ensure consistency and security compliance. |
Configuration Changes | If changes are made to the instance type or operating system in the launch template, Instance Refresh can apply these changes throughout the ASG. |
Migrations from Launch Configuration to Launch Template | Once you’ve copied your Launch Configuration to a Launch Template, Instance Refresh makes it easy to update all of your instances to the new template. |
Instance Refresh Methods
There are primarily three strategies that you can use when performing an Instance Refresh.
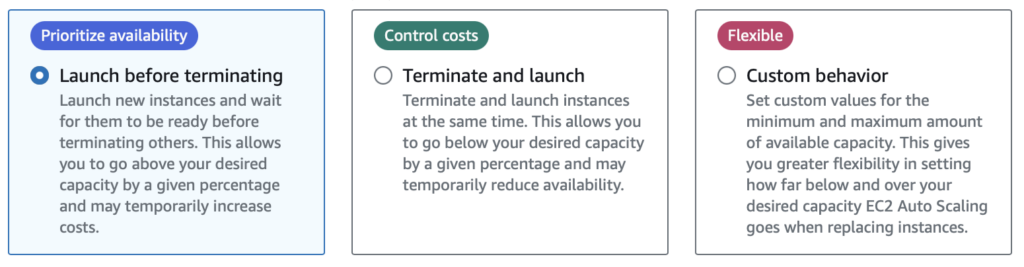
Let’s contrast these three approaches in a table.
| Priority | Strategy | Purpose | Example Use Case |
| Availability | Launch before terminating | For applications where maintaining high availability is crucial. It involves launching new instances first and waiting for them to be fully operational before terminating older instances. It allows the ASG to temporarily exceed its desired capacity, which might increase costs during the refresh period but ensures that the application remains highly available without any downtime. | High-Traffic Websites and Applications. For services experiencing variable traffic, this strategy ensures that capacity is never compromised, thus maintaining performance during peak times. |
| Controlling Costs | Terminate and launch | Ideal for cost-sensitive operations, this method terminates existing instances and launches new ones simultaneously. This strategy may temporarily reduce the overall capacity below the desired level, potentially affecting availability. It’s a suitable approach when minor disruptions are acceptable, and cost efficiency is a priority. | Batch processing workloads. For organizations with flexible operational hours, this strategy can help reduce costs significantly. |
| Flexibility | Custom behavior | This approach offers the most control by allowing custom thresholds for how far below or above the desired capacity the ASG should operate during the refresh. This is particularly useful for environments with complex needs, where standard approaches do not align perfectly with operational requirements and meticulous control is required. | Complex deployments, where different segments of the environment might require updates at different stages or speeds. |
How to Configure Instance Refresh: A Step-By-Step Guide
- Open the Amazon EC2 console: Navigate to the Auto Scaling Groups page
- Select your Auto Scaling Group: Click on the name of the group you want to configure.
- Go to the ”Instance Refresh” tab
- Initiate Instance Refresh: Click on the “Start Instance Refresh” button.
- Select the instance refresh strategy:
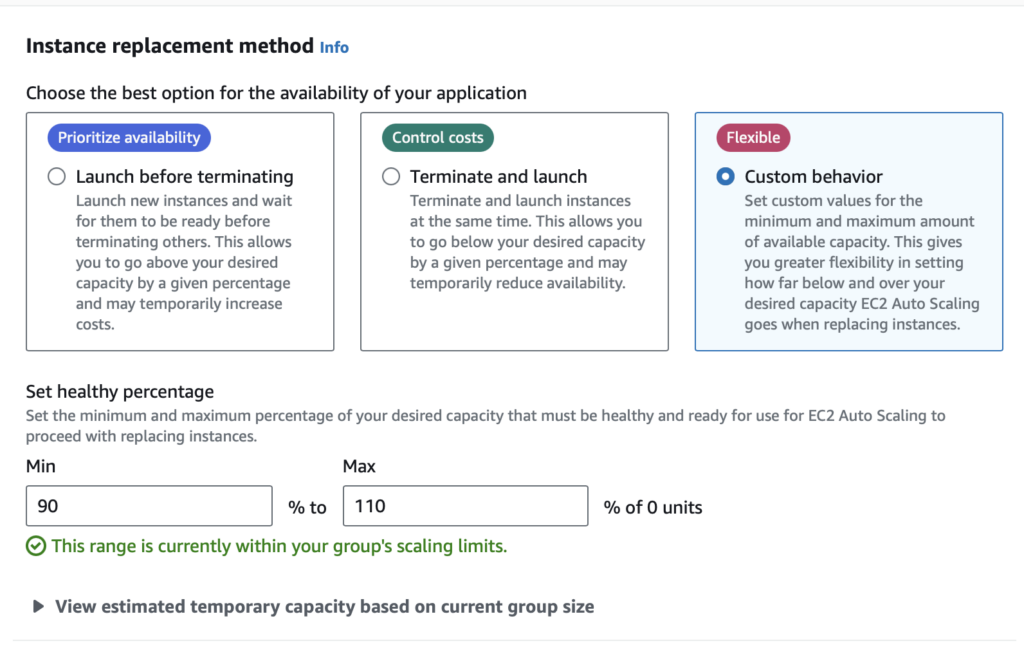
Select one of Launch before terminating, Terminate and launch or Custom behavior (detailed above) to meet your business requirements.
Configure additional (optional) refresh settings:
- Set the instance warmup timeout.
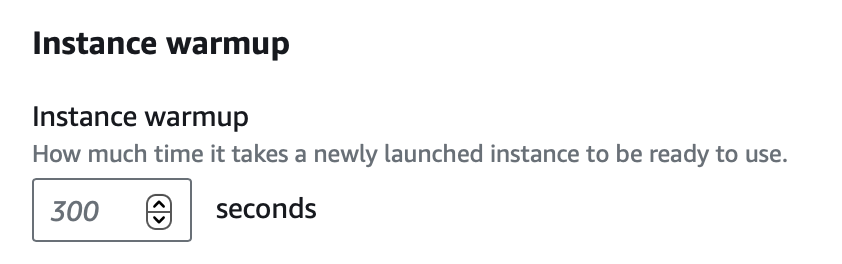
Set the duration for new instances to initialize and start handling traffic effectively.
- Define instance refresh checkpoints:
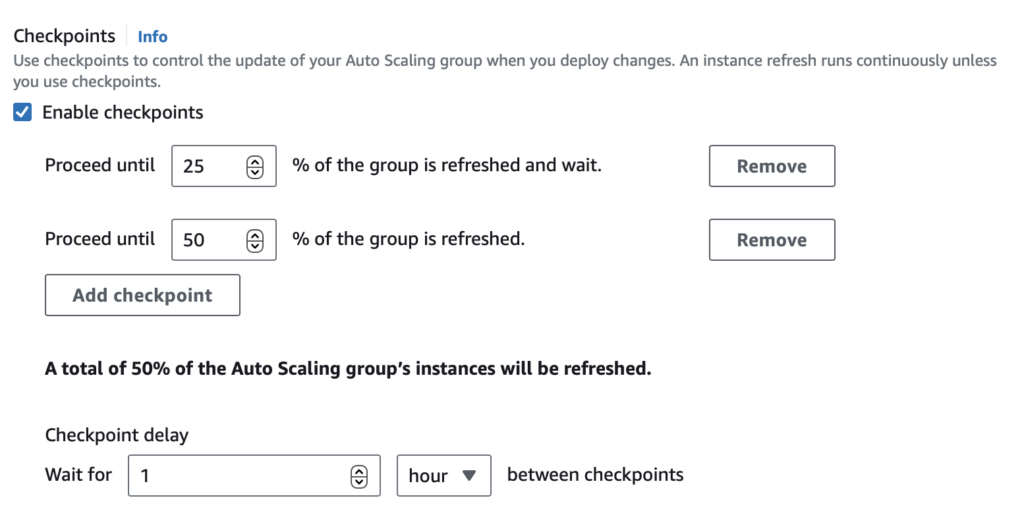
If you wish to manage the refresh process in phases, define checkpoints. Specify the relative size of each group of instances to be refreshed and the delay before proceeding to the next checkpoint. This is useful for large deployments where gradual updates can mitigate risk. This can also help to limit the number of instances that are going to be updated in general, if you don’t want Instance Refresh to replace all ASG instances.
- Force Instance refresh to replace even instances that match your new configuration

Opt to replace even those instances that already match the new configuration. This can be useful when ensuring that all instances are uniformly configured, regardless of their current state
- Define what to do with Standby and Scale-in protected instances
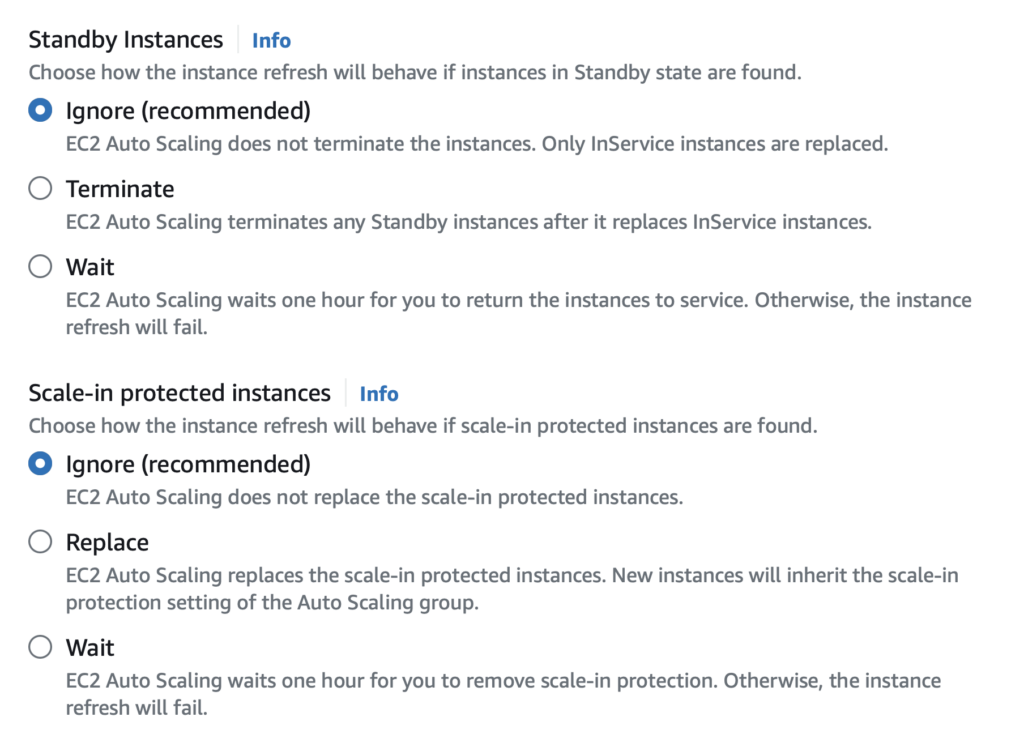
By default, Instance Refresh will not replace Standby or Protected instances. If you want them to be replaced as well, you may want to explicitly define it here.
- Monitor the Refresh Progress:
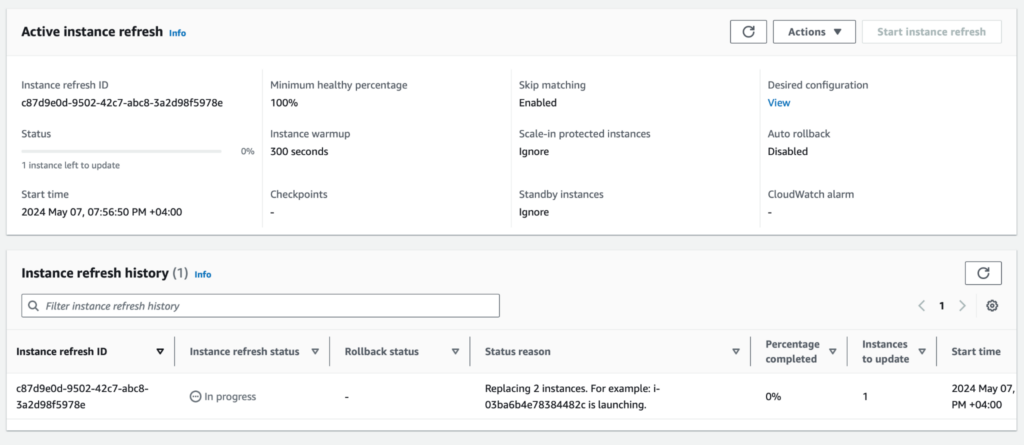
Once the refresh is initiated, you can monitor its progress in the ASG console. AWS provides real-time updates on the status of the instance replacements, allowing you to track the refresh phase.
Wrapping up
If you’re looking to optimize your AWS Auto Scaling Groups, nOps provides a comprehensive solution that simplifies the process. Compute Copilot is an intelligent workload provisioner that continuously manages, scales, and optimizes all of your ASGs to get you the lowest cost with maximum performance. Compute Copilot makes it easy to save on ASG costs with Spot. Fully aware of the changing Spot market, your dynamic usage, and your AWS purchase commitments, Copilot automatically and continuously tunes your ASG configurations to ensure you’re (1) always using the right amount of Spot, and (2) always on the most cost-effective and reliable options available, gracefully moving your workloads onto optimal instances to drastically reduce your rates of termination. If you’re currently using Spot to save on your ASG costs, you’re familiar with the complexity involved in choosing the best Spot instances for your workloads and cost-optimizing your commitment usage. Copilot makes all of this easy, so that your time is freed for building and innovating. Copilot is compatible with all of your ASGs, even if you’re using Warm Pools or other advanced features that add complexity and management overhead. And because Copilot is built on your existing AWS-native ASGs, it’s ultra-easy to onboard. Simply plug it in to effortlessly run mission-critical workloads with peace of mind that you’re always getting the best performance and stability at the lowest costs. nOps manages over $1.5 billion in AWS spend and was recently ranked #1 in G2’s cloud cost management category. Book a demo to find out how to save in just 10 minutes.