Skip to content

Kubernetes offers an optimal environment for orchestrating containerized applications, featuring robust tools to optimize resource usage and reduce costs. A key player in this optimization game is autoscaling — a mechanism that not only ensures operation efficiency but also drives significant cost savings.
This detailed guide explores the complexities of Kubernetes autoscaling. We’ll cover everything you need to know about Horizontal Pod Autoscaler (HPA) and Vertical Pod Autoscaler (VPA), from the basics to advanced strategies with Cluster Autoscaler, Karpenter, Goldilocks and KEDA — with real-world use cases of horizontal vs vertical scaling, example configurations, pro tips and more. First, let’s briefly discuss horizontal vs vertical scaling.What is Horizontal Scaling?
Horizontal scaling means adding more servers or instances to distribute load and increase capacity.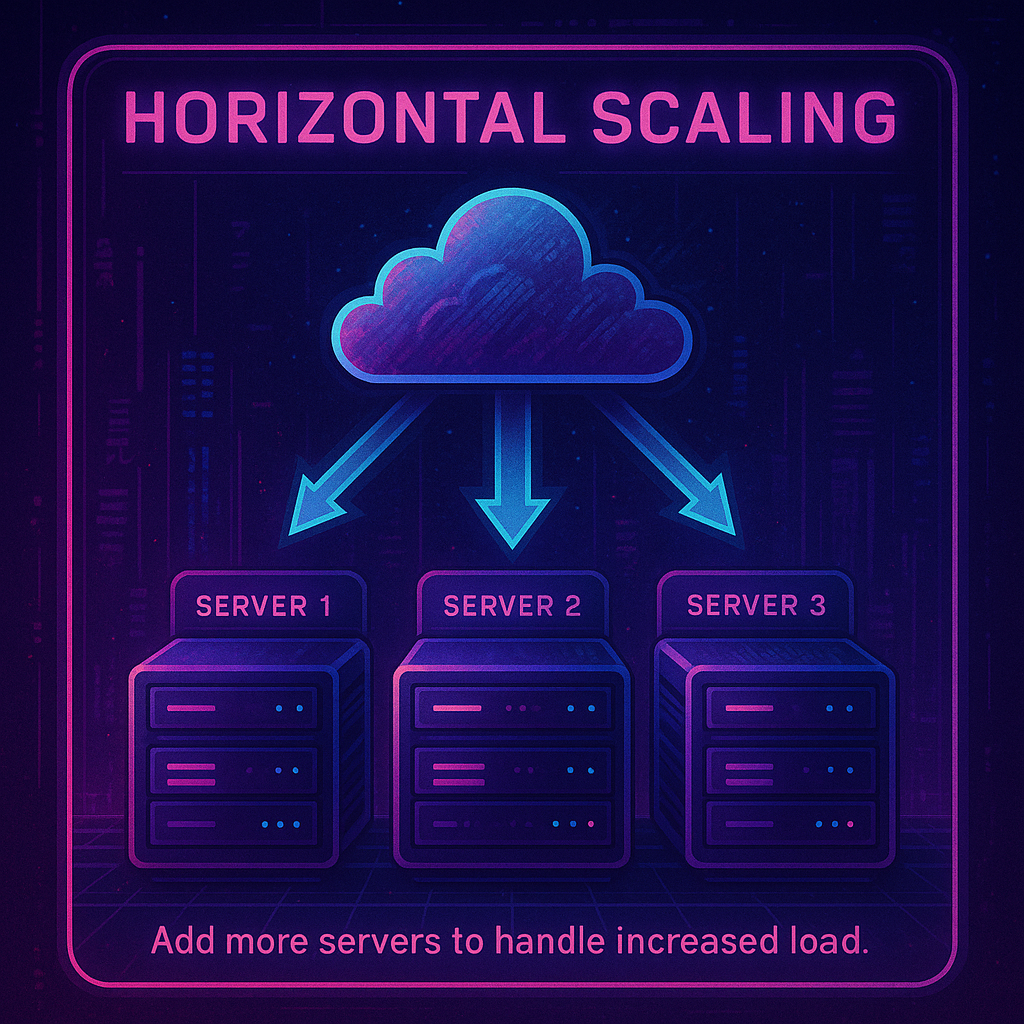
What is Vertical Scaling?
Kubernetes Autoscaling: The Basics of Horizontal and Vertical Scaling
Autoscaling in Kubernetes is about smartly aligning resource utilization with actual demand, to eliminate unnecessary expenditures. Let’s discuss the differences between various types of scaling in conjunction with the four main Kubernetes autoscaling technologies: Horizontal Pod Autoscaler, Vertical Pod Autoscaler, Cluster Autoscaler, and Karpenter.
Horizontal Scaling with Horizontal Pod Autoscaler (HPA)
Horizontal scaling involves adding multiple servers to an existing pool of machines to handle increased load, rather than upgrading the capabilities of an existing machine. Horizontal cloud scaling is like adding more lanes to a highway during rush hour, facilitating smooth traffic flow. HPA dynamically adjusts the number of pod replicas in a deployment based on observed metrics like CPU or custom metrics.Vertical Scaling with Vertical Pod Autoscaler (VPA)
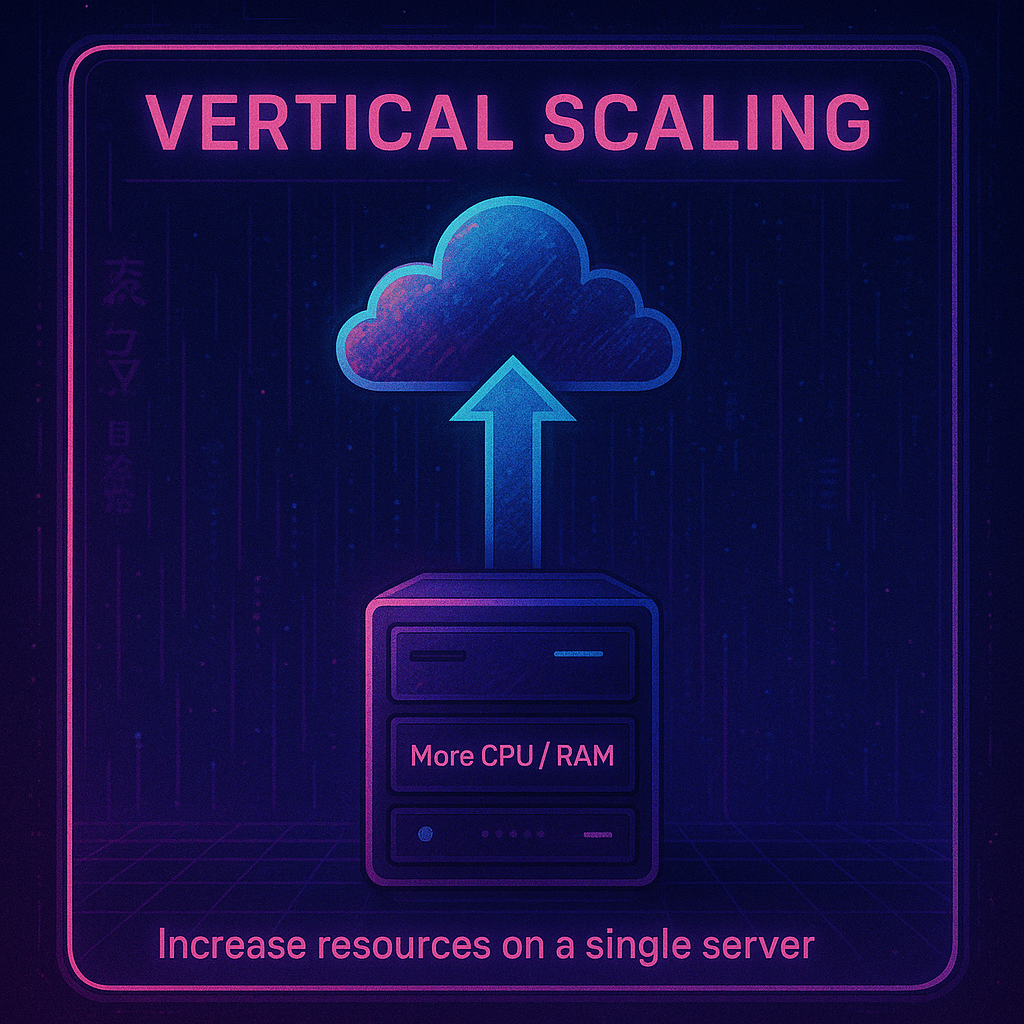
Vertical scaling involves adding additional capabilities (such as processing power, memory or storage) to a single machine, to manage higher loads without adding multiple machines to the system. In comparison to horizontal scaling, think of vertical scaling as ensuring every car on the highway has just enough fuel for its journey, no more, no less. VPA optimizes resource allocation within pods, adjusting CPU and memory settings to match usage patterns.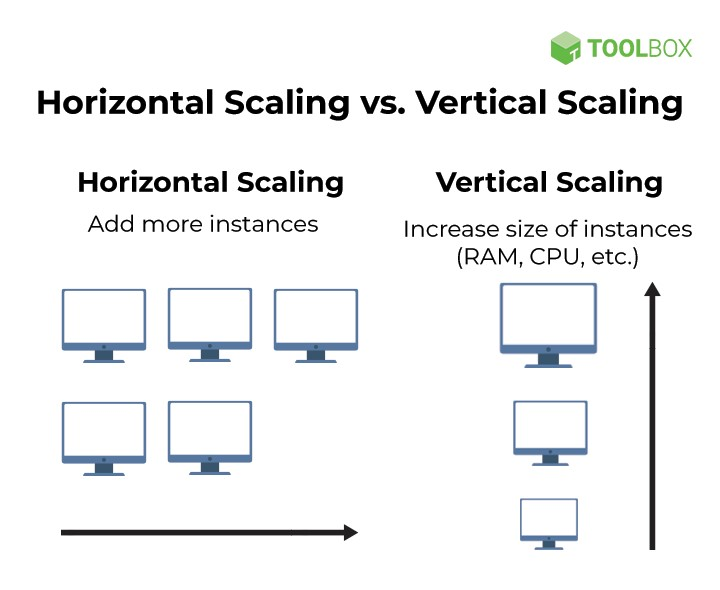 Instances scaled horizontally vs vertically — source: spiceworks Let’s compare horizontal scalability vs vertical scalability with a quick table.
 | HPA | VPA | |
| Limitations and considerations | Requires applications to be designed for scale-out, distributing workloads across multiple instances. May not instantly meet sudden spikes in demand due to the time taken to start new instances. | Constrained by the maximum resource limits of individual instances. May lead to resource wastage if not carefully managed, as idle resources continue to incur costs. |
| Operational insights | Ensure containers have defined CPU and memory requests to allow HPA to make accurate scaling decisions. Utilize metrics-server for resource usage metrics and consider custom or external metrics for fine-grained scaling control. | Best paired with workloads with variable resource demands that are hard to parallelize. Run VPA in “Off” mode initially to gather resource usage recommendations before enforcing changes. |
| Real-world application | Ideal for stateless applications with fluctuating traffic, HPA can dynamically scale services like web servers or API gateways, all running the same code, to match demand. | Suited for applications with consistent performance requirements, VPA can ensure resource-intensive applications like databases have the necessary resources. |
Cluster Autoscaler and Karpenter: Vertical Scaling and Horizontal Scaling at the Node Level
While HPA and VPA are integral for optimizing resource usage at the pod level, managing the underlying infrastructure’s scalability is crucial for comprehensive resource optimization. This is where Cluster Autoscaler and Karpenter, the two leading node management solutions, come into play. Let’s discuss the different ways that they interact with HPA and VPA. Cluster Autoscaler (CA) automatically scales your Kubernetes clusters based on the metrics you define. It monitors the resource utilization of nodes in your EKS/Kubernetes Cluster, and scales up or scales down the number of nodes in a node group accordingly. It makes scaling decisions intelligently, evaluating both node usage and factors like pod priority and PodDisruptionBudgets to make scaling decisions, minimizing disruptions. Karpenter, an open source, flexible, high-performance Kubernetes cluster autoscaler. This advanced node scheduling and scaling technology enhances pod placement for improved instance utilization, proactively and dynamically provisioning nodes in anticipation of actual workload needs. It addresses pre-defined node group constraints, enabling more fine-grained control over resource utilization. Karpenter employs application-aware scheduling, considering pod-specific requirements like taints, tolerations, and node affinity.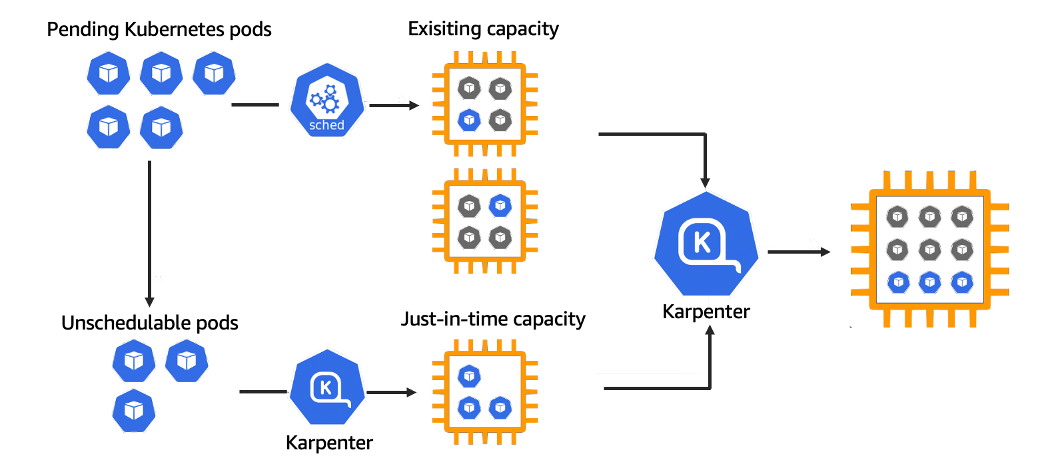 Karpenter diagram, source: aws
 How Cluster Autoscaler and Karpenter Interact with HPA and VPA
Cluster Autoscaler focuses on node-level scaling, which is one layer above the pod-level adjustments handled by HPA and VPA. While HPA and VPA change the quantity and size of pods, CA modifies the cluster’s capacity to host these pods. CA complements HPA by providing the necessary infrastructure for the additional pod replicas. When HPA decides to scale out, CA ensures there are enough nodes to schedule the new pods. On the other hand, with VPA, CA helps in reallocating resources across the cluster. If VPA increases the resource requests of pods, CA can provision additional nodes if the current nodes are insufficient to meet these new demands. Karpenter offers a more dynamic and responsive scaling solution compared to CA, directly interacting with pod specifications and cluster state. It takes the baton from HPA and VPA, fine-tuning the infrastructure to the pods’ needs. Karpenter operates with a deep understanding of pod specifications and can provision nodes that precisely fit the resource requirements, which is beneficial when using VPA to adjust pod resources. When it comes to HPA, Karpenter efficiently manages the cluster’s node count to accommodate the number of pod replicas created.
Vertical Pod Autoscaler (VPA) vs. Horizontal Pod Autoscaler (HPA):
Now that we’ve covered the basics of Kubernetes autoscaling, let’s dive into the VPA and HPA more in depth with some technical examples.
Vertical Pod Autoscaler (VPA)
VPA adjusts the CPU and memory requests and limits of pods in a deployment or stateful set, optimizing resource allocation for efficiency and performance. It operates at the pod level, modifying the resource specifications of individual containers within a pod. This process is driven by an analysis of resource usage data, including metrics (CPU and memory usage) collected from the Metrics Server or a custom metrics provider to make scaling decisions.
VPA has three operational modes:
- Off: Only recommendations are provided without applying them.
- Initial: Applies recommended resource requests only at pod creation.
- Auto: Continuously updates resource requests and limits for running pods.
Example 1: Vertical scaling with Memory Intensive Application
Consider an application that processes large datasets and occasionally requires significant memory. The VPA can be set up to manage the memory resources dynamically.
apiVersion: autoscaling.k8s.io/v1 |
Configuration Explanation:
- targetRef: Specifies the Kubernetes object (Deployment in this case) that the VPA will manage.
- updateMode: Auto: VPA will automatically update the pods with the recommended CPU and memory requests and limits.
- resourcePolicy: Defines the resource constraints for the containers managed by the VPA.
- containerName: ‘*’: Applies the policy to all containers in the specified pod.
- minAllowed and maxAllowed: Set the minimum and maximum memory limits that VPA can set for the containers.
Example 2: Vertical scaling for a CPU-Intensive Service
For a service that may experience varying CPU loads, such as a web server handling fluctuating traffic, the VPA can help manage CPU resources efficiently.
apiVersion: autoscaling.k8s.io/v1 |
Configuration Explanation:
- targetRef: Targets the web-server Deployment for resource management.
- updateMode: Auto: Allows VPA to automatically adjust resource limits and requests.
- resourcePolicy: Sets specific resource guidelines for the VPA to follow.
- containerName: web-container: Specifies which container in the pod to apply the policy to.
- minAllowed and maxAllowed: Define the minimum and maximum CPU resources. The cpu: 200m means 200 millicores (or 0.2 cores), and cpu: 2 means 2 cores.
These examples show how VPA can be configured to manage resources for different types of workloads. The minAllowed and maxAllowed parameters in the resourcePolicy section are particularly important, as they prevent the VPA from setting the resources too low or too high, ensuring the application has the resources it needs without wasting capacity.
Where VPA shines | |
Stateful Applications | For applications like databases that may require more memory as the dataset grows, VPA can adjust the memory request and limit to match the usage pattern. |
Resource-intensive Batch jobs | Batch jobs processing large amounts of data might need more CPU or memory resources intermittently. VPA ensures these resources are allocated dynamically as needed. |
Horizontal Pod Autoscaler (HPA)
HPA scales the number of pod replicas in a deployment, replication controller, replicaset, or stateful set based on observed CPU utilization, memory usage, or custom metrics. It integrates with Metrics Servicer for resource-based metrics and can also use custom metrics provided through the custom metrics API. HPA configuration involves defining min and max replica counts and the target metric values for scaling.
Example 1: Horizontal Scaling Based on CPU Utilization
This example shows an HPA configuration that scales based on CPU utilization:
apiVersion: autoscaling/v2beta2 |
Explanation:
- scaleTargetRef: Specifies the target resource (a Deployment named cpu-intensive-app) to be scaled by HPA.
- minReplicas and maxReplicas: Define the minimum and maximum number of pod replicas allowed (here 2 and 10 respectively).
- metrics: The section where we define what metric the HPA should monitor for scaling decisions.
- type: Resource: Indicates that the HPA is scaling based on a resource metric, in this case, CPU.
- name: cpu: Specifies that the CPU utilization is the metric to be monitored.
- target: Defines the target value for CPU utilization. Here, it’s set to scale up when the average CPU utilization across all pods exceeds 80%.
Example 2: Horizontal Scaling Based on Custom Metrics
This example demonstrates an HPA configuration that uses custom metrics for horizontal scaling. Let’s assume the application needs to scale based on the number of requests per second.
apiVersion: autoscaling/v2beta2 |
Explanation:
- scaleTargetRef: Targets the web-app Deployment.
- minReplicas and maxReplicas: Set to 3 and 15, respectively, indicating the range within which the HPA can adjust the replica count.
- metrics:
- type: Pods: Indicates that the scaling is based on a metric that is measured per pod.
- metric: Specifies the custom metric to monitor, in this case, http_requests.
- target:
- type: AverageValue: The scaling action is triggered based on the average value of the specified metric across all pods.
- averageValue: 1000m: This means the HPA will scale out the number of pods when the average number of HTTP requests per second, per pod, exceeds 1000.
In both examples, the HPA monitors specified metrics and automatically adjusts the number of pod replicas in the target deployment to meet the defined conditions. By leveraging these configurations, you can ensure that your application scales dynamically in response to actual workload demands, maintaining performance and resource efficiency.
| Where HPA shines | |
| Web applications with variable traffic | For a web service experiencing varying traffic throughout the day, HPA can scale the number of replicas to accommodate the changing load, ensuring consistent performance and preventing data loss in the case of hardware or software failure |
| Microservices in a service-oriented architecture | In a microservices architecture, individual services might need to scale independently based on demand. HPA allows each service to scale based on its specific load. |
When to Use Horizontal vs Vertical Scaling
Now that you have an in-depth understanding of HPA and VPA, let’s discuss the technical considerations of the difference between horizontal and vertical scaling.
VPA is about optimizing the resource allocation of existing pods, best for applications with varying resource demands that are not easily parallelized. Scale vertically when:
- You have applications with unpredictable resource requirements that change over time.
- The workload cannot be easily divided into more instances or replicas.
On the other hand, HPA focuses on scaling out or in the number of replicas to handle workload changes, suitable for applications that can be parallelized effectively. Use horizontal scaling when:
- The application can handle increased load by simply adding more instances.
- You need to respond quickly to changes in demand by scaling out.
It’s also worth keeping some technical considerations in mind. HPA is often easier to implement and understand as it deals with scaling the number of replicas based on observable metrics like CPU and memory usage. On the other hand, VPA requires a deeper understanding of the application’s resource usage patterns and can lead to pod restarts when applying new resource limits, which might not be desirable in all scenarios.
Let’s summarize the major differences between horizontal scale vs vertical scale in a quick table.
| Feature | Horizontal Pod Autoscaler (HPA) | Vertical Pod Autoscaler (VPA) |
| Scaling Dimension | Scales the number of pod replicas horizontally (out or in). | Scales the resources (CPU and memory) of pods vertically (up or down). |
| Use Case | For applications with variable external demand, such as web servers or consumer-facing apps. | For applications with stable but intensive compute or memory needs that grow or shrink over time, like batch processing jobs or databases. |
| Operational Mode | Scales based on real-time defined metrics like CPU or custom metrics. | Adjusts CPU and memory requests and limits for existing pods based on usage. |
| Metric Source | Primarily uses CPU and memory utilization or custom metrics. | Uses historical and real-time CPU and memory usage data. |
| Management Complexity | Requires tuning of metrics and thresholds for scaling decisions. | Needs careful management to avoid frequent pod restarts due to resource limit changes. |
| Load balancer | Required to actively distribute workload across multiple nodes | Not required in the single node |
| Stateless vs Stateful Impact on Workloads | Can rapidly scale out to handle increased load, suitable for stateless applications. | Adjusts pod resources which can lead to pod restarts, more suitable for stateful applications or those with steady stateful behavior. |
Understanding the Suitability of VPA for Stateful Applications and HPA for Stateless Services
Whether your application is stateless or stateful has a major impact on whether you should use HPA or VPA to optimize your resources. Let’s delve deeper into the reasons why.
Stateful applications are generally suited to VPA
Stateful applications, like databases or data processing systems, maintain a continuous state across sessions or transactions. They often have specific resource requirements that can change based on the workload, data volume, or complexity of operations. Generally, vertical scaling suits stateful applications for the following reasons:
- Stateful applications are sensitive to resource configuration. VPA fine-tunes CPU and memory allocations based on usage patterns, ensuring that these applications have enough resources to operate efficiently without over-provisioning.
- VPA adjusts the resources of each pod individually, which aligns with the nature of stateful applications where scaling the application often means scaling the resources per instance, rather than increasing the number of instances.
- VPAs minimize disruption for stateful applications. While VPA can cause pods to restart when adjusting resources, stateful applications are typically designed to handle such disruptions gracefully, preserving their state and recovering quickly.
Unlike VPA, HPA is not always ideal for stateful applications. Scaling stateful applications horizontally (increasing the number of pods) can complicate state management and data consistency, requiring sophisticated mechanisms to synchronize state across replicas.
Stateless Applications are not generally suited to VPA
The horizontal scaling approach to increasing the number of instances aligns better with the scalability needs of stateless applications. In contrast, it can be challenging to use VPA with Stateless Applications.
Stateless applications, such as front-end web servers, can handle requests independently of one another and don’t maintain any internal state between transactions. While vertical scaling can be used with stateless applications, it may not always be the best approach
- Pod restarts can disrupt stateless applications: Stateless applications often prioritize availability and quick response times. VPA’s method of restarting pods to adjust resources can lead to temporary unavailability, which might be undesirable for high-traffic stateless services.
- VPA has scalability constraints. VPA scales the resources vertically, which has its limits. For stateless applications that can easily scale out, horizontal scaling is often more effective in handling sudden traffic spikes by adding more replicas instead of increasing the size of existing ones.
Using Vertical and Horizontal Scaling Together
While VPA and HPA can be used independently, careful consideration is required when using them together to avoid conflicting scaling actions. VPA focuses on adjusting individual pod resource limits based on usage history, which optimizes for the resource allocation of each pod. On the other hand, HPA scales the number of pods in a deployment based on current CPU usage to handle traffic demands. This divergence can lead to situations where VPA’s recommendations for resource reduction conflict with HPA’s need to scale out, potentially causing resource contention or under-provisioning. Additionally, the complexity of managing both autoscalers together can increase the risk of misconfiguration.
If you’re going to use them together, it is advised to use VPA for setting resource requests accurately and HPA for managing the number of instances based on those resource requests.
To learn more about using HPA and VPA together, check out our recent podcast on multidimensional pod autoscaling.
Advanced Kubernetes scaling Tools: Goldilocks and KEDA
For a more comprehensive and understanding of Kubernetes autoscaling, let’s now discuss how advanced tools like Goldilocks and KEDA fit into the equation. These tools can help optimize Kubernetes autoscaling by fine-tuning resource requests and implementing custom scaling rules.
Goldilocks: Fine-Tuning Pod Resources
Goldilocks is an open source Kubernetes controller that provides recommendations for CPU and memory resources per pod, based on historical usage data. It identifies the “just right” settings each pod should request and limit to prevent resource wastage and OOM kills. These insights help fine-tune your VPA configurations, ensuring resource requests and limits more closely match actual usage patterns for improved resource efficiency.
Tip: Use Goldilocks to regularly review and adjust the resource allocations of pods, ensuring that VPA’s configurations are always in line with the actual resource usage patterns, helping to maintain an optimal balance between resource availability and cost.
Example configuration:
apiVersion: goldilocks.v1 |
This example shows a simplified representation of how Goldilocks could generate VPA recommendations for a deployment named my-service.
KEDA: Event-Driven Autoscaling
KEDA, or Kubernetes Event-Driven Autoscaling, introduces a different dimension to autoscaling by focusing on event-driven triggers. It allows scaling of Kubernetes deployments based on events from a variety of sources like message queues, database changes, or external metrics.
KEDA extends HPA capabilities by allowing it to scale deployments based on the number of events needing processing, rather than traditional metrics like CPU and memory utilization. It dynamically adjusts the HPA configurations based on custom metrics from external event sources.While VPA adjusts the resource allocation per pod, KEDA ensures that the number of pods matches the workload generated by external events, making it a powerful tool in event-driven architectures.
Tips:
- KEDA is especially useful in microservices architectures where different components need to scale based on the rate of events they process.
- It requires careful configuration of event sources and scaling thresholds to ensure that pods scale effectively in response to workload changes.
Example Configuration:
apiVersion: KEDA.sh/v1alpha1 |
In this example, KEDA is configured to scale my-event-driven-app based on the length of a queue named my-queue. The deployment will scale out if there are more than 5 messages in the queue, providing an efficient response to fluctuating event volumes.
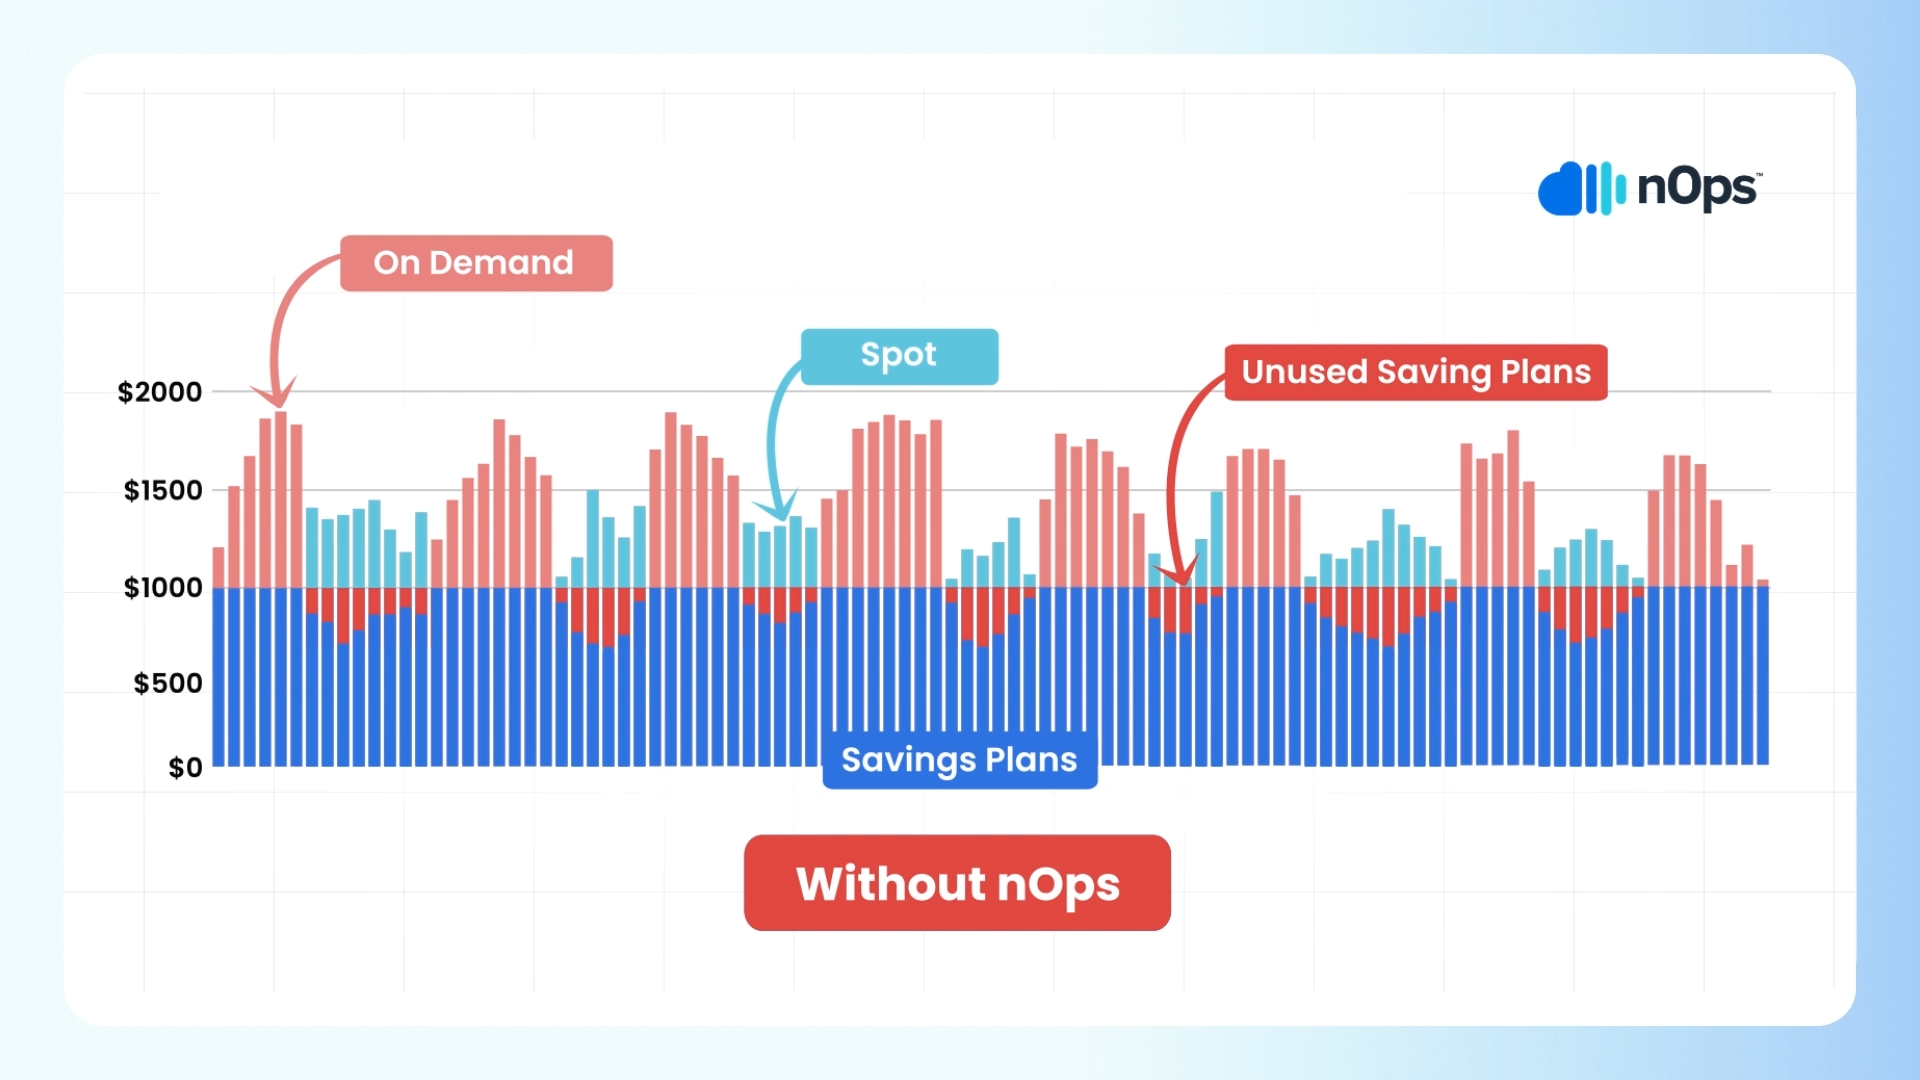
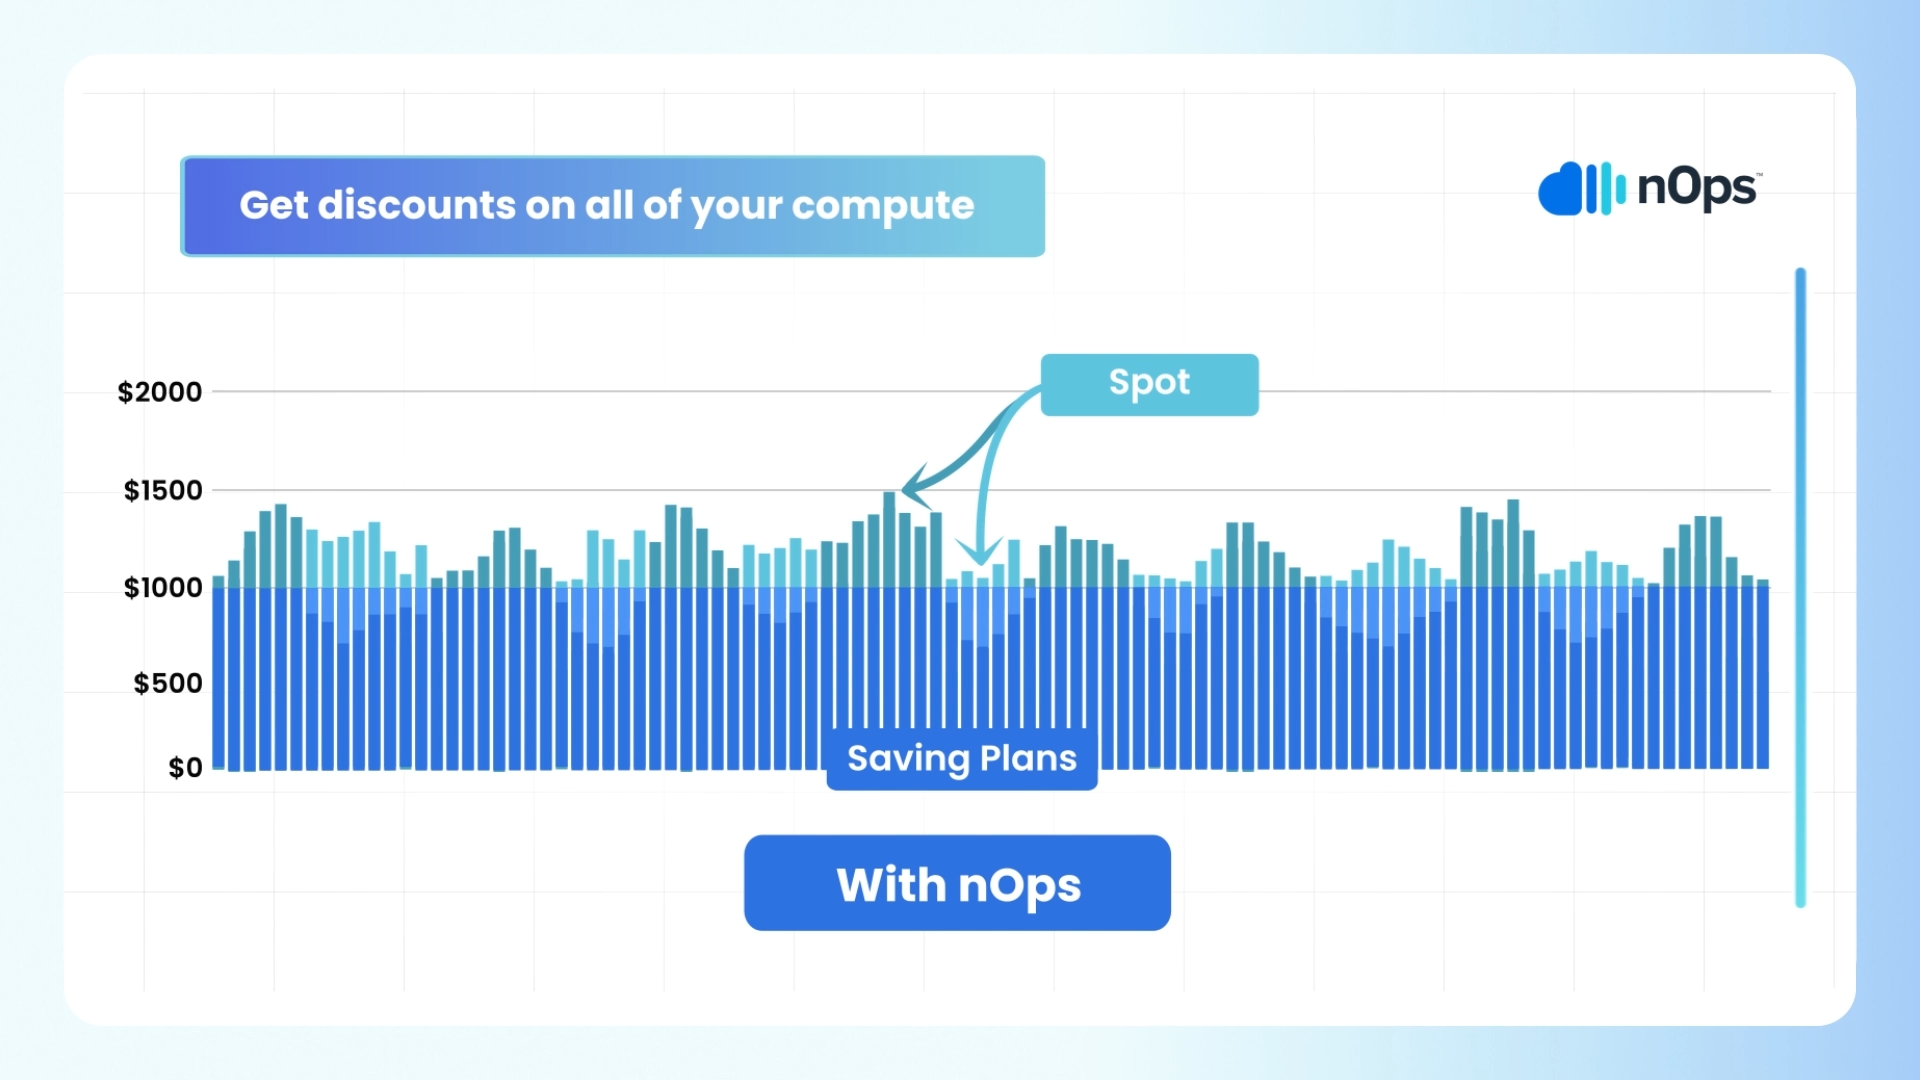
Optimize EKS with nOps
If you’re looking to optimize your EKS utilization and costs, nOps can help. Just simply integrate it with Karpenter or Cluster Autoscaler to start saving.
nOps offers proprietary AI-driven management of instances for the best price in real time. It continually analyzes market pricing and your existing commitments to ensure you are always on the best blend of Spot, Reserved, and On-Demand, gracefully replacing nodes before termination. Here are a few of the benefits:
- Hands free. Copilot automatically selects the optimal instance types for your EKS workloads, freeing up your time to focus on building and innovating. As your dynamic usage scales, Copilot continually reconsiders your instance placement.
- Effortless Spot savings. Copilot makes it easy to benefit from Spot savings. nOps predicts terminations 60 minutes in advance, putting you on diverse and safe Spot options to greatly reduce unexpected interruptions. In fact, our Spot SLAs are the same as AWS On-Demand.
- No vendor-lock in or upfront cost. Just plug in your AWS-native EKS clusters to start saving effortlessly, and change your mind at any time.
Our mission is to make it easy for engineers to cost-optimize, so that they can focus on building and innovating. nOps was recently ranked #1 in G2’s cloud cost management category.
Join our customers using nOps to cut cloud costs and leverage automation with complete confidence by booking a demo today!