Skip to content

- Blog
- EKS Optimization
- Cluster Autoscaler Lifecycle Management & Cost Optimization | Part 2: Pod Priority & Preemption
Cluster Autoscaler Lifecycle Management & Cost Optimization | Part 2: Pod Priority & Preemption
In this blog series, we’ll discuss best practices and practical information regarding effective Cluster Autoscaler lifecycle management, with a focus on optimizing resource utilization and costs.
In Part 1, we delved into the importance of Pod Disruption Budgets and the crucial role of maintaining replicas across multiple nodes in EKS. In Part 2, let’s explore another vital aspect of effective EKS Life Cycle Management: Pod Priority and Preemption.
What are Pod Priority and Preemption?
Real World Use Case of Pod Priority and Preemption
Imagine you’re running a Kubernetes cluster for a large e-commerce platform. Within this cluster, you have various microservices handling different aspects of the platform, such as product catalog management, user authentication, order processing, and payment handling.
Now, let’s say there’s a sudden surge in traffic due to a flash sale event, causing a spike in user activity. During this peak period, the order processing microservice, which is critical for handling customer orders and generating revenue, experiences increased demand for resources.
Without Pod Priority and Preemption, you run into resource allocation issues. As the cluster reaches its resource limits due to the increased workload, new pods for critical services (like order processing) struggle to be scheduled because lower priority pods (like product catalog management) are consuming too many resources. This leads to degraded performance or even service failures, impacting the user experience and potentially resulting in lost sales.
With Pod Priority and Preemption, you have configured Pod Priority to prioritize the order processing microservice pods over less critical services. As a result, the order processing microservice is able to handle the surge in traffic efficiently.
Why is it important to configure Pod Priority and Preemption along with Cluster Autoscaler in your EKS cluster?
Cluster Autoscaler helps in dynamically adjusting the number of nodes in your cluster based on resource demands. However, it does not always immediately address the needs of high-priority or critical pods in situations where resources become constrained. Even though Cluster Autoscaler can scale up the cluster, it’s still beneficial to ensure that the most important workloads get the resources they need without unnecessary delays. Therefore, Pod Priority and Preemption can help ensure that high-priority pods are scheduled and allocated resources promptly, even before Cluster Autoscaler has scaled up the cluster to meet increased demand.
Additionally, Cluster Autoscaler with EKS only adjusts the desired capacity of the Auto Scaling Group (ASG) based on the pending pods or nodes in the cluster. However, the maximum capacity of the ASG, which represents the upper limit of how many instances can be provisioned, is typically set manually and independently of the Cluster Autoscaler. The Cluster Autoscaler will not automatically adjust the maximum capacity. Therefore, when the desired capacity is already equal to the maximum capacity and a high-priority deployment needs more capacity, Cluster Autoscaler won’t be able to continue scaling the cluster, and Pod Priority and Preemption becomes even more important in this scenario to ensure that high-priority deployments get the necessary capacity.
To sum it up, while Cluster Autoscaler scales your cluster based on overall resource demands, configuring Pod Priority and Preemption allows you to fine-tune the scheduling and eviction behavior within your cluster, especially for critical workloads or resource allocation optimization. Depending on your specific use case/workload requirements, it might still be beneficial to configure both features together.
How to configure Pod Priority and Preemption in an EKS cluster
1. Create Priority Class:
Define priority classes that specify the priority level of pods. PriorityClass resources are used to assign a priority value to pods. Higher priority values indicate higher priority. You can create a PriorityClass by creating a YAML file and applying it to the cluster using kubectl apply -f . The globalDefault field in the PriorityClass configuration indicates whether the priority class should be considered as the default priority class for Pods that do not specify a priorityClassName.
{ apiVersion: scheduling.k8s.io/v1 kind: PriorityClass metadata: name: high-priority value: 1000000 globalDefault: false description: "This priority class is for high priority pods." } 2.Assign the Priority Class to Pods:
{ Copy code apiVersion: apps/v1 kind: Deployment metadata: name: my-deployment spec: replicas: 3 selector: matchLabels: app: my-app template: metadata: labels: app: my-app spec: containers: - name: my-container image: my-image:latest priorityClassName: high-priority } 3.Test the Setup:
How PodPriority and Preemption can Maximize Cost Efficiency
Without mechanisms like PodPriority and Preemption, you risk needing to over-provision resources to ensure that critical workloads always have enough capacity, leading to higher costs due to unused resources. By dynamically allocating resources based on workload priorities, you can optimize resource utilization and potentially reduce the need for over-provisioning.
How Pod Priority and Preemption can help you save money with Spot
Configuring Pod Priority and Preemption properly become even more critical when using Spot instances for cost-optimization.
AWS Spot instances can save you up to 90% in costs compared to On-Demand instances. And contrary to common belief, it is possible to use Spot instances reliably in workloads beyond stateless workloads.
However, Spot Instances come with the caveat of potential interruptions, as they can be reclaimed by AWS with short notice if the current Spot price exceeds your bid price or if capacity becomes constrained.
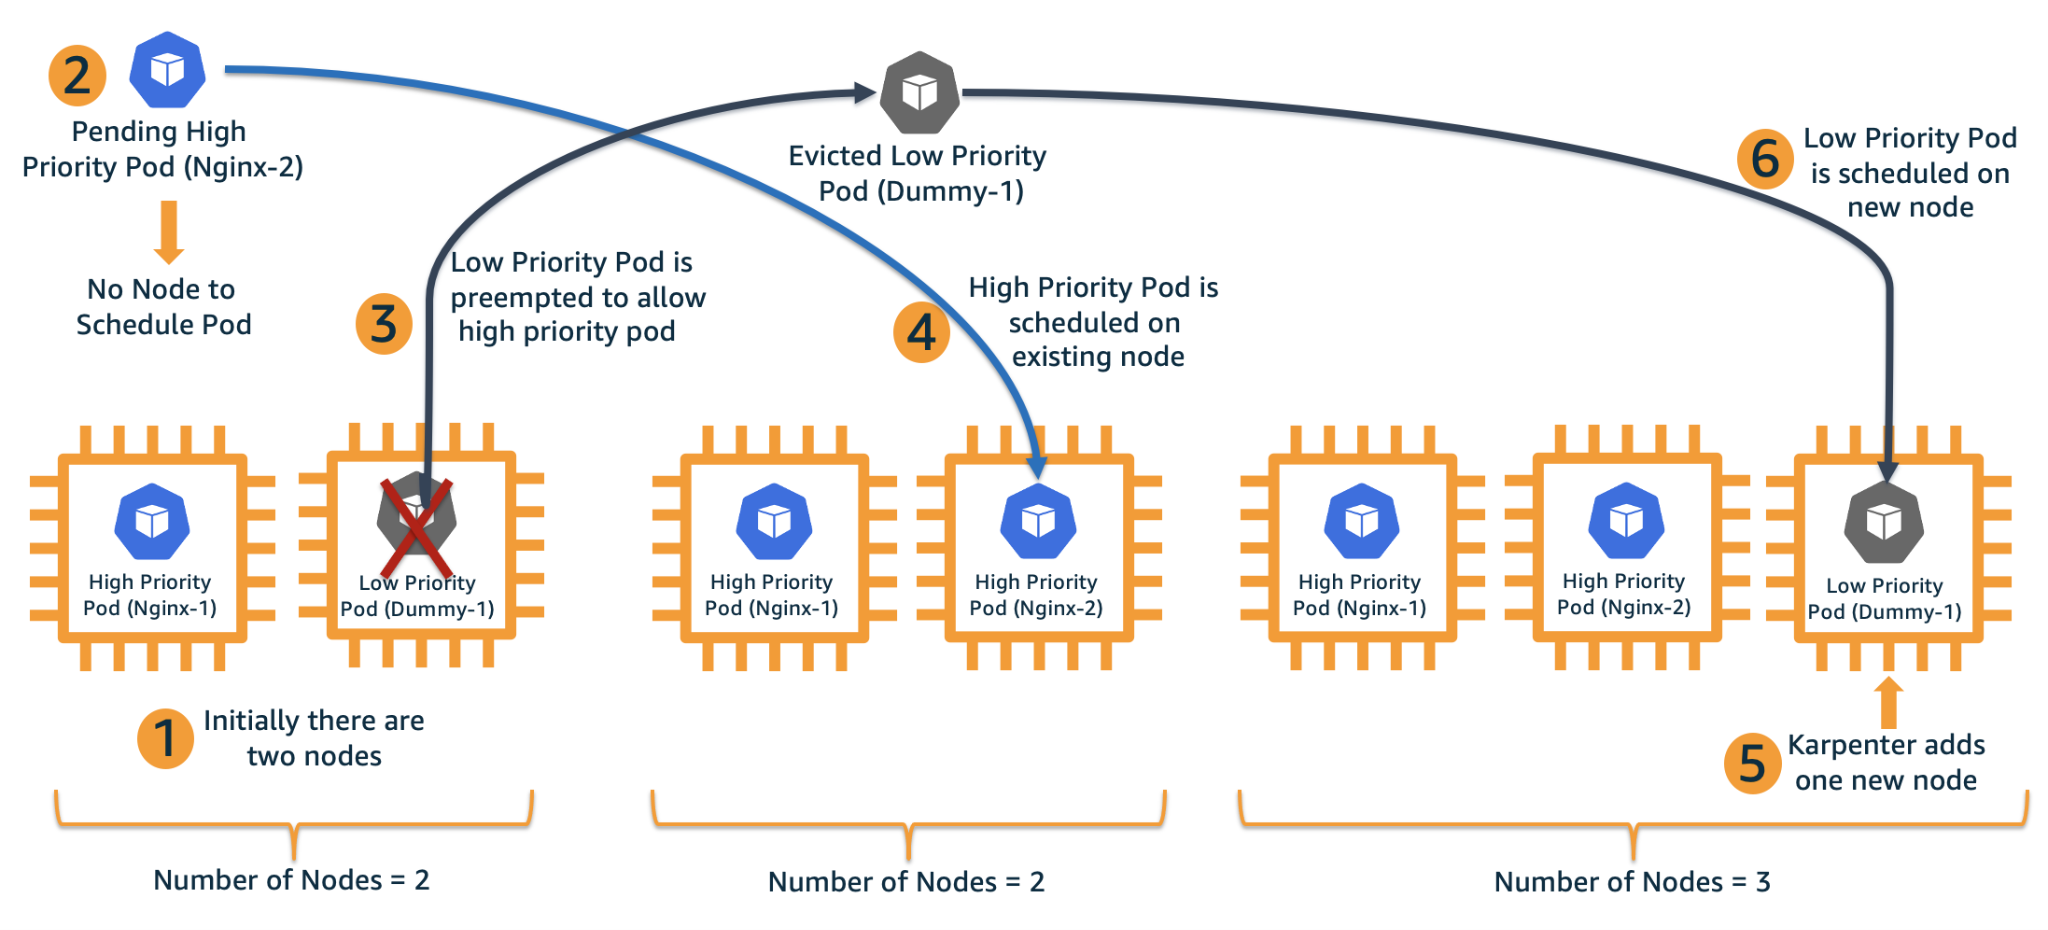
PodPriority and Preemption can help mitigate the impact of Spot instance interruptions by allowing you to gracefully handle them. For example, if a Spot instance running high priority pods gets interrupted, lower-priority pods can be preempted, allowing critical workloads to continue running in another node while the cluster is still waiting for Cluster Autoscaler to automatically adjust the number of instances in the cluster.
In addition to PodPriority and Preemption and other important configurations detailed in the part 1 of this blog series, there’s another highly beneficial tool that enhances the reliability and cost-effectiveness of your environment by increasing the lifetime of Spot instances in your cluster: Compute Copilot.
What is Compute Copilot?
At nOps, our class-leading ML makes it easy to get the best prices and highest reliability for Spot. We offer a fully turnkey solution, providing you with a simple management dashboard to configure your savings. Once configured, it intelligently provisions all your compute automatically so you get the best pricing available without sacrificing reliability.
And with awareness of your organization-wide commitments, it ensures you’re on the most reliable and cost effective blend of Spot, Savings Plans, Reserved Instances and On-Demand.
Here are the key benefits of using Compute Copilot for easy, hassle-free savings.
- Effortless cost savings & reliability. Copilot continually moves your workloads onto optimal Spot instance types, gracefully draining nodes in the process.
- No vendor-lock in. Just plug in your preferred AWS-native service (EC2 ASG, EC2 for Batch, EKS with Karpenter or Cluster Autoscaler…) to start saving effortlessly, and change your mind at any time.
- No upfront cost. You pay only a percentage of your realized savings, making adoption risk-free.
nOps manages over $1.5 billion in cloud spend and was recently ranked #1 in G2’s cloud cost management category. Join our customers using nOps to slash your cloud costs and leverage Spot effortlessly by booking a demo today.
Last Updated: May 21, 2025, EKS Optimization
Last Updated: May 21, 2025, EKS Optimization