Cluster Autoscaler Lifecycle Management & Cost Optimization | Part 1
Part 1: Pod Disruption Budgets and the Importance of Replicas Across Multiple Nodes in EKS
Managing Kubernetes clusters efficiently is crucial for optimizing costs without compromising performance and availability. Amazon Elastic Kubernetes Service (EKS) coupled with Cluster Autoscaler provides a powerful solution for automatically scaling clusters based on resource utilization and workload demands. This automation helps ensure optimal resource allocation and efficient operation of the cluster. Learn more on cost optimization with Cluster Autoscaler.
In this blog series, we’ll discuss best practices and practical how-to information regarding effective EKS lifecycle management, in other words, the processes and practices surrounding the deployment, scaling, and maintenance of resources within a Kubernetes cluster. This article will focus on how you can use Cluster Autoscaler with Pod Disruption Budgets and Pod Topology Spread Constraints to safeguard your applications against disruptions, while optimizing your resource utilization and costs.
What is a Pod Disruption Budget, and why are they important for scaling with Cluster Autoscaler?
A Pod Disruption Budget (PDB) is a Kubernetes feature that allows you to control voluntary disruptions on a group of Pods, such as those caused by maintenance tasks or scaling events. It helps ensure applications remain highly available by specifying the minimum number or percentage of Pods that must remain available.
PDBs help prevent too many Pods of a certain application from being unavailable simultaneously, which could potentially lead to service disruption or degradation. For example, you might have a stateful application with multiple replicas, and you want to ensure that at least a certain number of replicas remain available at all times.
The Cluster Autoscaler dynamically adjusts the desired capacity of the Autoscaling Group associated with a node group in your EKS cluster. This means that nodes might be added or removed based on the workload demands. When a node needs to be removed, a draining process is started to ensure that all its running pods are rescheduled onto other nodes; this is where PDB help prevent too many pods becoming unavailable simultaneously leading to application downtime and disruptions.
How to create Pod Disruption Budgets?
Creating a PDB object involves defining a YAML file that specifies the criteria for allowing disruptions. Here are the steps involved:
Step 1: Understand Application Requirements
Before creating a PDB, it’s essential to have a clear understanding of the application’s high availability and resilience requirements:
- How many instances of your application can be down at the same time without affecting service? (Do you have a single vs multiple instance stateful application, restartable batch job, etc.)
- Are there specific times when disruption tolerance is higher or lower?
These considerations will guide the configuration of your PDB.
Step 2: Define PDB YAML File
Create a YAML file for your PDB – myapp-pdb.yaml. Within spec, define either minAvailable or maxUnavailable to control how many available pods with the label app: myapp can be disrupted:
- minAvailable: Specifies the minimum number of pods that must remain available. Can be set as an absolute number (e.g., 2) or a percentage (e.g., 60%).
- maxUnavailable: Specifies the maximum number of pods that can be unavailable. Also can be an absolute number (e.g., 1) or a percentage (e.g., 40%).
Here is a sample PDB YAML file:
apiVersion: policy/v1
kind: PodDisruptionBudget
metadata:
name: myapp-pdb
spec:
minAvailable: 2
selector:
matchLabels:
app: myapp
This PDB ensures that at least two instances of the application labeled myapp are always available. Here’s an example PDB configuration that uses percentages:
apiVersion: policy/v1
kind: PodDisruptionBudget
metadata:
name: myapp-pdb
spec:
minAvailable: 60%
selector:
matchLabels:
app: myapp
This PDB ensures that at least 60% of the pods matching app: myapp remain available during any voluntary disruptions.
Using percentages in Pod Disruption Budgets is particularly beneficial for deployments that scale based on demand. As your application scales up, a percentage-based PDB automatically adjusts to ensure that a consistent proportion of your application remains available, without needing manual adjustments.
Step 3: Apply the PDB
Deploy the PDB to your cluster with:
kubectl apply -f myapp-pdb.yaml
Step 4: Confirm the PDB is Active
Check the status of your PDB with:
kubectl get pdb
For more detailed information, including which pods are currently covered by the PDB, use:
kubectl describe pdb myapp-pdb
When working with a cluster autoscaler, remember that PDBs can impact how and when nodes can be scaled down. If a large portion of nodes is underutilized, but pods on those nodes are protected by PDBs, the cluster autoscaler will respect Pod Disruption Budgets. By using percentages, we ensure that the PDBs allow for enough flexibility to let the autoscaler optimize resource usage efficiently, maintaining application performance while minimizing costs.
Configuring PDBs Effectively
Even with PDBs in place, misconfigurations can lead to unexpected consequences. Let’s discuss the most important and useful best practices and configuring pitfalls, so you can ensure you’re leveraging and configuring PDBs effectively for minimizing downtime and disruptions.
Matching Minimum Available to Replica Count
One common misconfiguration is setting the minimum available value in the PDB to match the replica count of the deployment or service. This configuration leaves no room for maneuvering during a voluntary disruption. For example, if you have a deployment with 5 replicas, and you set your PDB’s minimum available to 5, Kubernetes is left with no flexibility to evict any pod, even for critical maintenance or auto-scaling down actions. This could lead to scenarios where necessary maintenance is delayed, or resources are underutilized. A better approach would be for the cluster administrator to set the minimum available to a number that allows some flexibility, such as 4 out of 5, ensuring that maintenance and scaling activities can proceed without completely disrupting service for the pods controlled
Here is a simple example of a bad configuration:
apiVersion: policy/v1
kind: PodDisruptionBudget
metadata:
name: example-pdb
spec:
minAvailable: 3 # For a deployment with 3 replicas
selector:
matchLabels:
app: myapp
Note: only an integer value can be used with .spec.minAvailable, not a percentage.
The Importance of Replicas Across Multiple Nodes in EKS to maintain high availability
When configuring Pod Disruption Budgets for a service, the primary objective is to fortify its resilience and safeguard against downtime. As such, you don’t want to confine all replicas of the service to a single node — risking downtime in the event that this node faces termination or health issues.
You can disperse service replicas across various nodes with a Kubernetes feature called “Pod Topology Spread Constraints”. These allow you to specify rules for how Pods should be spread across the nodes in a cluster. You can dictate the distribution of Pods within your cluster across various failure domains such as regions, zones, nodes, and custom-defined topology domains.
To leverage Pod Topology Spread Constraints for distributing your application's pods across different nodes, follow these instructions:
1. Define Deployment yaml:
Create a YAML file named myapp-deployment.yaml with the following content. This file defines a deployment that manages a simple application with three replicas. Deploy the config using kubectl apply -f myapp-deployment.yaml
apiVersion: apps/v1
kind: Deployment
metadata:
name: myapp-deployment
spec:
replicas: 3
selector:
matchLabels:
app: myapp
template:
metadata:
labels:
app: myapp
spec:
containers:
– name: myapp-container
image: nginx
topologySpreadConstraints:
– maxSkew: 1
topologyKey: “kubernetes.io/hostname”
whenUnsatisfiable: ScheduleAnyway
labelSelector:
matchLabels:
app: myapp
YAML example for a simple application with three replicas, using a label selector.
This configuration ensures that your deployment’s pods are spread out across different nodes, enhancing your application’s resilience and maintaining high availability. The maxSkew: 1ensures that pods are distributed as evenly as possible, considering the number of pods across nodes identified by kubernetes.io/hostname.
2. Define Pod Disruption Budget yaml:
Create a YAML file named myapp-pdb.yaml with the following content. This PDB configuration ensures that at least two replicas of your application remain available during a voluntary disruption. Apply this configuration using kubectl apply -f myapp-pdb.yaml
apiVersion: policy/v1
kind: PodDisruptionBudget
metadata:
name: myapp-pdb
spec:
minAvailable: 2
selector:
matchLabels:
app: myapp
For more information on how to spread pods across multiple nodes, please refer to the Kubernetes documentation for Pod Topology Spread Constraints.
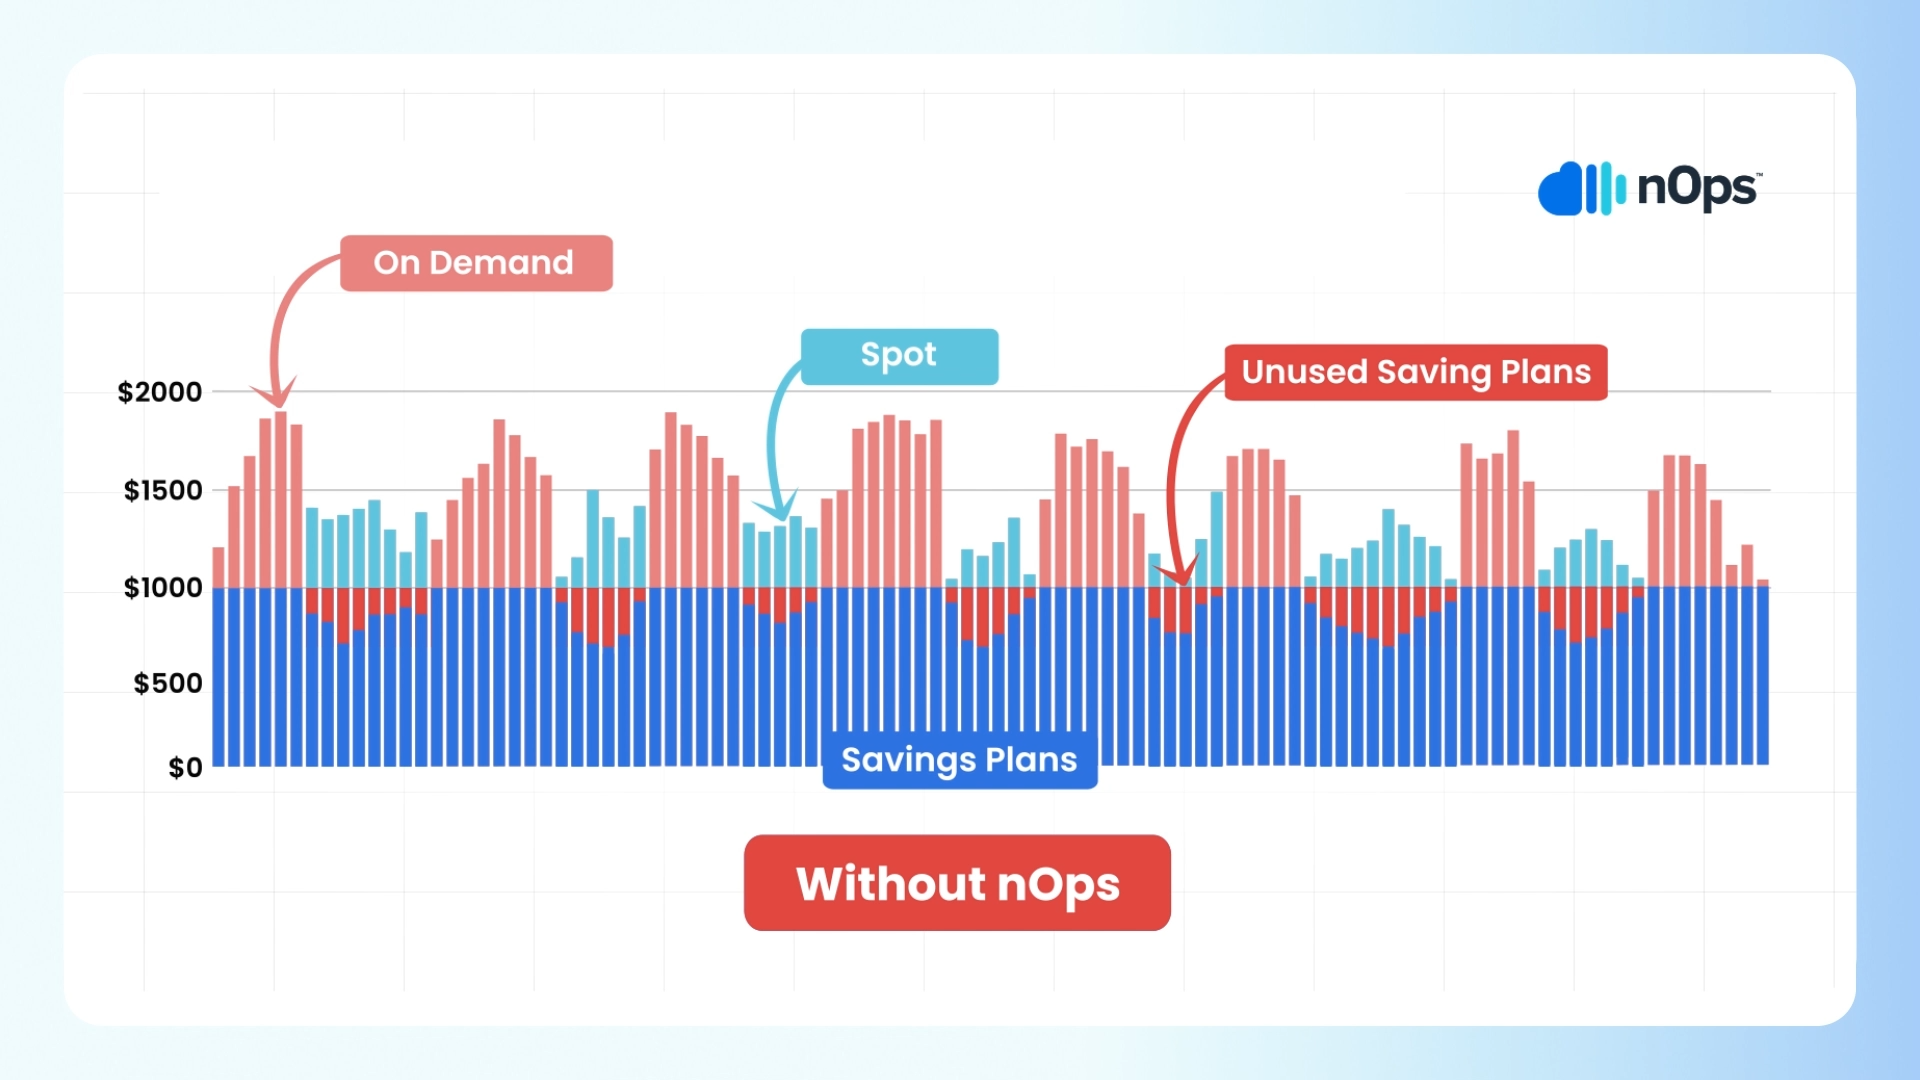
Leveraging Pod Disruption Budgets and replica distribution to save with Spot instances in your Kubernetes cluster
Spreading service replicas across multiple nodes and configuring PDBs properly become even more critical when using Spot instances for cost-optimization.
AWS Spot instances can save you up to 90% in costs compared to On-Demand instances. And contrary to common belief, it is possible to use Spot instances reliably in workloads beyond stateless workloads.
However, Spot Instances come with the caveat of potential interruptions, as they can be reclaimed by AWS with short notice if the current Spot price exceeds your bid price or if capacity becomes constrained.
Therefore, by distributing service replicas across multiple nodes and properly configuring PDBs, organizations can mitigate the impact of Spot instance interruptions. As mentioned previously, if one node running Spot Instances is reclaimed, only a portion of the service’s replicas will be affected, while the remaining replicas on other nodes continue to serve traffic. This proactive distribution strategy helps maintain service availability and resilience, even in the face of Spot Instance interruptions.
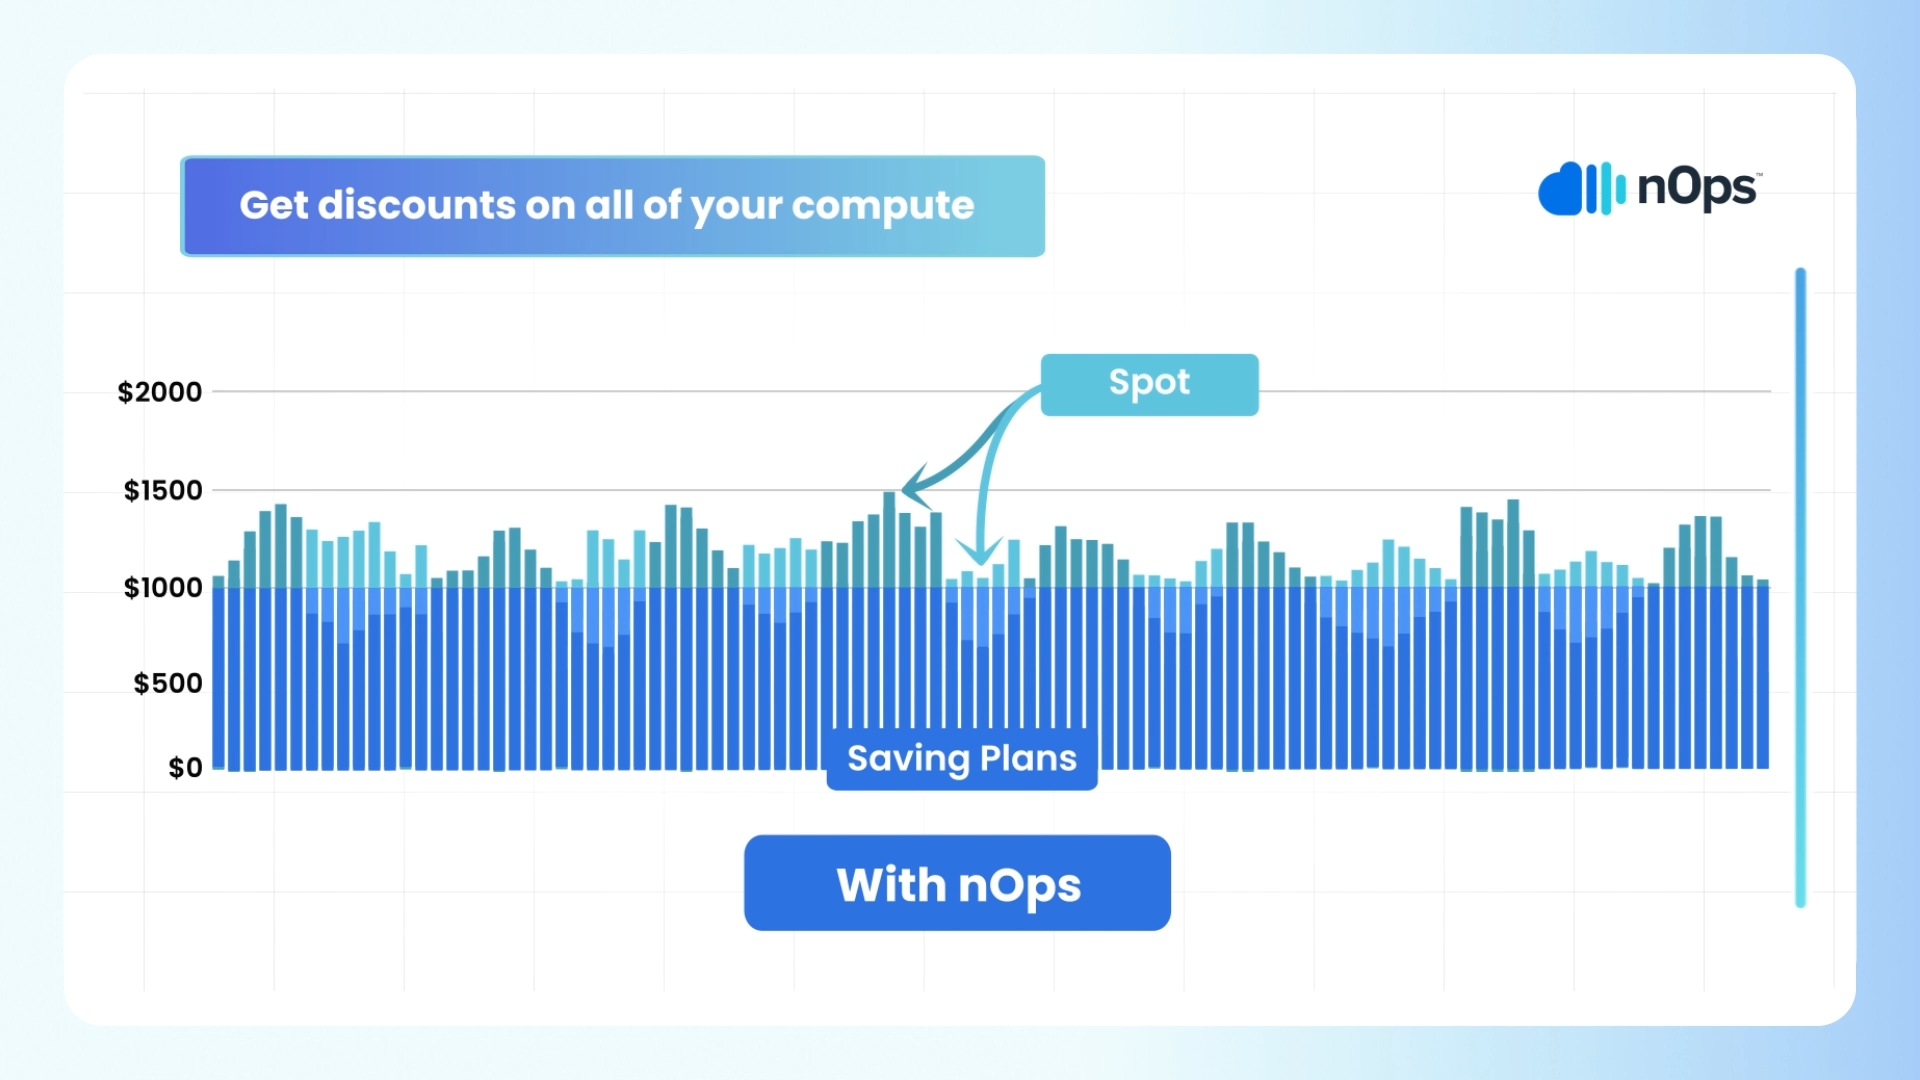
In addition to leveraging PDBs and distributing service replicas across multiple nodes, there’s another highly beneficial tool that enhances the reliability and cost-effectiveness of your environment by increasing the lifetime of Spot instances in your cluster: Compute Copilot.
What is Compute Copilot?
At nOps, our class-leading ML makes it easy to get the best prices and highest reliability for Spot. We offer a fully turnkey solution, providing you with a simple management dashboard to configure your savings. Once configured, it intelligently provisions all your compute automatically so you get the best pricing available without sacrificing reliability.
And with awareness of your organization-wide commitments, it ensures you’re on the most reliable and cost effective blend of Spot, Savings Plans, Reserved Instances and On-Demand.
Here are the key benefits of using Compute Copilot for easy, hassle-free savings.
- Effortless cost savings & reliability. Copilot continually moves your workloads onto optimal Spot instance types, gracefully draining nodes in the process.
- No vendor-lock in. Just plug in your preferred AWS-native service (EC2 ASG, EC2 for Batch, EKS with Karpenter or Cluster Autoscaler…) to start saving effortlessly, and change your mind at any time.
- No upfront cost. You pay only a percentage of your realized savings, making adoption risk-free.
nOps manages over $1.5 billion in cloud spend and was recently ranked #1 in G2’s cloud cost management category. Join our customers using nOps to slash your cloud costs and leverage Spot effortlessly by booking a demo today.