Skip to content

Spot-to-Spot Consolidation in Karpenter: Best Practices
Karpenter offers advanced scheduling and auto-scaling capabilities for EKS, improving application availability and cluster efficiency by rapidly launching right-sized compute resources in response to changing application load.
One key benefit of Karpenter is its built-in native support for Spot instances. EC2 Spot Instances are spare EC2 capacity available for up to 90% off compared to On-Demand prices. However, Spot instances can be interrupted by AWS when the capacity is needed back. Karpenter makes it easier to save with Spot by automatically cordoning and draining nodes, and launching a new node as soon as it sees the Spot interruption warning.
In this article, we’ll walk you through why Spot-to-Spot consolidation is critical, how it works and how to use it.
What is Spot-to-Spot consolidation?
Spot-to-Spot consolidation is a Karpenter feature that replaces existing Spot nodes with cheaper, equivalent Spot instances when available. It continuously scans for better-priced capacity across instance types and Availability Zones. If a more cost-effective option meets the same scheduling constraints, Karpenter gracefully evicts pods from the original node and launches a replacement—optimizing costs without disrupting workloads.
How to enable Spot-to-Spot consolidation in Karpenter
Since v0.34.0, you can enable the feature gate to use Spot-to-Spot consolidation. This feature can be enabled in two ways:
Option 1: During Helm install
Install the Karpenter chart.
Add the following argument:
--set settings.featureGates.SpotToSpotConsolidation=true
Option 2: Post-install
Update Karpenter configuration using environment variables or CLI parameters.
Restart the controller to apply changes.
More info here.
Importance of Spot-to-Spot Consolidation in Karpenter
Without Spot-to-Spot consolidation, nodes running Spot instances may continue to operate underutilized or idle after their initial workloads have completed.
Consider this very common scenario: You’re scheduling big batches of workloads, which tend to get scheduled on very large worker nodes.
Without Spot-to-Spot consolidation, Karpenter won’t consider consolidating the workloads that are on your Spot instances. That means that if you’ve finished half of those workloads, the pods go away — but half of those nodes are left sitting there still running, driving up costs indefinitely.
In the real world, we see this all the time. Often, teams don’t even know how much excess capacity they have in their Kubernetes clusters.
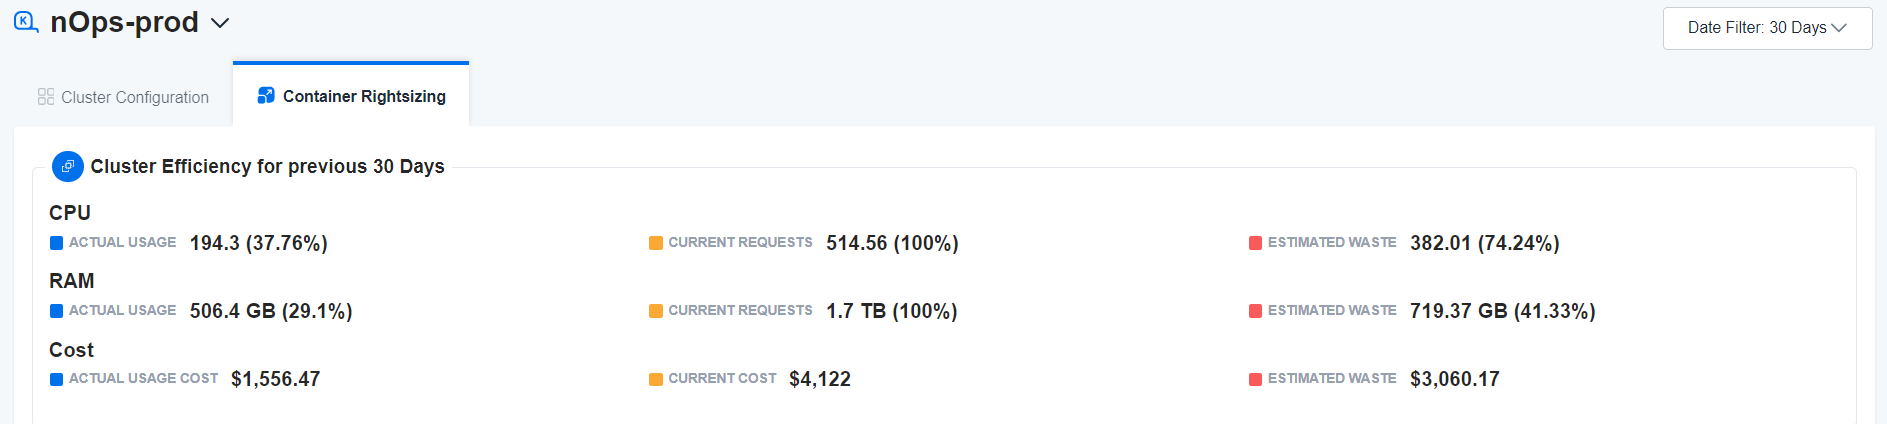
If this sounds familiar, the nOps dashboard shows you at a glance how much excess capacity you have in your clusters.
If you’re excess capacity is very high, you can look at your container usage over time to ask why this is the case. If you’re nodes aren’t being consolidated very well, the Spot-to-Spot consolidation feature just might be the solution to your problem.
How Does Spot-to-Spot Consolidation Work?
Let’s explore this Karpenter feature and how it works, before getting into some best practices.
Karpenter Workload consolidation
First, let’s briefly take a step back and talk about workload consolidation in Karpenter.
Karpenter works to actively reduce overprovisioning and thus cluster cost by identifying opportunities to consolidate nodes. This occurs when:
- Nodes can be removed because the node is empty
- Nodes can be removed as their workloads can be rescheduled onto other nodes in the cluster.
- Nodes can be replaced with lower priced and rightsized variants due to a change in the workloads.
In general, Karpenter prefers to terminate nodes running fewer pods, nodes that will expire soon, and nodes with lower priority pods.
Spot Consolidation in Karpenter
Karpenter simplifies the management of Spot instances with its Default Deletion Consolidation setting, which automatically removes Spot nodes when they are no longer needed or can be replaced for cost efficiency.
For more aggressive savings, users can enable the SpotToSpotConsolidation feature flag, allowing Karpenter to replace existing Spot nodes with other Spot nodes to further enhance cost savings.
Instance Type Flexibility
Karpenter uses a price-capacity-optimized strategy to select lower-priced Spot instances. This strategy does not always opt for the absolute lowest priced instance due to the risk of interruption, which can result in higher costs due to frequent replacement and downtime. Instead, it considers a range of options that still offer cost savings but with lower interruption risks.
Karpenter assesses “instance type flexibility,” or the number of available Spot instance types priced lower than the currently launched Spot instance. This flexibility is crucial for:
- Avoiding High Interruption Rates: By not always selecting the lowest priced instance, Karpenter avoids nodes that are highly likely to be interrupted, ensuring greater stability and reduced downtime.
- Ensuring Comparable Availability: Karpenter launches instances with enough types to ensure that the replacement instance has a similar availability profile to the current one.
The Ultimate Guide to Karpenter

For single-node Spot-to-Spot consolidations, Karpenter requires a minimum of 15 instance types to ensure sufficient flexibility. This prevents a “race to the bottom” scenario where nodes are continuously replaced with the cheapest, but least stable, instances. Multi-node consolidations do not have this flexibility requirement since the likelihood of “race to the bottom” is minimized when consolidating multiple nodes into one.
The following is an example of a flexible and diversified NodePool:
apiVersion: karpenter.sh/v1beta1 kind: NodePool metadata: name: default spec: template: spec: requirements: - key: karpenter.k8s.aws/instance-category operator: In values: ["c", "m", "r"] - key: karpenter.k8s.aws/instance-size operator: In values: ["medium" , "large", "xlarge", "2xlarge"] - key: karpenter.sh/capacity-type operator: In values: ["Spot"] nodeClassRef: name: default To sum it up, Karpenter’s Spot consolidation, especially when enhanced with the Spot-to-Spot replacement feature, can help dramatically improve your cost and operational efficiency.
Best Practices for Spot-to-Spot Consolidation in Karpenter
Use a diversified NodePool with at least 15 instance types
This ensures Karpenter has enough replacement options to safely perform single-node Spot-to-Spot consolidation without overconcentrating on volatile instance types.Avoid restricting instance size or family too tightly
Overly narrow requirements reduce flexibility and prevent Karpenter from identifying viable lower-cost alternatives. Use broadinstance-categoryandinstance-sizeconstraints.Monitor instance interruption rates and pricing volatility
Choose Spot pools with a balance of savings and stability. Karpenter avoids high-interruption zones, but you should still monitor AWS Spot capacity trends for persistent volatility.Enable consolidation features intentionally
Setconsolidation.enabled=trueand activate theSpotToSpotConsolidationfeature gate only when you’re ready to tune consolidation behavior and verify replacement patterns in production.Set pod disruption budgets (PDBs) to control eviction risk
Spot-to-Spot consolidation involves draining nodes. Use PDBs to protect critical workloads from excessive disruption during consolidation events.Tune consolidation intervals carefully
Karpenter’s consolidation loop runs periodically—avoid overly aggressive intervals that lead to unnecessary replacements, especially for transient workloads or bursty usage patterns.Combine with container-level rightsizing
Spot consolidation reduces node costs; container rightsizing ensures you’re not over-requesting CPU/memory inside those nodes. You can use tools like nOps to optimize both dimensions.
Kubernetes Cost Optimization: Container Visibility & Right-Sizing Tips
The first step to reducing your Kubernetes costs is visibility. With nOps, it’s fast and easy to understand and allocate 100% of your unified EKS and AWS costs — from your largest resources all the way down to your individual container costs.
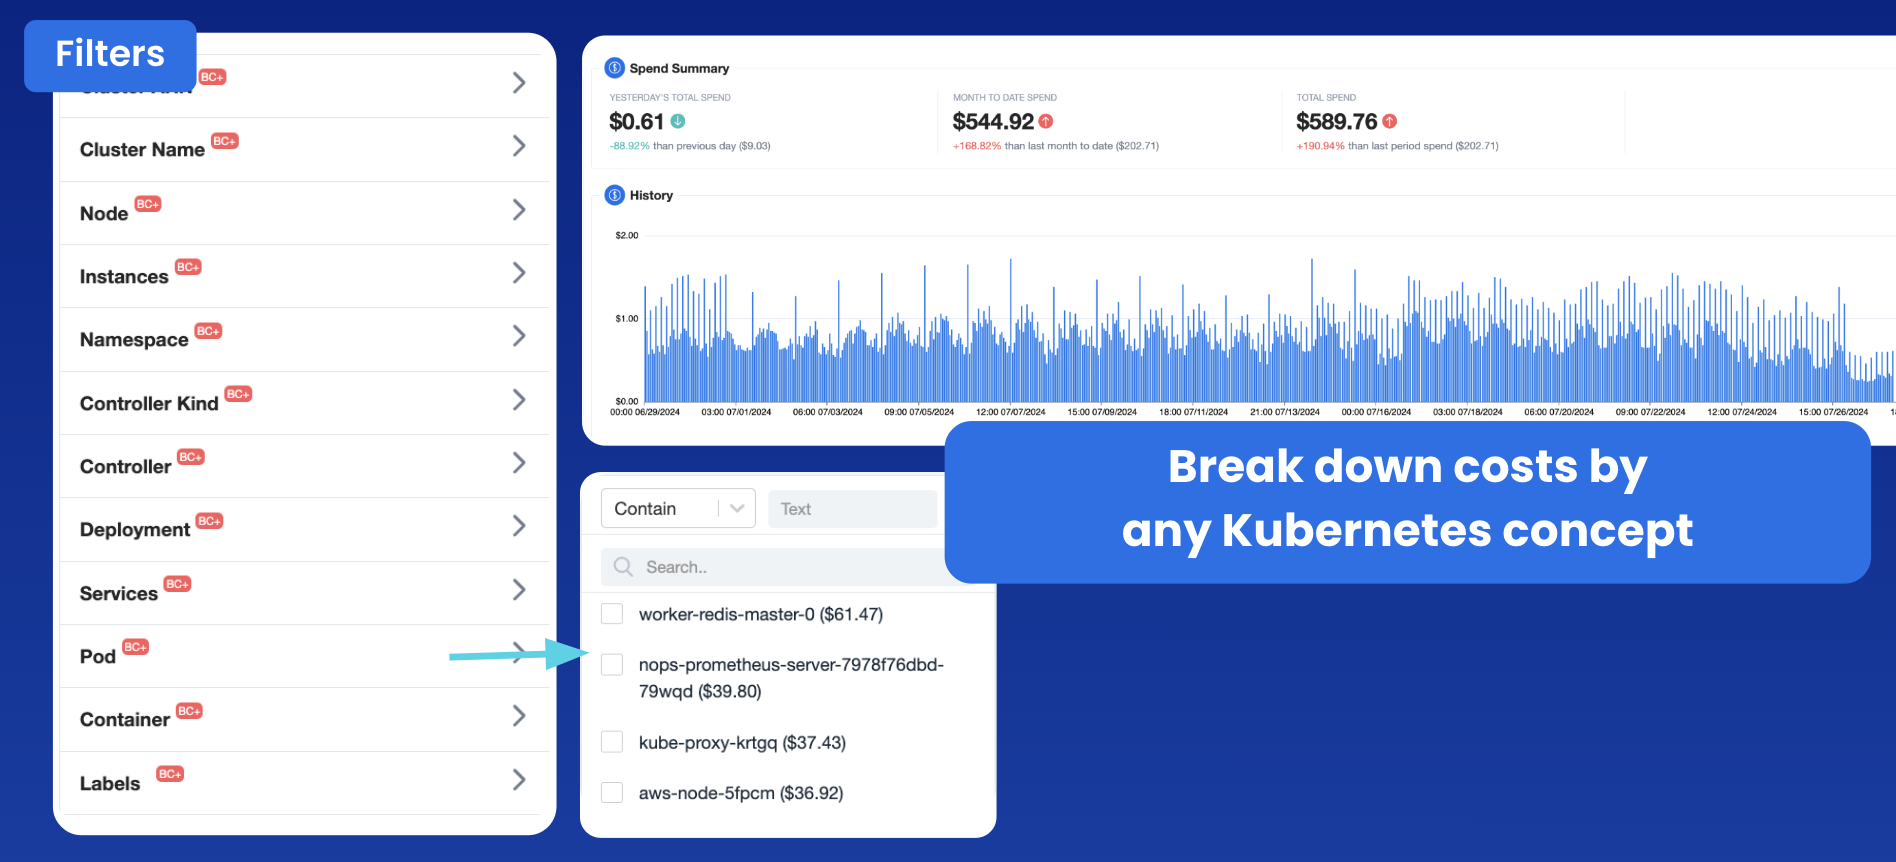
You can filter based on any Kubernetes concept down to the node or pod level, for complete visibility into the allocation of resources within your Kubernetes clusters.
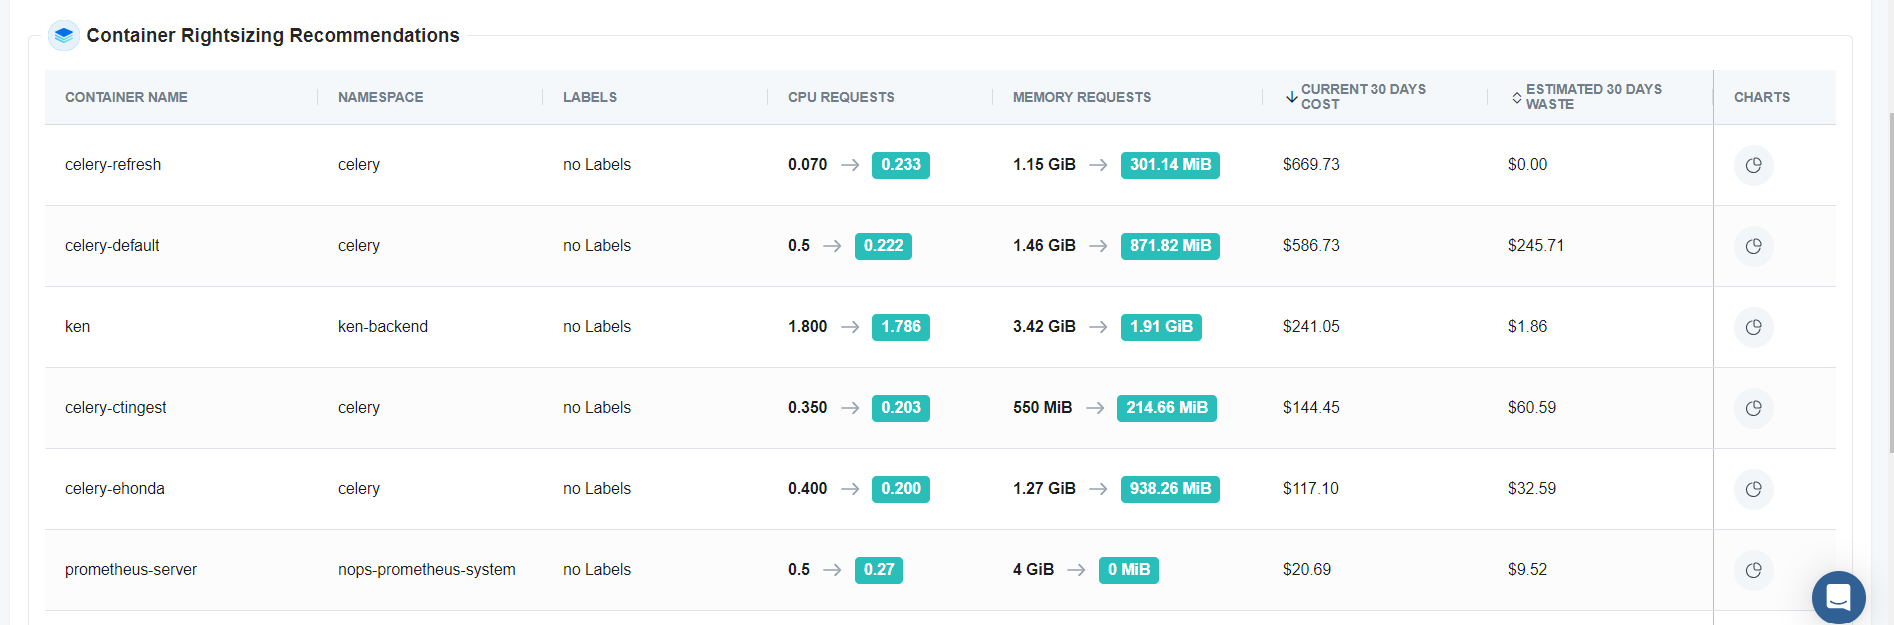
The Cluster Efficiency provides detailed insights and actionable recommendations on how to adjust your container deployments for optimal performance and cost.
nOps continually processes massive amounts of near real-time and historical data from multiple sources including your AWS Cost and Usage Report (CUR) for the most accurate, high-resolution view of your costs down to the penny.
You can review the granular historical data backing each recommendation right in the dashboard — so you can act with the utmost confidence in the reliability of recommendations.
You can one-click auto-container rightsize in the nOps dashboard to save even more engineering time and effort. Our mission is to make Kubernetes optimization easy, so that you’re freed up to focus on building and innovating.
nOps was recently ranked #1 in G2’s cloud cost management category, and we manage $2 billion in AWS spend for our customers. Book a demo to find out how to save in just 10 minutes.

Demo
AI-Powered Cost Management Platform
Discover how much you can save in just 10 minutes!
Frequently Asked Questions
Let’s dive into a few common questions regarding Karpenter & Spot instances.
How to do Spot consolidation?
Karpenter logs consolidation decisions and emits events when replacing nodes. You can observe Spot-to-Spot replacements in CloudTrail, EC2 termination notices, or by monitoring Karpenter’s controller logs. Nodes are cordoned and drained before termination. To trace specific decisions, enable debug logging and watch for the consolidationController and emptinessController activity.
Does Spot-to-Spot consolidation affect Kubernetes cluster management?
No. Karpenter handles the entire lifecycle—cordoning, draining, and replacing Spot nodes—without manual intervention. It respects pod disruption budgets and evicts gracefully, ensuring workload availability. Control plane components and autoscaler integrations remain unaffected. Engineers don’t need to modify existing cluster operations; consolidation runs in the background as part of normal provisioning.
How to use Spot-to-Spot consolidation functionality?
Enable Karpenter Spot-to-Spot consolidation by setting consolidation.enabled=true in the Karpenter configuration. Ensure your provisioners define flexible instanceRequirements or nodePools with multiple instance types and AZs. The broader the capacity options, the more consolidation opportunities. Karpenter will automatically identify and replace Spot nodes with cheaper alternatives that meet the same scheduling constraints.
Last Updated: February 9, 2026, Spot
Last Updated: February 9, 2026, Spot